background image

12 of 14 


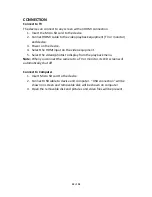
CONNECTION 

Connect to TV 
The device can connect to any screen with an HDMI connection. 

1.


Insert the Micro SD card to the device 

2.


Connect HDMI cable to the video playback equipment (TV or monitor) 
and device. 

3.


Power on the device. 

4.


Select the HDMI input on the video equipment. 

5.


Select the videos/photos to display from the playback menu. 

Note: When you connect the camera to a TV or monitor, its LCD screen will 
automatically shut off. 
 
Connect to Computer 

1.


Insert Micro SD card to the device 

2.


Connect USB cable to device and computer.  “USB connection” will be 
shown on screen and removable disk will be shown on computer 

3.


Open the removable disk and pictures and video files will be present. 


Содержание 500CAM

Страница 1: ...500CAM 500GCAM 1080P Full HD Micro SD GPS Logger Speed Camera Detector 500GCAM Only User Manual...

Страница 2: ...2 of 14 CONTENTS Quick Start Guide 3 Product Overview 3 Button Functions 4 LED Status Lights 5 Operation 6 Menu Settings 8 Connection 12 DVR Player 13 Product Specifications 13 Appendix 14...

Страница 3: ...USB port The camera will power on and start recording video automatically To stop video recording press the OK button To restart recording press the OK button PRODUCT OVERVIEW 1 HDMI Port 2 Lens 3 Spe...

Страница 4: ...mera Button In video mode pressing the camera button will capture a still image Reset Button Should the system crash for any reason press the reset button to reset the device Menu Button Pressing the...

Страница 5: ...hen playing a video in playback mode pressing this button will rewind the video OK Button In video mode pressing this button will start stop video recording In playback mode pressing this button will...

Страница 6: ...CAM only Insert the GPS module into the camera holder as shown below Install the device on the windscreen using the sticker or sucker When the power is on the device will automatically search and find...

Страница 7: ...h the camera and GPS module will be powered G Sensor Function In the event of a collision the Gravity Sensor G Sensor will record the direction and data associated with that collision The sensitivity...

Страница 8: ...D 1920x1080 720P 1280x720 WVGA 848X480 VGA 640X480 The higher the resolution the better quality the video but the recording time on your Micro SD card will be reduced Loop Recording Off 2 Minutes 3 Mi...

Страница 9: ...on detection will be G Sensor Set Off Low Medium High The higher the setting the more sensitive the G Sensor will be Record Audio Off On Turn on or off the built in microphone Date Stamp Off On Turn o...

Страница 10: ...conds Delay the point that the camera turns on once it receives power Power Off Delay Off 10 Seconds 20 Seconds 30 seconds Delay the point that the camera turns off once it stops receiving power Auto...

Страница 11: ...Polski Mandarin Cantonese Russian Japanese Select your desired language Format Cancel OK Selecting OK will format the memory card and all recordings will be lost Select cancel to avoid formatting Defa...

Страница 12: ...e HDMI input on the video equipment 5 Select the videos photos to display from the playback menu Note When you connect the camera to a TV or monitor its LCD screen will automatically shut off Connect...

Страница 13: ...in 1080P for 17mm lens 110o in 1080P for 14mm lens Audio Built in Microphone Still Image 2560x1440 2304x1296 1920x1080 1280x720 LCD 2 7 inch LCD Display GPS Logger 500GCAM only Modulization GPS Logger...

Страница 14: ...equipment to participating sites run by their local councils Please remember that this equipment will be further handled during the recycling process so please be considerate when depositing your equ...

Отзывы: