background image


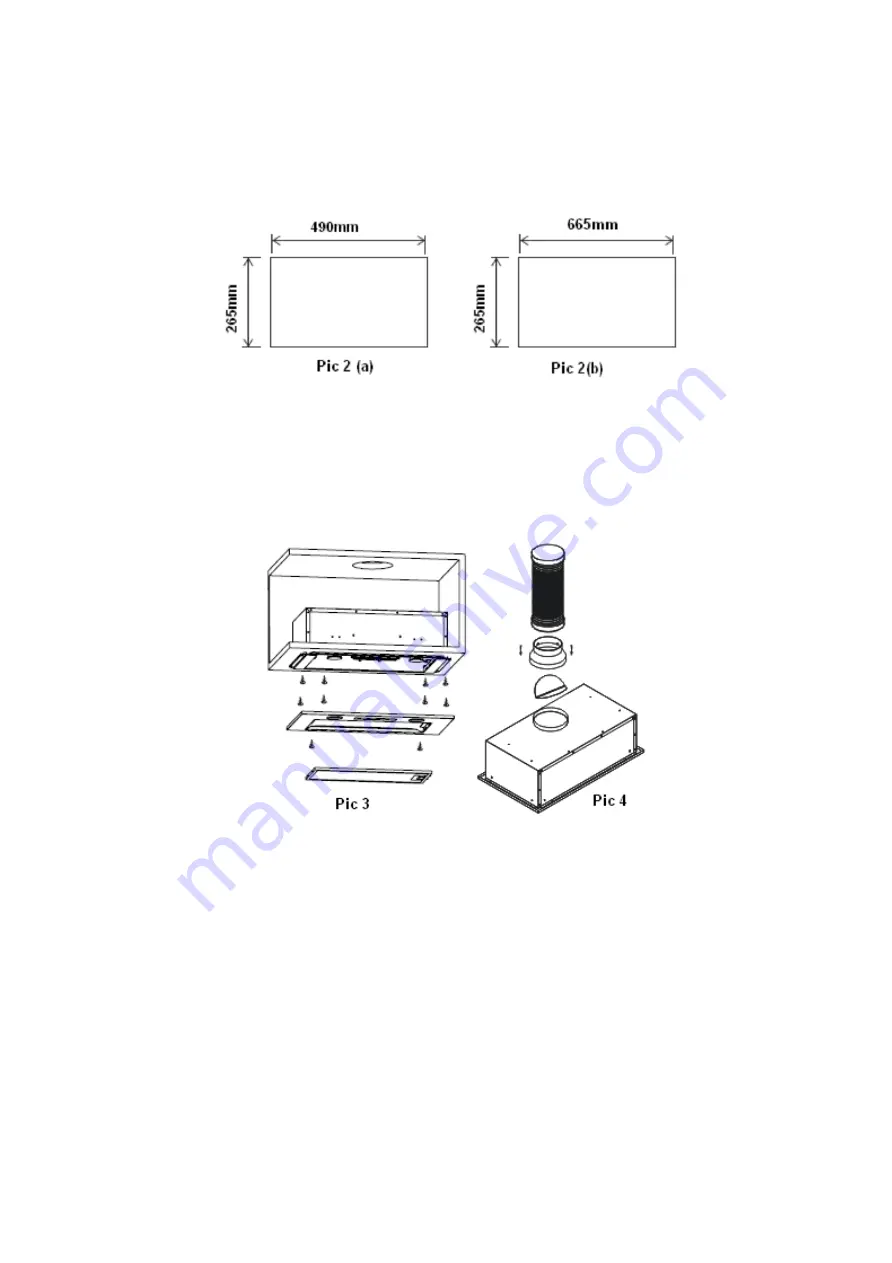
3.  Drill a hole in the cupboard, with hole wide 490*265(mm)for 52CM, hole wide 

665*265(mm) for 70CM.Refer to pic below. Make sure the distance between 

the edge of the hole and the edge of the cupboard edge is at least 35mm. 


4.  Remove the aluminium filter and remove the two front panel screws. 


5.  Use a screwdriver to secure the 8pcs ST4*18 screws and fix the hood body to the 

cupboard. 

6.  Replace the front panel with the two screws and replace the filter. 


7.  Install the v-flaps and converter to the outlet and fix the expansion pipe to the outlet 

with cable tie. 

Note: The expansion pipe is not included in the product. 


Содержание eiQ52CANOPY

Страница 1: ...osing your electriQ cooker hood This instruction manual is designed to provide you with all required instructions related to the installation use and maintenance of the appliance In order to operate t...

Страница 2: ...CONTENTS SAFETY 3 INSTALLATION 5 OPERATION 7 CLEANING AND MAINTENANCE 7 FILTER INFORMATION 8 LIGHT INFORMATION 9 TROUBSLEHSOOTING 10 SUPPORT 10 PRODUCT FICHE 11 2...

Страница 3: ...replaced as necessary The extraction fan must be level to avoid grease collection at one end as this could cause a potential fire risk Do not leave frying pans unattended during use because overheated...

Страница 4: ...A number of alternative solutions are available to ensure this If in any doubt professional advice should be sought Regulations concerning the discharge of air have to be fulfilled There is a potentia...

Страница 5: ...picture by means of an extraction duct enamel aluminium flexible pipe or non flammable material with an interior diameter of 150 120mm 1 Before installation turn the unit off and ensure it is not plu...

Страница 6: ...at least 35mm 4 Remove the aluminium filter and remove the two front panel screws 5 Use a screwdriver to secure the 8pcs ST4 18 screws and fix the hood body to the cupboard 6 Replace the front panel w...

Страница 7: ...od If it s not cleaned the grease residue potentially flammable will saturate on the filter Clean it with a soft nylon brush in a mild solution of warm water and a small amount of washing up liquid Wa...

Страница 8: ...ILTERS To install filters for the following four steps 1 Angle the filter into slots at the back of the hood 2 Push the button on handle of the filter 3 Release the handle once the filter fits into a...

Страница 9: ...with the globe as this can reduce the life of the globe Before changing the lights make sure that the appliance is plugged off Protect against danger when changing lights such as wearing gloves CHANGI...

Страница 10: ...great INFORMATION FOR DISMANTLING Do not dismantle the appliance in a way which is not shown in the user manual The appliance could not be dismantled by user At the end of life the appliance should no...

Страница 11: ...low Qmax 381 3 m3 h Measured airflow rate at the QBEP 227 7 m3 h best efficiency Measured air pressure at PBEP 201 Pa best efficiency point Measured electric power WBEP 84 2 W input at best efficiency...

Страница 12: ...x 364 7 m3 h Measured airflow rate at the QBEP 180 5 m3 h best efficiency Measured air pressure at best PBEP 190 Pa efficiency point Measured electric power input WBEP 85 2 W at best efficiency point...

Отзывы: