background image

ELCART

ELCART DISTRIBUTION SPA  via Michelangelo Buonarroti, 46 - 20093 Cologno Monzese (Milano) ITALY

Tel. +39 02.25117310 Fax +39 02.25117610 sito internet:  www.elcart.com    e-mail: [email protected]

Manuale di istruzioni/Scheda tecnica

La divulgazione dei dati contenuti in questa scheda è da ritenersi un servizio puramente informativo e non costituisce alcun vincolo da parte della Elcart in merito a prestazioni ed utilizzo del prodotto.

The divulgation of data contained on this technical sheet are exclusively for informational reasons and establish no link on behalf of Elcart regard to thr performances and the usa of the product.

La divulgacion de los datos contenidos en esta ficha son un servicio unicamente informativo y no constituyen ningun vinculo de parte de Elcart respecto a las prestaciones y uso del producto.

ART. 9/23600

PAGINA 8 DI 10

On the left bottom display the changeable free 

memory. Then press "RECORD" button Hold on 

to save the video. (video could be played in the 

Video pier of the Explorer)

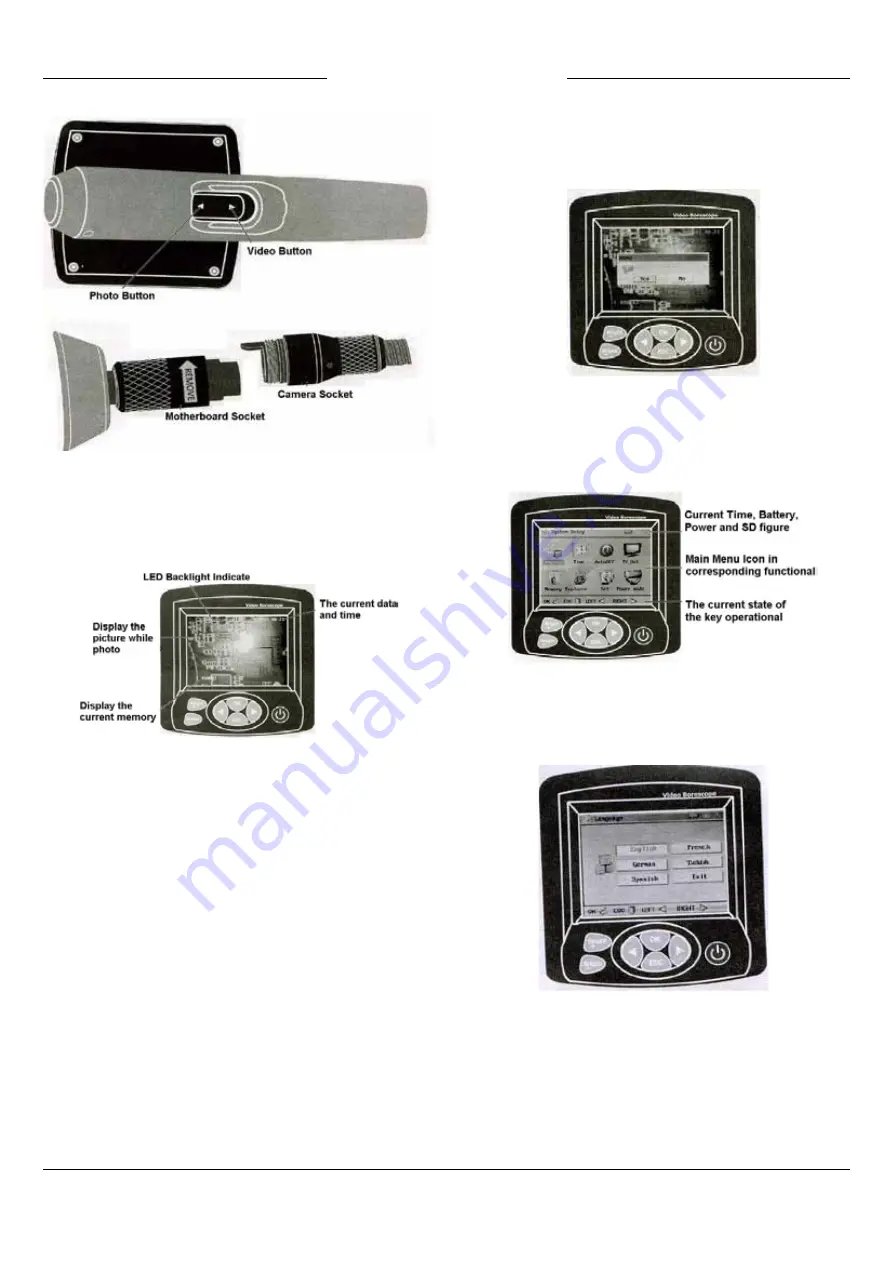
2.System Set

2-1 Under the Video Mode Press "OK'' button, then 

pop-up the following dialog box Right-left to move 

the cursor to YES then press "OK" button to enter 

into the system setting, as follows: 

2-2.Up


•Turn to the last photo function while scanning 

the pictures 

• Mode in the menu for a menu function upward.

2-3 Down 

• Browse pictures for a picture of the function 

down. 

•Mode in the menu for the next menu function.

2-4.Language 

•language setting as followings:


Through the song, a selection of different 

5. oPeRATIoN DeScRIPTIoN

1.operation under Video Mode

1-1 Power ON/OFF


Hold the power button for three seconds enter 

into the following mode: 


Hold on the power button for three seconds to 

close the instrument.

1-2.Adjust The Brightness of CMOS


In the camera mode press the button 

for each short to increase backlight level until the 

brightest; BRIGHT - per short by a dim level then 

brighten and dark cycle. (10 for the brightest, the 

most dark for 0, 0 when the LED goes out)

1-3.Rotate Images


Under video mode, press last/next song to 

achieve 180-degree rotating and change the 

angle.

1-4. Photo 

In camera mode, Press the "SNAP" button shortly 

to save the picture. (open the time/date, then the 

photo will display current time and date. photo 

Explorer can browse the photos)

1-5.Video


Under video mode, Hold the RECORD button for 

three seconds enter into the video, on the left up 

side of the screen will display a video symbol. 

Содержание NI-23600

Страница 1: ... 1 2 Manutenzione e pulizia Riparazioni di manutenzione devono essere eseguite da professionisti Si prega di pulire la macchina da presa dopo averla usata non usare detergenti per la pulizia di questo strumento 1 3 Simboli di sicurezza Conforme con le norme europee di sicurezza CE 9 23600 Sonda di ispezione visiva Nimex NI 23600 Manuale d istruzioni Contents 1 Safety Tips 2 Function Description 3 ...

Страница 2: ...0 3 Specifiche 4 Nome e funzione Dispositivi fotosensibili 1 4 CMOS pollici Sensore Pixel 640 480 Risoluzione massima 320 240 Il numero massimo di fotogrammi FPS 30FPS S Il colore medio bit 24 Metodo di messa a fuoco manuale Lunghezza dispositivo flessibile 1M Diametro fotocamera 17 millimetri Supporti leggibili MPEG4 3GP AVI ASF Formato foto supportato JPEG Videocamera formato 3gp Formato immagin...

Страница 3: ...io 10 per la più brillante 0 per il più buio 0 quando il LED si spegne 1 3 Rotazione Immagini In modalità video premere LAST NEXT per realizzare una rotazione di 180 gradi dell immagine 1 4 Foto In modalità fotocamera premere il tasto SNAP brevemente per salvare l immagine Aprire la data ora poi la foto mostrerà l ora e la data corrente È possibile sfogliare le foto con Photo Explorer 1 5 Video In...

Страница 4: ...a dall interfaccia principale oppure premere il tasto ESC per ritornare alla modalità video 2 6 Settaggio spegnimento automatico Consultare la seguente figura 2 7 Uscita TV Out Inserire nel foro delle cuffie il cavo Video TV OUT le altre spine laterali nel VIDEO TV il canale sinistro il canale destro giallo è il video il rosso il bianco e nero sono i canali sinistro e destro Selezionare TV OUT nel...

Страница 5: ... disponibili dopo aver premuto qualsiasi tasto 3 Modalità uscita In qualsiasi impostazione siate nel sistema di interfaccia premendo il tasto ESC tornerete al menù principale 6 AVVISO Mentre si piega il cavo flessibile l angolo non deve essere maggiore di 90 Rimuovere le batterie se l apparecchio rimane fermo per lungo periodo questo eviterà che perdite di liquido dalle batterie rovinino l apparec...

Страница 6: ...ed for wild adventure 1 2 Maintenance and cleaning Repair or maintenance should be carried out by professionals not only to carry out manual Please clean the camera after using it don t use detergents to clean this instrument 1 3 Safety Symbols Satisfied with European CE safety standards 9 23600 Sonda di ispezione visiva Nimex NI 23600 Manuale d istruzioni Contents 1 Safety Tips 2 Function Descrip...

Страница 7: ... prestaciones y uso del producto ART 9 23600 PAGINA 7 DI 10 3 SpecifiCATIONS 4 Name and Function Photosensitive Devices 1 4 inch CMOS Sensor Pixel 640 480 Maximum Resolution 320 240 The Maximum Number of Frames FPS 30FPS S The Median Color bit 24 Focusing Method Manual Gooseneck Length 1m Camera Diameter 17 mm Could Be Played Files MPEG4 3GP AVI ASF Photo Format Supported JPEG Camera Video Format ...

Страница 8: ...to move the cursor to YES then press OK button to enter into the system setting as follows 2 2 Up Turn to the last photo function while scanning the pictures Mode in the menu for a menu function upward 2 3 Down Browse pictures for a picture of the function down Mode in the menu for the next menu function 2 4 Language language setting as followings Through the song a selection of different 5 OPERAT...

Страница 9: ...p press SNAP and RECORD to adjust the date and time Press K button to save the system setting from the main interface or press ESC back up to video mode 2 6 Automatic Shut Down Setting See the following figure 2 7 TV OUT Output Inserted in the headphone hole TV OUT Video cable the other side plugs into the TV VIDEO the left channel right channel yellow is the VIDEO the red and black and white are ...

Страница 10: ... the main menu again it won t effect under the video mode browsing files mode This function shorten the time of charging power without displaying the screen 3 Exit Mode Any setting in the system interface press ESC button return back to the video interface any setting in the system interface 6 NOTICE While curving the gooseneck the angel should be less than 90 or it won t come back Taking out the ...

Отзывы: