Elation Trio-1248 Скачать руководство пользователя страница 19

Elation Professional® www.elationlighting.com - Trio-1248 - Page 18

  Trio-1248                                                         oPErATioN - rECord FuNCTioN

6. How to Set EXT Keys

EXT Keys act as direct bump buttons for channels 49 through 52. They can be linked to a conven-
tional fixture, or a fog machine. The user has the option to have the EXT Keys to act as bumps or 
on/off switches.
EXT Keys cannot be built into a Submaster or a Chase.
When the Channel Setup screen is entered, the user will notice that there are 52 channels set for the 
dimmers when there are only 48 Faders on the console to control them. The additional 4 dimmers 
are linked to the EXT Keys. The user has the option to have the EXT Keys to act either as a Bump or 
on/off switch.

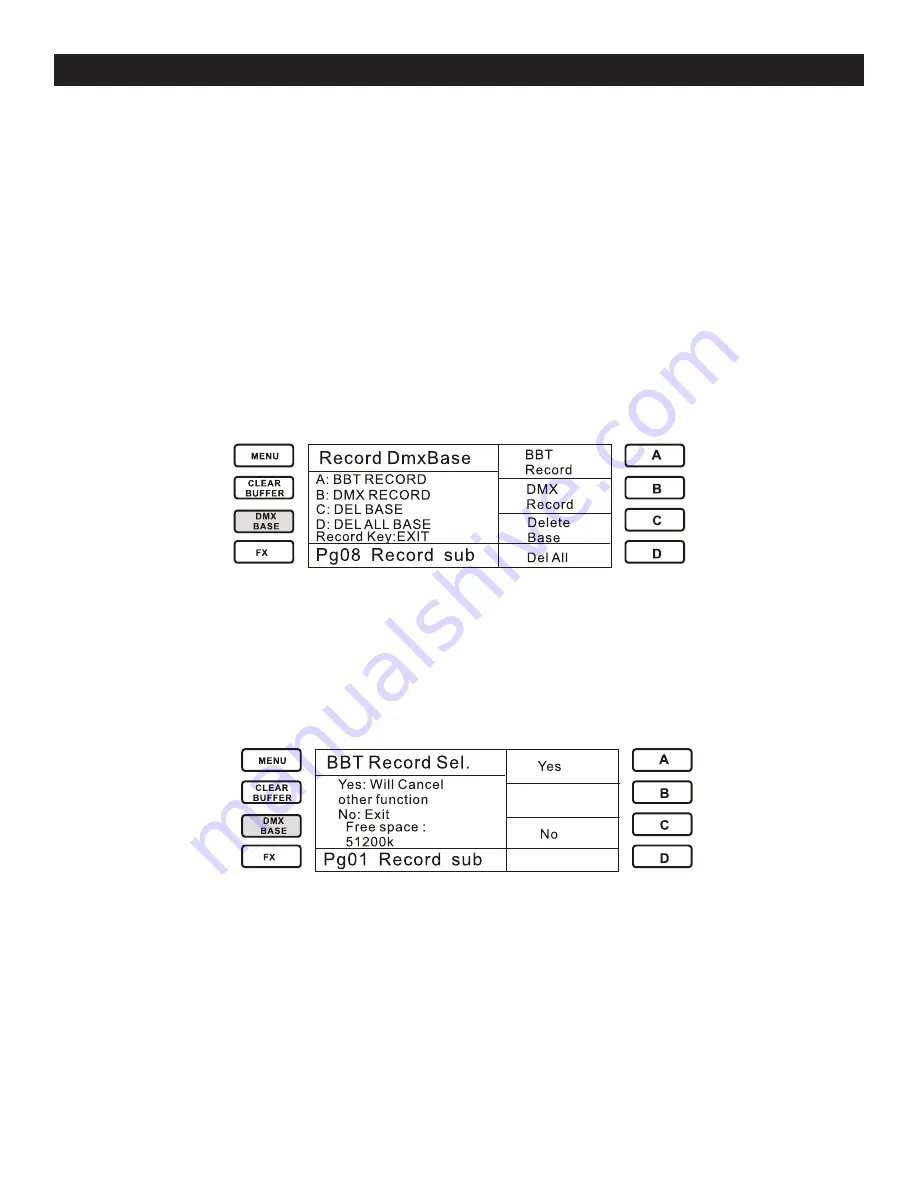
7. recording dmX Base

The Trio-1248 also allows you to record DMX data form an external DMX device to DMX Base- this 
action is referred to as DMX Base Record.
In “Record Submaster” Mode, press DMX Base” and press any Fx1-Fx12 key. This will switch the 
console into “Record DMXBase” mode. 


BBT record:

BBT stands for “Blackout Blackout Technology”. This was created so chase/show sequences would 
loop seamlessly. The idea is to write a blackout step at the beginning of a chase or show and a 
blackout step at the end of the chase or show so the controller will automatically recognize the 
blackout steps and will loop the chase or show seamlessly on playback.
The user only needs to use the BBT Record function if using an external console to record a Chase 
into the Trio-1248. The user must make sure to insert a blackout at the beginning and the end of the 
Chase.


Press the A key to confirm


Press the C key to Exit

dmX record:

To choose DMX Record, Press the A key to confirm, then Select “Start”. The console will then begin 
recording all the DMX information.

delete Base:


Used to delete a single DMX Base file.

del All:

Used to delete all DMX Bases data.

Содержание Trio-1248

Страница 1: ...Rev 4 10 Trio 1248 ...

Страница 2: ...ingle Scene Mode 11 4 1 1 Crossfade in Single Scenes 11 4 1 2 Fade A and B Settings 12 4 2 Two Scene Mode 12 4 3 Submaster Mode 13 4 3 1 Fade A and B Settings 14 4 3 2 Crossfade in Submaster 14 4 3 3 Record Function 15 Record Submaster 15 Record Fx1 through F12 16 How to edit a scene 17 How to Trigger Fx 17 How to delete Fx 17 How to set EXT Keys 18 Record DMX Base 18 4 4 ML Moving Light 20 4 4 1 ...

Страница 3: ... 4 7 4 Memory Lock 37 4 7 5 Update Software 37 4 7 6 Update VGA 37 4 7 7 Update DMX BS 38 4 7 8 VGA Set 41 4 7 9 Art Net Set 42 4 7 10 Upload LIB 42 4 7 11 LIB Set 43 4 7 12 Change Password 44 4 7 13 Rev1 02 45 4 8 VGA Card Installation Tips 45 5 DMX Setup 46 5 1 Data Cable DMX Cable Requirements 46 5 2 5 pin XLR DMX Connectors 47 6 Service 48 6 1 Maintenance 48 6 1 1 General Inspection 48 6 1 2 B...

Страница 4: ...the outside of the return package Items returned without a RA number clearly marked on the outside of the package will be refused and returned at customer s expense You may obtain a RA number by contacting customer service A brief description of the problem as well as RA number must be written down on a piece of paper and include in the shipping container If the unit is under warranty you must als...

Страница 5: ...oisture Do not remove the plug ground pin or connect to an ungrounded circuit This unit is not designed for use by persons under the age of 12 Use only under adult supervision Turn off the power if not using this unit for a long time 2 2 Compliance The CE marking an acronym for the French Conformite Europeenne certifies that a product has met EU health safety and environmental requirements which e...

Страница 6: ...y inspect each system com ponent for damage in the case that damage is found please contact our customer support cen ter listed below for further instructions The Elation Professional Trio 1248 system carton should includes the following 1 Trio 1248 Lighting Console 1 External AC Adaptor 1 User Manual 3 3 Caution There are no user serviceable parts inside this unit Do not attempt any repairs yours...

Страница 7: ...10 1 152 recordable scenes 24 Pages x 48 scenes in Submaster mode for conventional lights 11 24 faders control conventional moving lights and LED fixture channels 12 Controls 12 Moving Light fixtures with up to 40 channels each 20 playbacks x 99 steps in Moving Light Mode 13 Controls 12 LED RGB Fixtures 20 playbacks x 99 steps in LED mode 14 12 FX Keys act as multi function keys which allow the us...

Страница 8: ...lor ML GRAND MASTER PRESET A B FLASH LEVEL Red Green Blue Attr F IXTURE PlayBack 1 12 25 36 13 24 37 48 Preset A Preset B Manual 10M 5M 1M 40s 20s 5 0s 2 0s 0 5s 0 2s 1 2 3 4 5 6 7 8 9 10 11 12 1 24 25 48 13 14 15 16 17 18 19 20 21 22 23 24 B LACK O UT A B C D MENU CLEAR BUFFER FX DMX BASE FX1 FX2 FX3 FX7 FX8 FX9 FX4 FX10 FX11 FX5 FX12 FX6 SINGLE SCENE TWO SCENE RECORD NEXT SUB MASTER ML MEM P LAY...

Страница 9: ...ds when in the Menu 14 Clear Buffer Clears the programmer 15 DMX Base Works in conjunction with FX keys 1 12 When the DMX Base key is pressed Programs 1 12 can be played back by pressing FX keys 1 12 The DMX Base programs can only consist of recorded data uploaded from an external DMX console All 12 chases can run simultane ously 16 FD ST Time key This is a multi function key FD represents Fade Ti...

Страница 10: ...rsal USB drive so that data can be uploaded and downloaded to and from the TRIO 4 VGA Optional Slot Connects monitor 800x600 max pixel resolution via VGA connection 5 DMX IN Connects and receives DMX signal from any universal DMX console Receives Data Only 6 DMX OUT Port A Outputs DMX signal for DMX Base Playback only Recorded programs from an external con trol source Port B Outputs DMX signal for...

Страница 11: ...truction to describe this action without knowing the control s previous state For example if the control is not selected clicking the control once selects it If it is already selected no action is required Highlight describes the outlining of selected text or files with a colored border to make it stand out For example this text is highlighted Text may be highlighted by clicking and dragging the c...

Страница 12: ...tion 4 1 2 Fade A and Fade B Settings to preset Cross fade times 4 Repeat steps 1 4 to continue using the Crossfade Next function To exit the Next function Activate A and B Preset Faders to their top position and deactivate the Next key Note 1 In Single Scene yellow backlite key Two Scene yellow backlite key and Submaster modes red backlite key one or more channel bump scenes can be set active bas...

Страница 13: ...rio 1248 Operation single scene mode Trio 1248 Operation two scene mode 4 2 Two Scene Mode 1 When Two Scene Mode is entered by pressing the Two Scene key the LCD Screen will show this display The Channel Faders on the page represent Scene A and Scene B Faders 1 12 control Scene A Faders 13 24 control Scene B When Preset A and B Faders are in the Top position the LCD will perform Scene A and Fade o...

Страница 14: ...ene or Two Scene Mode the Submaster is created by the faders being adjusted in either of theses modes then switching into Submaster Mode to then record and play the Submaster Refer to the Record Function Section for details 2 Submaster Pages To change Submaster pages hold down the SubMaster key The LCD will show you the current page Use the Bump Buttons to select the desired page Any recorded Subm...

Страница 15: ...y setting Preset A and B Faders in the bottom position Move the Preset A and B to the top position the first recorded bump indicator will blink yel low Move the Preset A and B faders toward the bottom position to fade in the first Scene the first recorded fade stop blinking as the scene fades in Additional Information for Crossfading 1 To stop a crossfade move only the Preset A Fader down and then...

Страница 16: ...r to a Bump push the Bump key that is desired to contain the Submaster Repeat actions for additional Submaster recordings After the Submaster is recorded the indicator will illuminate red and the Record key will black out Also while in Submaster Record mode the user may select the functions Del Sub Del Page or Del All Press the Bump of the Submaster you want to Delete Press the A key to choose Del...

Страница 17: ...sh the Fx1 Fx12 that you want to Record Example Fx1 2 3 The Fx1 key will illuminate blue The LCD screen will then display the information for Fx1 Sxxx represents the current Step Txxx represents the total number of Steps 2 4 Press the Step key to record the scene and run Sxxx and Txxx After the Scene is completed for FX1 press the Step key and the Scene can be recorded to the current Step 2 5 If y...

Страница 18: ...utton of the Fx you are working on to record the value Repeat these actions for all Fx 4 How to Trigger FX After the recording is complete the Fx channels that have recorded sequences will illuminate red Press the Fx Key of the desired Fx the indicator will illuminate and blink yellow Press the Go Stop key to begin the Fx The Fx key will then blink red and run in sequence Runstep To stop the Fx fr...

Страница 19: ...ion is referred to as DMX Base Record In Record Submaster Mode press DMX Base and press any Fx1 Fx12 key This will switch the console into Record DMXBase mode BBT Record BBT stands for Blackout Blackout Technology This was created so chase show sequences would loop seamlessly The idea is to write a blackout step at the beginning of a chase or show and a blackout step at the end of the chase or sho...

Страница 20: ...e The fader will control the intensity of the fixture and the button is used while programming to select the fixture You must also specify what type of fixture is allocated to each handle Once you have entered this information the console can tell you the DMX address to set on your fixtures to match the settings it is using This setup process is called Patching You can Patch up to 12 fixtures on t...

Страница 21: ...st Bump button in the range The range of fixture will be patched to the same DMX address Repeat the above steps to patch any additional Handles 1 2 Editing and Recording various Scenes for a patched Moving Light The Trio 1248 allows you to edit and record various scenes for a patched moving light You may set the Pan Tilt Speed Color and Attribute for it 1 2 1 In ML Mode Press the Record button 1 2...

Страница 22: ...lue as a Step by pressing Menu button Otherwise it is void when you try to press Playback bump to set a chase step 2 Using Groups If you have several units of one fixture type you often want to select them all at the same time To avoid excessive Bump button use the Trio 1248 allows you to put fixtures into groups which you can use to select all fixtures by typing the group Bump 2 1 Making A Group ...

Страница 23: ... Delete Choose Yes to confirm the delete choose No to exit Choose Delete All to delete all of the recorded Chases Choose Yes to confirm choose No to exit 2 3 2 Delete Chase In ML Mode press Menu choose Next and then Delete To choose Delete Chase the Trio 1248 gives the user the option of deleting a single Chase or all Chases Choose Delete One to delete a single Chase The LCD will show Press Playba...

Страница 24: ...d to Press the related softkey to assign attributes to the Attribute Fader Adjust the Attribute Fader to control the Attribute value 3 3 Using the Clear Buffer key in ML Mode While the user sets channel values of a Moving Light the console provides a space for its channel information This is called the Scene Buffer If the user wants to clear up the channel informa tion the ClearBuffer key should b...

Страница 25: ...oint of the circle the size of the circle and the speed of the movement 5 1 Selecting a Shape In ML Mode when you choose a Shape it will be applied to all selected fixtures Select the fixture that you want to apply a shape to Select Shape The LCD will display Select Stop this will stop all running movements Select Circle the LCD will display Center Pan the center value of Pan when the moving light...

Страница 26: ...tep Select Record Blank Playbacks will blink red A programmed Playback will be off Press the bump button of the playback where you want to store the chase Set your scene for the Step Set Fade time and Step time for the step by using the FD ST key and Step Rate Fader Press the Bump button of the playback to store the programmer contents as step 1 of the chase Press the ClearBuffer unless you want t...

Страница 27: ... yellow Pressing Step will cause the Chase to run Step by Step Pressing the corresponding Bump an additional time will erase the manual control 7 Pan Tilt Invert In Fixture Menu the Pan Tilt of a moving light may be changed between Normal and Invert Prior to setting the Pan Tilt Invert it is required to select an allocated Moving Light Press the Bump button that you have allocated with a Moving Li...

Страница 28: ...manufacturer from the USB device Use More or Back to select the LED you desire Press D to choose Enter for confirmation of the selection The LCD will show you the name and auto patched DMX address for the fixture If you want to mod ify the assignment of the DMX address you can use FX1 FX10 to change the address The FX10 means 0 and the FX1 FX9 means 1 9 orderly To patch a single fixture press a de...

Страница 29: ...t into a group Press the Menu button then Press C to choose Edit Group Bump buttons 1 12 will indicate the recording state for the Group Blue blinking keys indi cate the group is blank a non blinking key indicates that the bump contains a group The LCD prompts you with Record Group Select a Bump as a Group Press any one of the bumps 1 12 to store your group Selecting a group of Fixtures Once you h...

Страница 30: ...orded chases Choose Yes to confirm the deletion Choose No to exit 4 5 5 List Fix The List Fix function will help the user to easily view the collocated fixtures and the corresponding DMX address In LED Menu Mode choose next and then choose List Fix The LCD will show you the name of the collocated Fixtures and their DMX addresses 4 5 6 Auto DMX When using this function the console will auto sort th...

Страница 31: ...ed between Left and Right Press B to select the Direct as Left or Right Press D to select Run or Stop In this mode your console allows you to preset the value for the color you have selected Press C to choose Color Set the LCD will display There are a total of 57 color types available for selection in each Color Library If you do not like the present color type you can press the C key to choose ad...

Страница 32: ...you to Confirm Playback Mode Press A to choose Yes the unit goes into Playback Mode The console will release all DMX output Press C to choose No the unit will continue to function in its current state When in Mem PlayBack Mode you may exit by pressing any of the other work modes that you wish to go into The LCD will prompt Exit Playback and Into as indicated below Press A to choose Yes the unit wi...

Страница 33: ... Assign Fade 2 Hold down the button of the recorded Submaster you want to configure then adjust the StepRate Fader to modify the FadeTime for it In this mode the Page Up and Page Down are used to set the Submaster Page Trio 1248 Operation memory playback mode Mem PlayBack Assign Fade MENU CLEAR BUFFER FX DMX BASE A B C D Master xxx Page UP Page Down SubMaster Page 003 ...

Страница 34: ...t of options Menu Channl Set Up Dmx Patch Next P 01 Select 1 24 Menu Update SW Update VGA Next P 01 Select 1 24 MENU CLEAR BUFFER FX DMX BASE A B C D MENU CLEAR BUFFER FX DMX BASE A B C D LcdSet Update DMX BS Menu VGA Set Next P 01 Select 1 24 MENU CLEAR BUFFER FX DMX BASE A B C D ArtNet Set UpLoad LIB Menu REV 1 02 P 01 Select 1 24 MENU CLEAR BUFFER FX DMX BASE A B C D LIB Set Next Change Paswrd ...

Страница 35: ...nnels to whichever fixtures they desire The user must simply set all other values to 0 Example If the user wants to use all 512 channels for Moving Lights both the Dimmer and LED Start and End channel values must be set to 0 4 7 2 DMX Patch Used to softpatch Channel to DMX or DMX to channel Default patch is 01 to 01 02 to 02 etc 1 Channel Patch Channel to DMX patch option Up to 9 channels can be p...

Страница 36: ...rm and save set up Press Menu to cancel or exit 3 Default Used to restore the factory patch settings Press A to confirm Yes Press C for No and exit 4 7 3 LCD Set Used to set the contrast and backlite brightness of the LCD The contrast can be adjusted from 0 FL and blacklite brightness can be changed between High Middle or Low Press A to increase the value Press B to decrease the value Press C to m...

Страница 37: ... console password Default 168168 and press Enter The console will immediately lock its memory leaving the work modes still available for use 4 7 5 Update Software Used to update console firmware The download file is saved in the path of Trio1248 Software Bin NOTICE The path and name of the file cannot be changed 1 Insert the USB drive that contains the firmware update file 2 In Single scene mode a...

Страница 38: ...ms The DMXBase files should be stored in the path of Trio1248 DMXBase 1 Insert the USB drive that contains the firmware update file 2 In Single scene mode access Menu Next D key then press C key Update Dmx_Bs 3 Input password 168168 press keys FX1 FX6 FX8 or user password if it was changed 4 Press D key to Enter 5 Once update is complete LCD will return to the home screen Your console will read th...

Страница 39: ... RGB LED s so they can be transferred and played in your Trio The software is designed for use on Microsoft Windows computer operating systems Please visit www elationlight ing com to download a copy When the TRIOFlash Software is launched the Main Screen is displayed Preview Files may also be opened using the Open Flash button The Play Pause and Stop buttons allow manual control of the playback T...

Страница 40: ...io 1248 Page 39 Trio 1248 menu File Convert Flash files may be converted to DMX scene files scn and loaded to the Trio With the desired file loaded in Preview Screen select File Convert Enter Flash file playback speed in frames per sec ond Select OK ...

Страница 41: ...opy the converted file to the path TRIO1248 DMXBASE in your USB drive You can now Update DMX Base with the converted file 4 7 8 VGA If you ve purchased the optional VGA card for your Trio you will have to Enable it for it to start func tioning The VGA option gives you the ability to view in realtime status information of playbacks effects submaster contents and preset data See main display below ...

Страница 42: ...s Please refer to the Update VGA 4 7 9 ArtNet Set The ArtNet Set option allows you configure the Trio for use with compatible Artnet devices 1 OpPoll Used to discover ArtNet devices connected to the Trios Artnet port 2 View Device Used to view ArtNet devices already discovered by the Trio 3 ArtNet Config Used to Enable Disable Artnet configure ArtNet Sub Switch and Universe for your Trio Choose Ar...

Страница 43: ...load any of the data press the related softkey to choose it the LCD screen will guide you through the process For example press A to choose System Upload the LCD shows you 1 Press A to select Yes and upload 2 Press B to select No and exit 4 7 11 LIB Set The Download LIB option allows you to download the entire system library or a single fixture from the Trio s library 1 Make sure you have inserted...

Страница 44: ...fer to totally clear up the configurations in the console prior to downloading from the USB device you may select Empty System to clear it up The console will take several minutes to complete the download 4 7 12 Change Password The Change Password option allows the user to change the password for the console Select Change Password the console LCD will prompt you to input Old Password the default p...

Страница 45: ...e all data 2 Disconnect the power from the rear of your console 3 Remove the fasteners on the rear panel of the console 4 Carefully insert the new VGA card and insure that is is installed correctly 5 Re install the fasteners 6 Connect your monitor and reconnect the power supply to the console 7 Turn on your system and select set up 8 Once you have enabled your monitor it will show the current stat...

Страница 46: ...ents For DMX and Master Slave Operation our unit and your DMX controller require a approved DMX 512 110 Ohm Data cable for data input and data output Figure 1 We recommend Accu Cable DMX cables If you are making your own cables be sure to use standard 110 120 Ohm shielded cable This cable may be purchased at almost all professional sound and lighting stores Your cables should be made with a male a...

Страница 47: ...ed these adaptors are readily available at most electric stores The chart below details a proper cable conversion Conductor 5 Pin XLR Male In 3 Pin XLR Female Out Pin 1 Pin 5 Do Not Use Pin 4 Do Not Use Pin 3 Pin 2 Pin 1 Pin 3 Pin 2 Not Used Not Used Data True signal Data Compliment signal Ground Shield 3 Pin XLR to 5 Pin XLR Conversion 1 2 3 T ermination reducessignal errors and avoids signal tra...

Страница 48: ...ry cloth to prevent dust accumulation If necessary slightly moisten the cloth with a mild soap and water solution Never use an abrasive cleaning solution on the exterior surfaces of the system components 6 2 Troubleshooting The Trio 1248 Lighting Console should perform well when properly operated and maintained how ever sometimes things just don t work like they should Table 5 contains symptoms ca...

Страница 49: ... manufactures warranty In the unlikely event your unit may require service please contact Elation The Trio 1248 carries a two year limited warranty Please fill out the enclosed warranty card to vali date your purprogram All returned service items whether under warranty or not must be freight pre paid and accompany a return authorization R A number The R A number must be clearly written on the outs...

Страница 50: ...n manual D This is not a service contract and this warranty does not include maintenance cleaning or periodic check up During the period specified above Elation will replace defective parts at its expense and will absorb all expenses for warranty service and repair labor by reason of defects in material or workmanship The sole responsibility of Elation under this warranty shall be limited to the r...

Страница 51: ...SB DC IN DIMENSIONS 264mm L x 482mm W x 70mm H 10 4 L x 19 W x 2 75 H WEIGHT 9Lbs 4 5Kgs WARRANTY 2 Year 730 Days Please Note Specifications and improvements in the design of this unit and this manual are subject to change without any prior written notice Elation Professional www elationlighting com Trio 1248 Page 50 ...

Страница 52: ... Elation Professional 6122 S Eastern Ave Los Angeles CA 90040 USA Tel 323 582 2650 Fax 323 582 2610 Web www elationlighting com E mail info elationlighting com ...

Отзывы: