background image

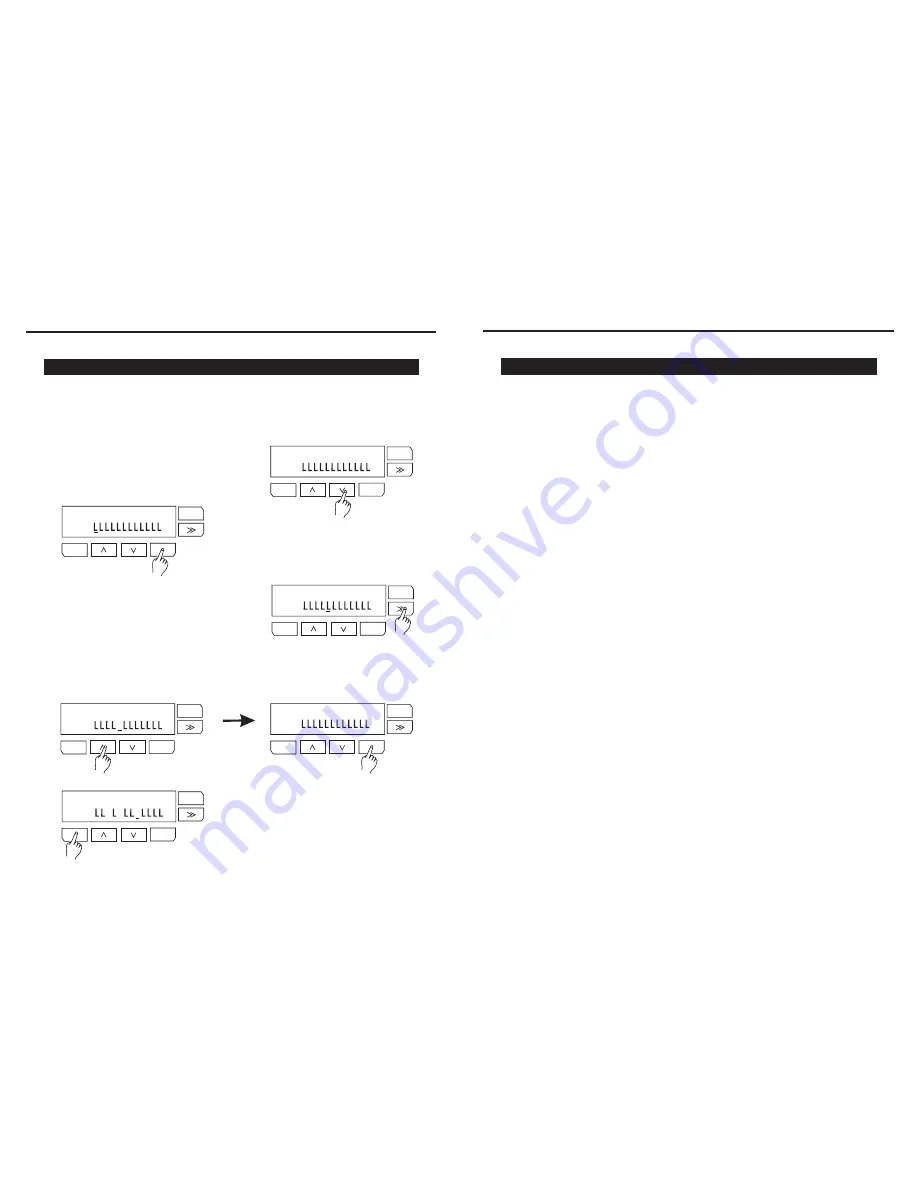
2. Tap ENTER button to enter CURVES

menu. The cursor is blinking on bar 1.

4. Tap UP/DOWN button to select

, and tap ENTER button

to save your setup. The LCD page will back to step 1.

Linear, Square or NO-DIM

3. You can tap >> button to move cursor from

bar 1 to bar 12.

Operation Guide

1. Tap UP/DOWN button to scroll to CURVES

menu.

This menu is used to select a dimmer curve for any or all the dimmer in system. There
are 3 dimmer curves available to choice from L-Linear, S-Square and N-NO-DIM.

5. Repeat the step 2~4,you can complete

your setup for Dimmer Curve.

-16-

ENTER

MENU

ESC

ENTER

MENU

ESC

ENTER

MENU

ESC

ENTER

MENU

ESC

ENTER

MENU

ESC

CURVES

6) CURVES

CH:

CURVES(Linear)

CH:

CURVES(Square)

CH:

CURVES

CH:

ENTER

MENU

ESC

CURVES(Linear)

CH:

S

CURVES(NO-DIM)

CH:

S

N

N

Tap ESC button to jump to previous page and
the current page will not be recorded.

Overview

1. 2x16 LCD Display

Shows the current activities or adjustments of menus.

Front View

2. DMX LED Indicator

This LED blinks when DMX signal is present.

7. UP( )/DOWN( ) Button

Tap UP/DOWN button to scroll through or adjust desired levels, menu
options during operation.

8. ESC Button

Tap this button to go back the previous menu level or escape without record.

10. ArtNET Port

-5-

11. Channel Dimmer Module(x12)

The channel dimmer module is incorporated with a 20A UL approval MCB
(Circuit Breaker) and SCRs (Silicon Controlled Rectifier) .

With RJ 45 standard network port, use to connect your PC.

4. ArtNET LED Indicator

This LED will blink when an available Ethernet network is connected.

5. MENU Button

This button is used to access set-up menus.

3. POWER LED Indicator

This LED will light when power source is connected.

6. >> Button

This button is used to scroll the sub-menus or move the cursor to right.

9. ENTER Button

All functions must press ENTER button to activate.

>

>

Содержание RMD-1220

Страница 1: ...24 004 2355 00 Rev1 0 User Instructions RMD 1220 It is important to read this instruction book prior to installing or using your new product for the first time Rack Mount Dimmer 12Channel...

Страница 2: ...menu 3 Tap button to select Temperature and use ENTER button to enter in Two temperature are displayed one for the left heat sink dimmer1 6 and the other for the right heat sink dimmer 7 12 Tap ESC o...

Страница 3: ...ever open this product under any circumstances Any repairs or internal adjustments should be made only by a trained technician Never operate this product with the cover removed Do not use your unit im...

Страница 4: ...eral Instructions Physical Dimensions Features Operation Guide 7 SETUP 15 Tap UP DOWN button to scroll GoScene from 01 99 ENTER MENU ESC ENTER MENU ESC ENTER MENU ESC ENTER MENU ESC ENTER MENU ESC 12...

Страница 5: ...Power Requirements Voltage 120V AC Frequency 60Hz All RMD 1220 Rack Mount Dimmers must be grounded for safety use Dimming Capacity Each pack contains twelve dimmers each with a Maximum load of 20A 4...

Страница 6: ...MX and A ArtNET Tap ENTER button to save or tap ESC to exit without record The page will back to step 1 17 ENTER MENU ESC ENTER MENU ESC ENTER MENU ESC ENTER MENU ESC ENTER MENU ESC ENTER MENU ESC Thi...

Страница 7: ...nd the current page will not be recorded Overview 1 2x16 LCD Display Shows the current activities or adjustments of menus Front View 2 DMX LED Indicator This LED blinks when DMX signal is present 7 UP...

Страница 8: ...DOWN button to scroll the scene display mode Once or Loop Fade time Fad1s from 1s 10s and the last scene E01 E99 8 Tap ESC button to back to step 1 and use UP DOWN button select sub menu Scene 15 ENT...

Страница 9: ...utton to select the sub menu you want to enter in 3 Tap ENTER button to enter Chase 4 Tap UP DOWN to scroll Scene number 5 Tap button to move cursor 14 ENTER MENU ESC ENTER MENU ESC ENTER MENU ESC ENT...

Страница 10: ...e Live Display 1 Home Live Display 2 LOCAL CONTROL 5 PLAY SCENE 6 CURVES 7 SETUP 8 INFORMATION There are 8 menus for RMD 1220 3 ADDRESS 4 SCENE REC 6 Tap ESC BACK Step 1 and use button to select Assig...

Страница 11: ...ge Scene number will increase 1 after signal record For example the Scene06 increased to Scene07 once Scene06 was recorded the input singal ENTER MENU ESC SCENE Copy Scene07 ENTER 1 Use MENU button to...

Страница 12: ...age will back to the previous step use button to select Patch mode This menu is used to set either the DMX512 start address or ArtNET address SubNET and Universe are available ENTER MENU ESC ADDRESS D...

Отзывы: