Elation EVLED256 Video Wall Скачать руководство пользователя страница 9

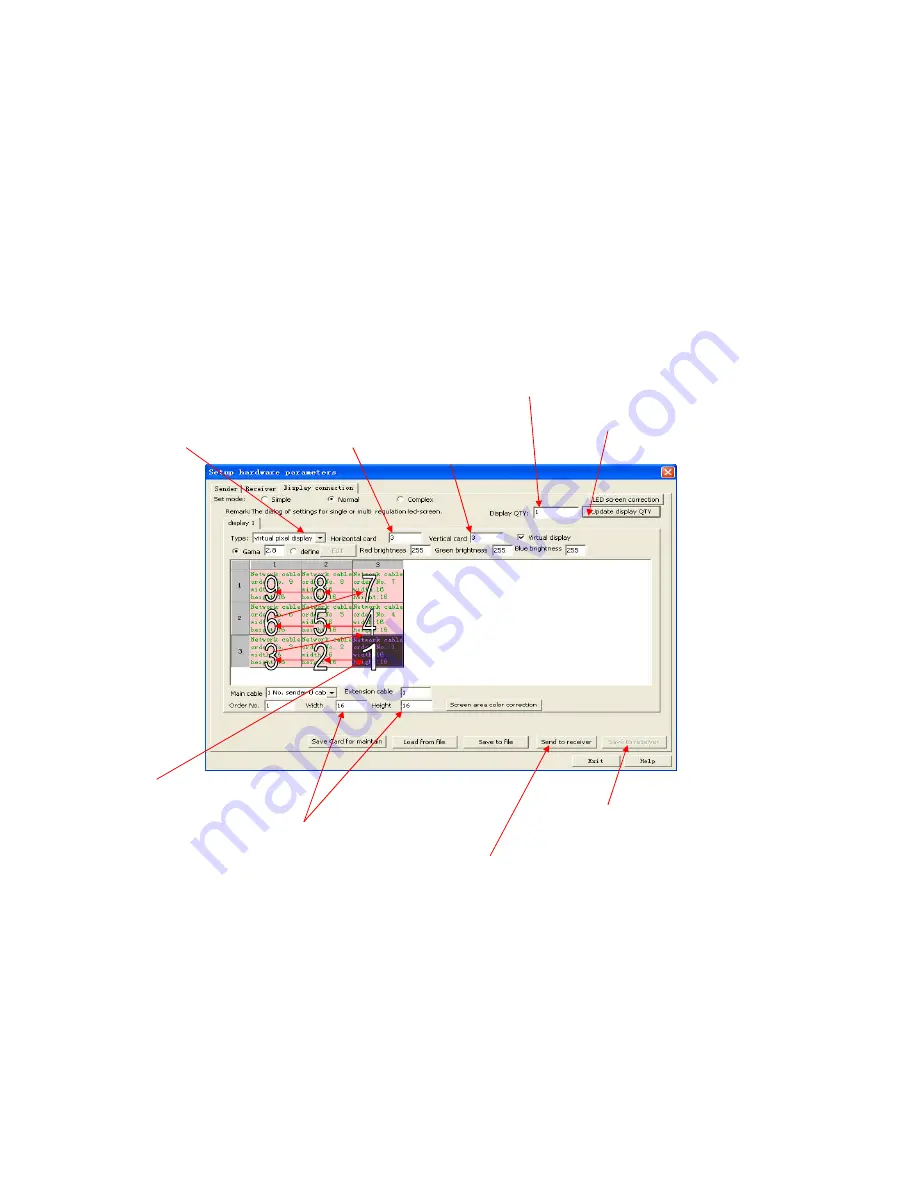
5. Mapping and setup: (For example: to map 3 rows and 3 columns, setup should be as pictured below)
Update the quantity of screens if using more than one main screen

In “Type”, select “virtual pixel display”

set rows and columns for your

screen

select pixel points of each panel (The pixel points for each EVLED256 is 16x16)

set the map based on the signal connection (

Z

type

connection as pictured below). Follow steps 1 – 9 in order.

(1). Input number of screens

(2). Click “Update display QTY”

(3). Type: select “virtual pixel display”

(4). Number of panels wide

(5). Number of panels high

(7). Signal connection:
(Front view data connection)

(9). Save parameter to sending card.

(6). Input the number of pixel points for each panel. The EVLED256
Panel should be set as 16 Width by 16 Height.

(8). Send settings to sending card.

Содержание EVLED256 Video Wall

Страница 1: ...EVLED256 Video Wall Quick Start Guide...

Страница 2: ...the included RS232 to USB convertor 2 On your PC set up a secondary or clone display A flashing green LED on the rear of the EVLED VSC indicates successful communication One end of DVI cable connects...

Страница 3: ...map Example map 3 rows by 3 columns This connection type is only recommended for up to 20 panels When using more than 20 panels an EVLED VDS data splitter should be used Contact your Elation represen...

Страница 4: ...III Application of Software 1 Launch LED Set software click Parameter as pictured below Parameter...

Страница 5: ...2 A password window will pop up as pictured below Input password 168 and click Ok...

Страница 6: ...your screen works in 1024 768 resolution mode there is no need to select another display mode If it does not click the Display mode drop down tab and select the correct display resolution for your scr...

Страница 7: ...isplay as pictured below Click Load from files select EVLED256 RCG Click Send to receiver Click Save on receiver Switch to Receiver setup screen 1 Load EVLED256 RCG panel profile 2 Send profile to rec...

Страница 8: ...Select Profile EVLED256 RCG...

Страница 9: ...r each EVLED256 is 16x16 set the map based on the signal connection Z type connection as pictured below Follow steps 1 9 in order 1 Input number of screens 2 Click Update display QTY 3 Type select vir...

Страница 10: ...or X and 0 for Y These coordinates place the play area in the upper left corner of your PC monitor The X start point refers to the width of your monitor The Y start point refers to the height of your...

Отзывы: