Record your voice as you sing along to the built-in song, or to any song on your audio device by connecting it to the microphone via the
built-in AUX cable. Each
Record Button
holds up to 3 minutes 45 seconds of audio. Have a great show!
Song Mode
• Slide the
Mode Switch
located on the side of the microphone to the
Song
position to enable song mode. Press the
Song Button
to turn on the microphone. Lights will flash and after a quick introduction, the microphone will automatically start playing the built-in
song.
• Press and hold the
Mic Button
to sing along to the song.
• Press the
Song Button
again to turn off the microphone.
Recording Your Voice
• Press and hold any
Record Button (Rec 1, Rec 2, Rec 3
or
Rec 4)
until it starts to blink, indicating recording mode.
• Once recording begins, press the
Song Button
to start the built-in music, and then hold the
MIC Button
to sing and record your voice
over the music. Press and release the blinking
Record Button
to stop and save recording.
MP3 Mode
• Slide the
Mode Switch
to the
MP3
position
to enable MP3 mode.
• Connect the built-in AUX cable to the headphone or line out jack on your audio device. Turn on and play your audio device.
• Press the
Song Button
to turn on the microphone and hear the music on your audio device.
• Press the
Song Button
again to start playing the built-in song.
• Press and hold the
Mic Button
to sing along with your MP3 player/audio device.
Recording From Your Music Device
• With your audio device connected to the microphone, choose a song that you would like to record. After you have selected a song,
use the
Play/Pause Button
on your audio device to pause the song.
• Press and hold the desired
Record Button
until it starts to blink, indicating record mode. Press the
Play/Pause Button
again on your
device to start the music and record the song from your device. Press and release the blinking
Record Button
to stop recording.
The light will turn solid, indicating a saved recording.
Listening to Your Recordings
Any Recording Button that is lit solid (not blinking) already has a saved recording on it.
• To listen to your recording, press and release the desired
Record Button
.
Erasing Your Recordings
• To
erase
a recording, press and hold the desired
Record Button
for
5 seconds
.
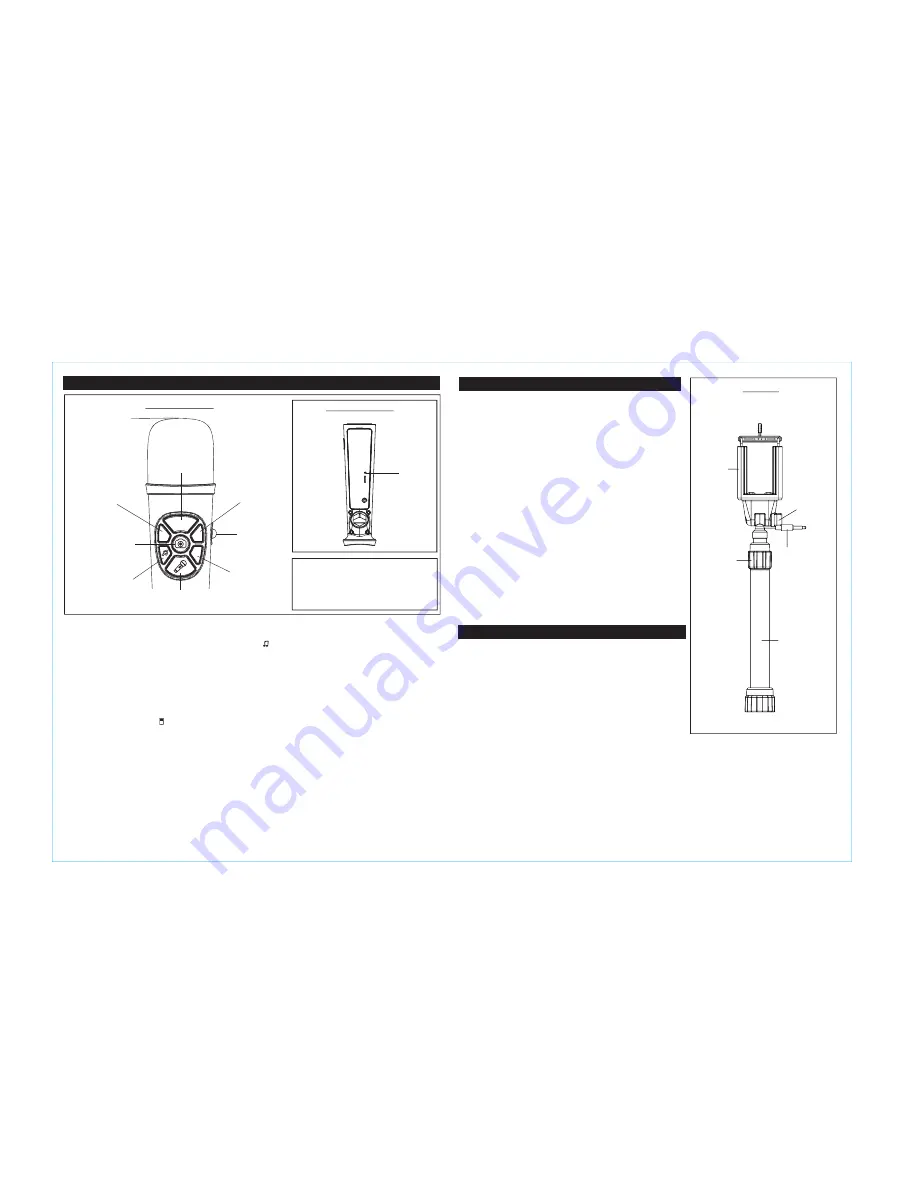
Playing with the Microphone
Front of Microphone
Back of Microphone
Press and hold
Mic Button while you sing
Press
Song Button
to Play song
Mode Switch
Song/MP3
Rec 1
Rec 2
Rec 3
Rec 4
Reset
Power Saving
Song/MP3 modes will automatically turn
off in about 5 minutes to save battery
power.
The included selfie stick has a built-in AUX cable and is great for taking still
pictures or making music videos of you and your friends. With the free
Selfie Star
Studio App
(available on the Apple App Store, for iPhones ONLY), you can add
stickers, troll hair and even create fun postcards.
Attaching the Selfie Stick
• Gently line up the built-in AUX cable on the end of the
Selfie Stick
with the
threaded post at the base of the Microphone. Turn the nut to the right to
attach. DO NOT OVER TIGHTEN
Extending the Selfie Stick
• Turn the
Selfie Stick Extension Nut
right to loosen. Gently pull out the
extension rod on the Selfie Stick to extend to the desired length. Turn extension
nut left to tighten. DO NOT OVER TIGHTEN.
Adjusting the Selfie Stick Camera Holder
• Pull UP on the adjustment tab on top of the camera holder until camera fits,
then gently release.
Connecting AUX Cable
• Insert the AUX plug at the end of the coiled cable into the headphone jack on
your iPhone. This will allow you to record music onto the microphone and
use the selfie functions.
CAUTIONS
• Make sure camera holder fits firmly around iPhone.
• DO NOT wave selfie stick around or otherwise tempt gravity when iPhone is
inserted in camera holder.
• Please be aware of your surroundings and note that some public places may
have rules regarding the use of selfie sticks.
Using the Selfie Stick
Using the App
MODEL: TR-077.EM
INSTRUCTION MANUAL (BACK)
Selfie stick
Extension
nut
Extension rod
Camera
holder
External Aux-in
cable/plug
Adjustment
tab
Microphone
RESET
Selfie Button
When app is active,
press to take a
selfie
Record Button 2
Record Button 1
Record Button 3
Record Button 4
Download the FREE
Selfie Star Studio App
from the Apple App Store. The
app is for iPhone only (Android devices are not supported at this time) and
requires
iOS 9.
• Before using the app, slide the microphone switch to
MP3 mode
and make
sure to store recordings in
Record Buttons 1-4
on the microphone.
• Once you install and open the app, the home screen will provide 3 fun options
to choose from:
•
Video
- Use the camera button on the microphone to record your own music
video or lip-sync video, then add fun animations in the background!
•
Selfie
- Take a selfie and decorate it with stickers, troll hair and more!
•
Photo Booth
- Create a collage of four photos and then decorate them all!


