C:
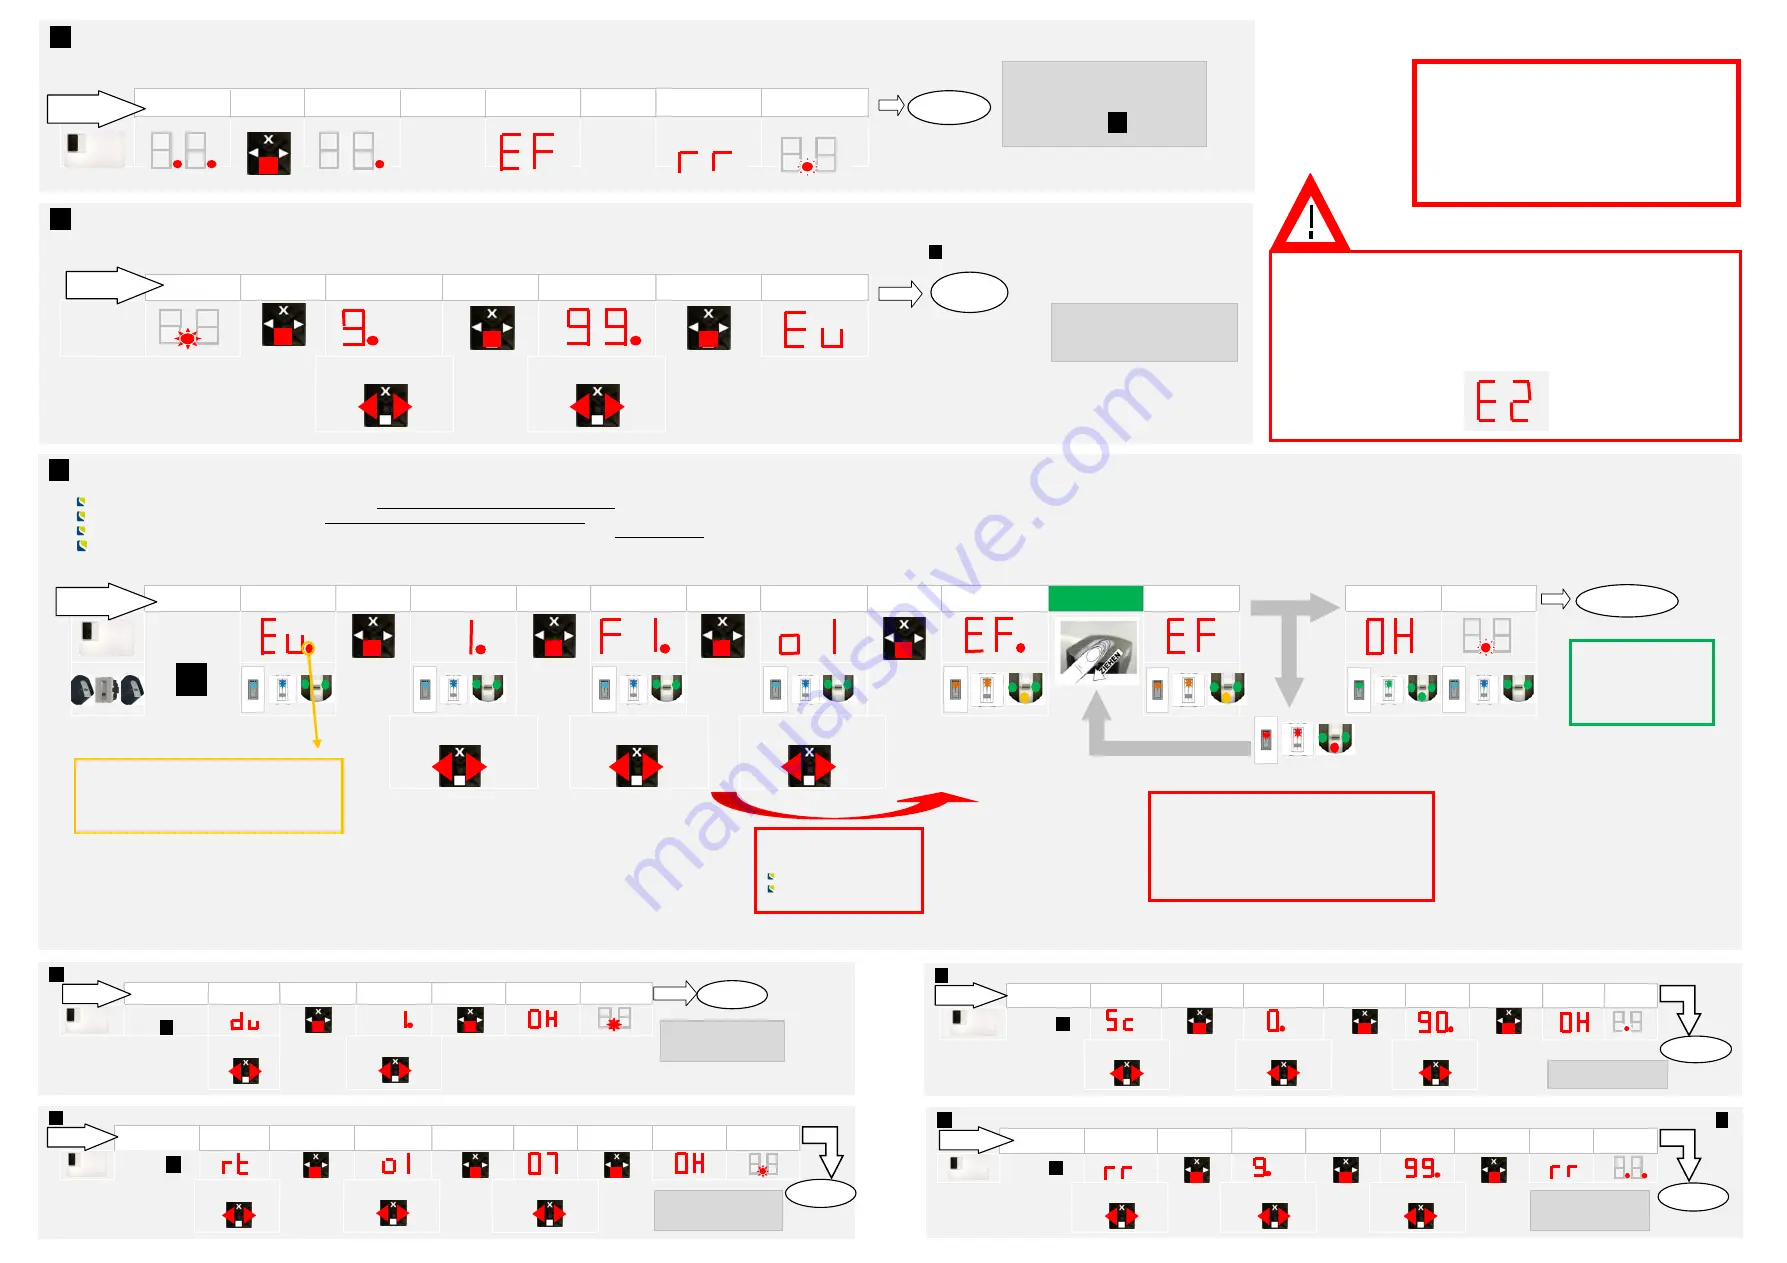
RECORDING FINGERPRINTS (Eu)
With Enroll User the following occurs:
Allocation of a user to a memory space:
0 - 99
Selection of the fingerprint number:
F1 – F10 (F0)
Allocation of the fingerprint to a switching relay (with ekey home 2, 3 and PC):
o1 – o3; od (Relays 1 and 2 switch together with one finger)
Fingerprint recording
ENTER SECURITY
CODE
DISPLAY
KEY
STROKE
D
SETTING
KEY
STROKE
D
SETTING
KEY
STROKE
D
SETTING
KEY
STROKE
DISPLAY
Swipe the
USER-FINGER
DISPLAY
DISPLAY
DISPLAY
SEE
B:
Select 0-99 for
USER NUMBER
Select F1-F10 for
FINGER NUMBER
Select RELAY o1-o3
or od
The USER FINGERPRINT WAS
NOT SAVED (POOR FINGER
IMAGE). Try again and observe
the guidelines on CORRECT
FINGER SWIPING!
START
The red dot only lights up if the
memory is already occupied (a
USER or fingerprint had already
been saved to this position)!
Your user
fingerprint is
now saved!
FINISHED
It is
not
possible to choose
the relay on control panels
featuring only one relay:
ekey home CP WM1
ekey home CP IN1
A:
INITIALIZING THE DEVICES
The devices have to be initialized. Only after this can fingerprints be saved. Proceed as follows:
DISPLAY
KEY
STROKE
DISPLAY
KEY
STROKE
DISPLAY
KEY
STROKE
DISPLAY
DISPLAY
The devices have now been
initialized. You may start
enrolling users->
See
C:
FINISHED
START
Security code
Factory setting
99
Should you have entered 3 times in a row a
wrong security code, then your system will be
locked for
30min (operating time)
. The
following error code will show up on the display:
B:
ENTERING THE SECURITY CODE
The security code is used to prevent unauthorized people having access to your system and thereby changing data. The factory default setting for this code is “
99
”: change this code straight after
having started up the system in order to ensure protection from manipulation. The necessary entries to change the code can be found in section
F:
.
DISPLAY
KEY
STROKE
D
SETTING
KEY
STROKE
D
SETTING
KEY
STROKE
DISPLAY
Security code
DIGIT 1
Security code
DIGIT 2
START
FINISHED
Now you can make the
entries and data changes
in your system.
De r NEUE
Siche rhe itscode ist
dam it ak tiv!
F:
CHANGING THE SECURITY CODE (Sc)
ENTER SE CURITY
CODE
DISPLA Y +
SE TTING
KEY STROKE
DISPLA Y +
SE TTING
KEY STROKE
DISPLA Y +
SE TTING
KEY STROKE
DISPLA Y
DISPLA Y
SEE
B:
Select MENU
ITEM Sc
NEW CODE
DIGIT 1
NEW CODE
DIGIT 2
FINISHED
STA RT
G:
RESETTING TO FACTORY SETTINGS (rr)
Warning! All stored fingers will be deleted!
The system has to be re-initialized (see
A:
)
ENTER SE CURITY
CODE
DISPLA Y +
SE TTING
KEY STROKE
DISPLA Y +
SE TTING
KEY STROKE
DISPLA Y +
SE TTING
KEY STROKE
DISPLA Y
DISPLA Y
SEE
B:
Select MENU
ITEM rr
Security code
DIGIT 1
Security code
DIGIT 2
Your device is now
back in its delivered
condition!
STA RT
FINISHED
The NEW se curity code is
now active !
D:
DELETING USERS (du)
ENTER SE CURITY
CODE
DISPLA Y +
SE TTING
KEY STROKE
DISPLA Y +
SE TTING
KEY STROKE
DISPLA Y
DISPLA Y
SEE
B:
Select MENU
ITEM du
Select USER
NUMBER
STA RT
FINISHED
The selected USER
has been deleted!
Re laisschaltze it für das
ge wählte Re lais ist
e inge ste llt!
E:
RELAY SWITCHING TIME (rt)
–
The switching time of e ach re lay can be se t from 1 se c to 99 se c.
.If 0 is set then the relay works as a tog gle relay.
ENTER SE CURITY
CODE
DISPLA Y +
SE TTING
KEY STROKE
DISPLA Y +
SE TTING
KEY STROKE
DISPLA Y +
SE TTING
KEY STROKE
DISPLA Y
DISPLA Y
SEE
B:
Select MENU
ITEM rt
Select RELAY
Switching time in
seconds (1-99)
FINISHED
STA RT
The relay switching time for
the se le cte d re lay has be en
se t!


