background image

English

20


4. MAKING USE OF USB (Universal Serial Bus) 

4. MAKING USE OF USB 

(Universal Serial Bus)  

This monitor provides a hub which supports the USB standard.  When connecting to a 
USB compliant PC or another hub, the monitor functions as a hub to which the USB 
compliant peripherals can be easily connected. 

Required system environment 

• 

PC with build-in USB ports or another USB hub connected to the USB compliant PC 

• 

EIZO USB Cable (MD-C93) 

NOTE

• 

The USB hub function may not work properly depending on the PC or peripherals. 
Please consult the manufacturer of each device about the USB support. 

• 

Using the USB Rev. 2.0 compatible PC or peripherals is recommended. 

• 

When the monitor is not on, the peripherals connected to the downstream ports will 
not operate. 

• 

Even if the monitor is in a power saving mode, the devices connected to the 
monitor’s USB ports (both the upstream and the downstream) will function. 

Connecting to the USB HUB 

1.

Connect the monitor to the PC with the signal cable (p.12) first, then 
turn on the PC. 

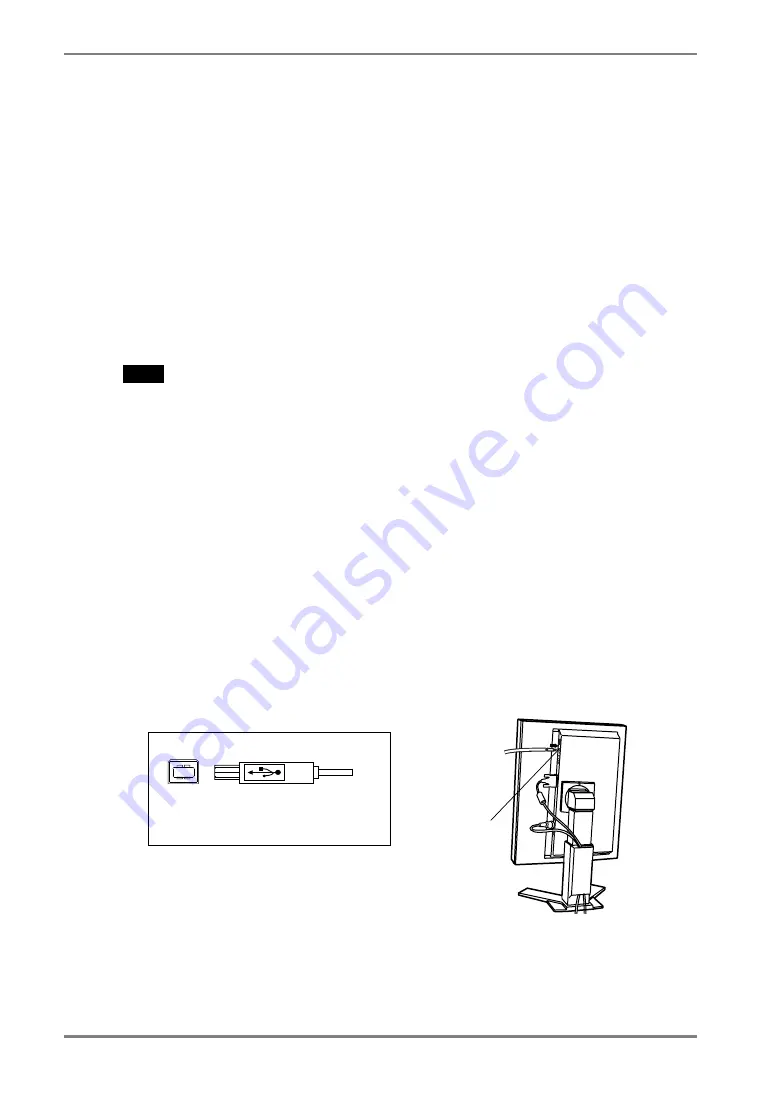
2.

Connect the upstream port of the monitor to the downstream port of 
the USB compliant PC or another hub by using the USB cable. 

After connecting the USB cable, the USB function can be set up automatically. 

To Downstream  
Ports of the PC  
or Another Hub 

Upstream Port: 

Connect the USB compliant PC or 
another hub using the USB cable. 

Upstream Port

Содержание G22-BL/G22-CL

Страница 1: ...User s Manual Monochrome LCD Monitor It shall be assured that the final system is in compliance to IEC60601 1 1 requirements...

Страница 2: ...O are registered trademarks of EIZO NANAO CORPORATION in Japan and other countries CAUTION Failure to abide by the information in a CAUTION may result in moderate injury and or property or product dam...

Страница 3: ...3 Useful Functions 17 3 4 Power save Setup 19 4 MAKING USE OF USB Universal Serial Bus 20 5 ATTACHING AN ARM 22 6 TROUBLESHOOTING 24 7 CLEANING 27 2 CABLE CONNECTION 12 3 ScreenManager 15 3 1 How to u...

Страница 4: ...tion and the caution statements on the unit refer to the figure below Location of the Caution Statements SIGNAL1 POWER INPUT Symbols on the unit Symbol Location This symbol indicates Side Main power s...

Страница 5: ...ult in fire electric shock or equipment damage If an object or liquid falls spills into the cabinet unplug the unit immediately Have the unit checked by a qualified service engineer before using it ag...

Страница 6: ...rounded main outlet Not doing so may result in fire or electric shock Use the correct voltage The unit is designed for use with a specific voltage only Connection to another voltage than specified in...

Страница 7: ...he unit is dropped please ask your dealer for advice Do not continue using a damaged unit Using a damaged unit may result in fire or electric shock When reattaching the tilt stand please use the same...

Страница 8: ...ease use the monitor with the brightness below 500 cd m equal to default setting of BRIGHTNESS approximately 70 2 The screen may have defective pixels These pixels may appear as slightly light or dark...

Страница 9: ...aving function p 18 DVI DMPM p 31 NOTE Regarding the scanning resolution the G22 BL G22 CL supports only the exclusive timing 1 2 Package Contents Please contact your local dealer for assistance if an...

Страница 10: ...ower saving Flashing orange 2 times for each Power save mode Flashing orange slowly Power is off Main power is on Off Power off 1 These buttons are changed to Up Left Right Down in case of selecting L...

Страница 11: ...Landscape display The panel pivots in the clockwise direction 90 The LCD monitor can be used with an optional arm stand by removing the stand p 22 4 Allows for connection of a security cable This loc...

Страница 12: ...it position 2 Plug the signal cable into the connector at the rear of the monitor and the other end of the cable into the video connector on the PC After connecting secure the connection with the scre...

Страница 13: ...ended to lead with slight sag for the smooth motion of the stand 5 Plug the other end of the power cord into a power outlet WARNING Use the enclosed power cord and connect to the standard power outlet...

Страница 14: ...the 10bit monochrome graphics card or the 8bit color graphics card follow the procedure below 1 Select the Signal Selection in the ScreenManager p 15 Others menu 2 Set the graphics card equipped the c...

Страница 15: ...d setting icon and press the Enter Button The setting menu appears 3 Use the Control Buttons to make all required adjustments and press the Enter Button to save the settings 3 Exiting the ScreenManage...

Страница 16: ...tion Change the orientation of the ScreenManager for monitor s portrait position Signal Selection Set the kind of graphics card Power Indicator Make non light for green lighting when the screen is dis...

Страница 17: ...t are particular to LCD monitors when the monitor screen is left on for a long period without use Procedure 1 Select Off Timer in the ScreenManager Others menu 2 Select Enable and press the Right and...

Страница 18: ...ation the functions below are automatically locked Locked function Brightness adjustment including the adjustment by Left and Right Buttons on the control panel LUT Setting Unlock function is availabl...

Страница 19: ...s USB both the upstream and the downstream ports Therefore power consumption of the monitor will change according to the connected devices even if the monitor is in a power saving mode This monitor c...

Страница 20: ...USB support Using the USB Rev 2 0 compatible PC or peripherals is recommended When the monitor is not on the peripherals connected to the downstream ports will not operate Even if the monitor is in a...

Страница 21: ...USB hub is available for connecting USB compliant peripherals to the downstream ports of the monitor Connecting Examples PC Keyboard Printer Mouse Downstream Ports Downstream Ports Connect the cables...

Страница 22: ...on the arm mounting 100 mm x 100 mm VESA compliant Supportable Weight Total weight of the monitor without stand and attaching equipment such as a cable T V GS approved arm or stand Please connect cab...

Страница 23: ...English 5 ATTACHING AN ARM 23 4 Attach an arm stand to the LCD monitor securely 4 Mounting Screws M4 10 mm Arm stand...

Страница 24: ...the Brightness setting Try pressing a key on the keyboard or clicking the mouse p 19 Try pressing the Power Button Try turning the PC on 2 Error message shown below will remain on the screen for 40 s...

Страница 25: ...to the characteristics of the panel itself and not the LCD product 7 Fingerprints remain on the screen Leaving the screen white may solve the problem 8 Locked message appears and the adjustment contro...

Страница 26: ...SB cable is correctly connected Check the downstream ports by connecting the peripherals to other downstream ports If the problem is solved by doing this contact an EIZO dealer For details refer to th...

Страница 27: ...other strong solvents as these may cause damage to the cabinet or LCD panel Cabinet To remove stains wipe the cabinet with a soft lightly moistened cloth using a mild detergent Do not spray wax or cle...

Страница 28: ...b are not connected Input Connector DVI D 1 Input Signal TMDS Single Link Dimensions 337 mm W 493 575 mm H 208 5 mm D 13 3 W 19 4 22 6 H 8 2 D Dimensions without stand 337 mm W 441 mm H 78 5 mm D 13 3...

Страница 29: ...4 325 5 12 8 208 5 8 2 27 1 06 8 0 31 55 2 17 78 5 3 09 6 5 0 26 15 5 0 61 301 5 11 9 168 6 6 R O T A T I O N Default settings PowerManager DVI DMPM Off Timer Disable Menu Position Center Menu Off Tim...

Страница 30: ...TMDS Data0 5 Shield 4 NC 12 NC 20 NC 5 NC 13 NC 21 NC 6 DDC Clock SCL 14 5V Power 22 TMDS Clock shield 7 DDC Data SDA 15 Ground For 5V 23 TMDS Clock 8 Analog Vertical Sync 16 Hot Plug Detect 24 TMDS...

Страница 31: ...spensable for the DVI DMPM as the monitor s power mode LUT Look up table Look up table is the compensation data to which the monitor refers when the monitor outputs the input data from a graphics boar...

Страница 32: ...Bey dem ger t handelt es sich um ein Klasse A Produkt Bei Betrieb des Ger ts in Wohnumgebungen ist gegebenenfalls durch entsprechende Ma nahmen daf r zu sorgen dass eine St rung des Radio und Fernsehe...

Страница 33: ......

Отзывы: