background image

English

10

1. INTRODUCTION

1-3. Controls & Connectors

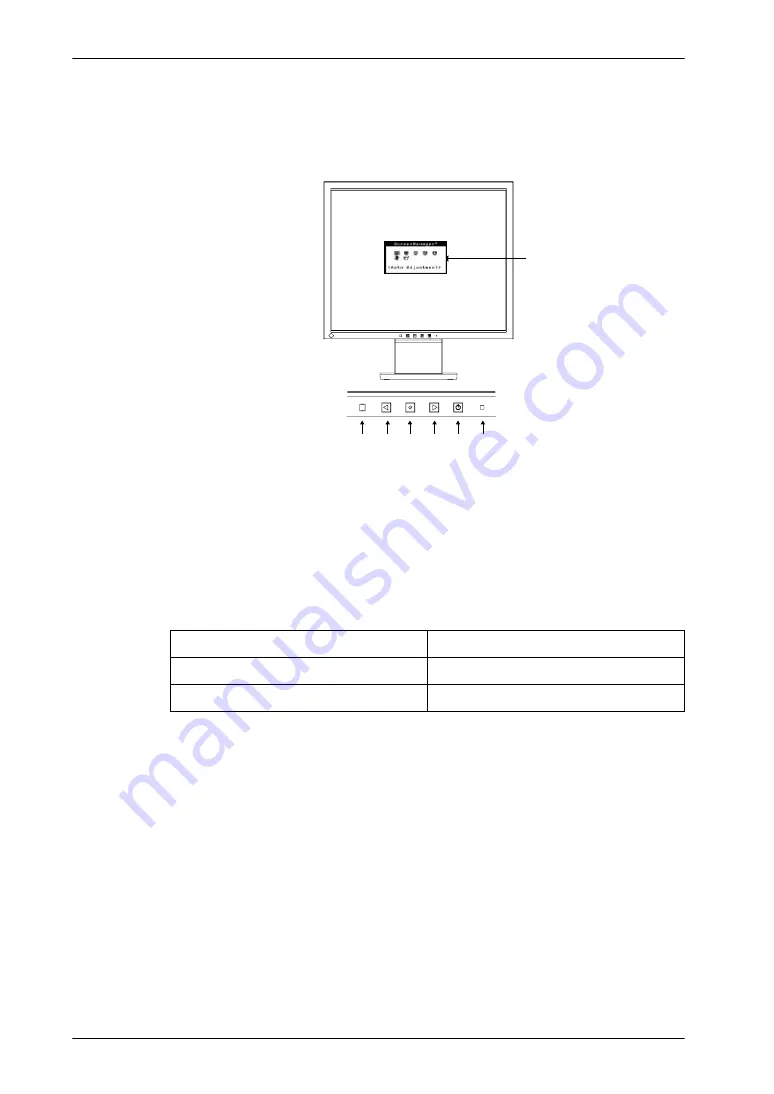
Front

(1)

ScreenManager

®

(2)

Sensor*

1

(3)

Control Button (Left)*

2

(4)

Enter Button

(5)

Control Button (Right)*

2

(6)

Power Button

(7)

Power Indicator*

3

*1 When using the BrightRegulator function, the sensor detects the surrounding brightness, 

see page 19.

*2 Pressing the Control buttons without displaying ScreenManager displaying the 

Brightness Adjustment (p. 19)When using the BrightRegulator function, the sensor detects 
the surrounding brightness, see page 19.

*3 Regarding the power indicator for the “Off Timer”, see page 18.

Green

Operation

Orange

Power saving

Off

Power off

(1)

(3) (4) (5)

(2)

(6) (7)

Control Panel

Содержание FLEXSCAN L551 -

Страница 1: ......

Страница 2: ...EIZO monitor specifications are subject to change without notice ENERGY STAR is a U S registered mark Apple and Macintosh are registered trademarks of Apple Computer Inc VGA is a registered trademark of International Business Machines Corporation DPMS is a trademark and VESA is a registered trademark of Video Electronics Standards Association Windows is a registered trademark of Microsoft Corporat...

Страница 3: ...e Signal Cable 14 3 SCREENMANAGER 16 3 1 How to use the ScreenManager 16 3 2 ScreenManager Adjustments and Settings 17 3 3 Useful Functions 18 4 ADJUSTMENT 19 4 1 Auto Screen Adjustment 19 4 2 Range Adjustment 19 4 3 Brightness Adjustment 20 4 4 Color Adjustment 21 4 5 Power save Setup 22 5 ATTACHING AN ARM STAND 23 6 TROUBLESHOOTING 25 7 CLEANING 27 8 SPECIFICATIONS 28 9 GLOSSARY 31 APPENDIX ANHA...

Страница 4: ...Location of the Caution Statements WARNING If the unit begins to emit smoke smells like something is burning or makes strange noises disconnect all power connections immediately and contact your dealer for advice Attempting to use a malfunctioning unit may result in fire electric shock or equipment damage Do not open the cabinet or modify the unit Opening the cabinet or modifying the unit may resu...

Страница 5: ...amaged unit may result in fire or electric shock Set the unit in an appropriate location Not doing so may result in fire electric shock or equipment damage z Do not place outdoors z Do not place in the transportation system ship aircraft trains automobiles etc z Do not place in a dusty or humid environment z Do not place in a location where the steam comes directly on the screen z Do not place nea...

Страница 6: ...der Touching them may result in electric shock When attaching an arm stand please refer to the user s manual of the arm stand and install the unit securely with the enclosed screws Not doing so may cause the unit to come unattached which may result in injury or equipment damage When the unit is dropped please ask your dealer for advice Do not continue using a damaged unit Using a damaged unit may ...

Страница 7: ... the unit laid down or upside down Blocking the ventilation slots prevents proper airflow and may result in fire electric shock or equipment damage Do not touch the plug with wet hands Doing so may result in electrical shock Use an easily accessible power outlet This will ensure that you can disconnect the power quickly in case of a problem Periodically clean the area around the plug Dust water or...

Страница 8: ...ed image is dark or black If pressure is repeatedly applied to the screen it may deteriorate or damage your LCD panel Leave the screen white to decrease the prints When the screen image is changed after displaying the same image for extended periods of time an afterimage may appear Use the screen saver or timer to avoid displaying the same image for extended periods of time When the monitor is col...

Страница 9: ...tion incorporated p 18 z BrightRegulator function incorporated p 19 z Support to sRGB p 31 standard 1 2 Package Contents Please contact your local dealer for assistance if any of the listed items are missing or damaged z LCD Monitor z User s Manual in the CD ROM z Power Cord z Setup Guide z Signal Cable MD C87 z LIMITED WARRANTY z EIZO LCD Utility Disk z Mounting Screws M4 x 12 mm x 4 pcs NOTE z P...

Страница 10: ...or function the sensor detects the surrounding brightness see page 19 2 Pressing the Control buttons without displaying ScreenManager displaying the Brightness Adjustment p 19 When using the BrightRegulator function the sensor detects the surrounding brightness see page 19 3 Regarding the power indicator for the Off Timer see page 18 Green Operation Orange Power saving Off Power off 1 3 4 5 2 6 7 ...

Страница 11: ...used with an optional arm stand by removing the stand see page 22 5 Allows for connection of a security cable This lock supports Kensington s MicroSaver security system For further information please consult Kensington Technology Group 2855 Campus Drive San Mateo CA 94403 USA Tel 800 650 4242 x3348 Intl 650 572 2700 x3348 Fax 650 572 9675 http www kensington com 8 9 10 11 12 Bottom ...

Страница 12: ...t VESA DDC the suitable resolution and the refresh rate are set by just plugging your display into the computer without any manual settings Resolution Frequency Dot Clock Remarks 640 480 75 Hz 135 MHz Max VGA VESA 640 480 67 Hz Apple Macintosh 720 400 70 Hz VEGA TEXT 800 600 75 Hz VESA 832 624 75 Hz Apple Macintosh 1024 768 75 Hz VESA 1152 864 75 Hz VESA 1152 870 75 Hz Apple Macintosh 1280 960 60 ...

Страница 13: ... the other end of the cable into the video connector on the PC After connecting secure the connection with the screw in fasteners Signal Cable Connector of the PC PC Signal Cable enclosed Video Output Connector D Sub mini 15 pin z Standard graphics card z Power Macintosh G3 Blue White Power Mac G4 VGA Signal Cable enclosed Macintosh Adapter Optional Video Output Connector D Sub mini 15 pin z Macin...

Страница 14: ...g so may result in fire or electric shock 3 Turn on the monitor s main power and then switch on the PC s power The monitor s power indicator will light up green If an image does not appear refer to the 6 TROUBLESHOOTING p 24 for advice Whenever finished turn off the PC and the monitor NOTE z When turning on the monitor and the computer for the first time the Auto Screen Adjustment function will op...

Страница 15: ...e setting menu appears 3 Use the Control buttons to make all required adjustments and press the Enter button to save the settings 3 Exiting the ScreenManager 1 To return to the main menu select the Return icon and press the Enter button 2 To exit the ScreenManager select Exit icon or and press the Enter button NOTE z Double clicking the Enter button at any time also exits the ScreenManager menu En...

Страница 16: ... Phase p 31 Hor Position Adjust the Horizontal Position Ver Position Adjust the Vertical Position Color Color Mode 4 4 Color Adjustment p 20 Custom Temperature Gain sRGB Others Off Timer Set the power save p 17 Menu Position Adjust the menu position BrightRegulator Adjust the brightness of the screen automatically depending on the surrounding brightness p 19 Reset Return to the factory default set...

Страница 17: ...e Procedure 1 Select Off Timer in the ScreenManager Others menu 2 Press the right and left buttons to adjust the On Period 1 to 23 hours Off Timer System 1 To delay entering the Power Off mode press the Power button during the advance notice period The monitor will continue to operate for an additional 90 minutes Power Resumption Procedure Press the Power button to return to a normal screen NOTE z...

Страница 18: ...ent z The Auto sizing function is intended for use on the Macintosh and on AT compatible PC running Windows It may not work properly in either of the following cases When running an AT compatible PC on MS DOS Not windows The background color for the wall paper or desktop pattern is set to black z If the appropriate screen cannot be made by using the Auto Screen Adjustment adjust the screen through...

Страница 19: ...this function 1 Select BrightRegulator in the ScreenManager Others menu 2 Select Disable NOTE z Do not block the sensor p 10 when using this function Adjusting the present brightness manually Procedure 1 Press the Right or Left control button without displaying the ScreenManger to display the adjusting menu 2 Adjust the brightness by left and right control buttons and press the Enter button NOTE z...

Страница 20: ...form the Range Adjustment p 18 before making the color adjustments Menu Color Mode Function Descriptions Adjustable range Custom sRGB Temperature p 30 To set the color temperature Off 6 500K 9 300K Default setting is off normal white NOTE z The values shown in the Kelvin are available only as a reference tool z Adjusting the Gain turns the Temperature adjustment Off Gain p 30 To change each color ...

Страница 21: ...the monitor from the power supply is recommended to save energy completely This monitor complies with the VESA DPMS p 31 Procedure Set the PC s power saving settings Power saving system Operate the mouse or keyboard to return to a normal screen PC Monitor Power Indicator Operation Operation Green Power saving STAND BY SUSPEND OFF Power saving Orange ...

Страница 22: ...s to the manufacturers before selecting Hole spacing on the arm mounting 100 mm x 100 mm VESA compliant Supportable Weight Total weight of the monitor without stand and attaching equipment such as a cable TÜV GS approved arm or stand z Please connect cables after attaching an arm stand Setup Procedure 1 Hold the lower part of the stand cover and remove by lifting it up 2 Lay the LCD monitor down D...

Страница 23: ...English 5 ATTACHING AN ARM STAND 23 4 Attach an arm stand to the LCD monitor securely Attach the removed stand cover again to the monitor Arm stand 4 Mounting Screws M4 x 12 mm ...

Страница 24: ...ly When the image is displayed correctly after a short time there is no problem with the monitor Some PCs do not output the signal soon after powering on Check that the PC is turned ON Check that the signal cable is properly connected to the PC or graphics board z Whenever an error signal message appears the signal frequency will be displayed in red Example Use the graphics board s utility softwar...

Страница 25: ...t or dark This is due to the characteristics of the panel itself and not the LCD product 7 Fingerprints remain on the screen Leaving the screen white may solve the problem 8 The screen is flicking or the position is not proper Select the Screen in the ScreenManager Auto Adjustment menu p 18 9 The Enter button does not operate The adjustment lock is probably on To unlock switch the LCD monitor off ...

Страница 26: ... as these may cause damage to the cabinet or LCD panel Cabinet To remove stains wipe the cabinet with a soft lightly moistened cloth using a mild detergent Do not spray wax or cleaner directly into the cabinet For details refer to the manual of the PC LCD Panel z The LCD surface can be cleaned with a soft cloth such as cotton or lens paper z If necessary stubborn stains can be removed by moistenin...

Страница 27: ...ng Mode Less than 1 W Input Connector D Sub mini 15 pin Input Signal Sync Separate TTL Positive Negative Input Signal Video Analog 0 7Vp p 75 Ω Positive Signal registration 30 Factory preset 19 Plug Play VESA DDC 2B Dimensions 369 mm W x 385 2 mm H x 192 mm D 14 5 W x 15 2 H x 7 6 D Dimensions wifhout stand 369 mm W x 307 mm H x 59 5 mm D 14 5 W x 12 1 H x 2 34 D Weight 4 0 kg 8 8 lbs Weight witho...

Страница 28: ...0K Gain 100 Off Timer Disable Menu Position Center BrightRegulator Enable Language English 1 0 04 339 8 13 4 1 0 04 369 14 5 14 0 55 314 12 4 14 0 55 3 9 0 15 272 2 10 7 3 9 0 15 385 2 15 2 231 7 9 1 192 7 6 42 9 1 69 59 5 2 34 28 6 1 13 64 5 2 54 128 5 0 78 2 3 08 85 2 3 35 150 5 9 30 5 232 9 1 75 5 2 97 17 4 0 69 14 6 0 57 mm inches ...

Страница 29: ...or Pin No Signal Pin No Signal Pin No Signal 1 Red video 6 Red ground 11 Ground Shorted 2 Green video 7 Green ground 12 Data SDA 3 Blue video 8 Blue ground 13 H Sync 4 Ground 9 No pin 14 V Sync 5 No pin 10 Ground Shorted 15 Clock SCL 5 1 3 4 2 8 7 6 9 10 12 13 14 15 11 ...

Страница 30: ...tly bluish white Gain Adjustment Adjusts each color parameter for red green and blue The color of the LCD monitor is displayed through the color filter of the LCD panel Red green and blue are the three primary colors The colors on the monitor are displayed by combining these three colors The color tone can change by adjusting the illumination amount passed through each color fs filter Phase The ph...

Страница 31: ...printers and digital cameras As a standard default space sRGB allows Internet users to closely match colors VESA DPMS Video Electronics Standards Association Display Power Management Signaling The acronym VESA stands for Video Electronics Standards Association and DPMS stands for Display Power Management Signaling DPMS is a communication standard that PCs and graphics boards use to implement power...

Страница 32: ...ot Clock MHz Frequencies Sync Polarity H kHz V Hz H V VGA 640 480 60 Hz 25 175 31 47 59 94 Nega Nega VGA 720 400 70 Hz 28 322 31 47 70 09 Nega Posi Macintosh 640 480 67 Hz 30 240 35 00 66 67 Nega Nega Macintosh 832 624 75 Hz 57 280 49 72 74 55 Posi Posi Macintosh 1152 870 75 Hz 100 000 68 68 75 06 Nega Nega Macintosh 1280 960 75 Hz 126 200 74 76 74 76 Posi Posi VESA 640 480 73 Hz 31 500 37 86 72 8...

Страница 33: ...Hz 78 750 60 02 75 03 Posi Posi VESA 1152 864 75 Hz 108 000 67 50 75 00 Posi Posi VESA 1280 960 60 Hz 108 000 60 00 60 00 Posi Posi VESA 1280 1024 60 Hz 108 000 63 98 60 02 Posi Posi VESA 1280 1024 75 Hz 135 000 79 98 75 03 Posi Posi Mode Dot Clock MHz Frequencies Sync Polarity H kHz V Hz H V ...

Страница 34: ...ity Energy z Energy saving mode after a certain time beneficial both for the user and environment z Electrical safety z Emissions Electromagnetic fields z Noise emissions Ecology z The products must be prepared for recycling and the manufacturer must have a certified environmental management system such as EMAS or ISO 14000 z Restrictions on chlorinated and brominated flame retardants and polymers...

Страница 35: ...mental labelling of personal computers The labelling scheme was developed as a joint effort by the TCO The Swedish Confederation of Professional Employees Svenska Naturskyddsforeningen The Swedish Society for Nature Conservation and Statens Energimyndighet The Swedish National Energy Administration Approval requirements cover a wide range of issues environment ergonomics usability emission of elec...

Страница 36: ...vous system and is toxic in high doses The relevant TCO 99 requirement states that batteries the colour generating layers of display screens and the electrical or electronics components must not contain any cadmium Mercury Mercury is sometimes found in batteries relays and switches It damages the nervous system and is toxic in high doses The relevant TCO 99 requirement states that batteries may no...

Страница 37: ...rence to radio communications However there is no guarantee that interference will not occur in a particular installation If this equipment does cause harmful interference to radio or television reception which can be determined by turning the equipment off and on the user is encouraged to try to correct the interference by one or more of the following measures Reorient or relocate the receiving a...

Страница 38: ...Befestigung des Bildschirmgerätes derart erfolgen daß die Höhe der Bildschirmmitte über dem Boden zwischen 135 150 cm beträgt d Der Standfuß muß die Möglichkeit zur Neigung des Bildschirmgerätes besitzen max vorwärts 5 min nach hinten 5 e Der Standfuß muß die Möglichkeit zur Drehung des Bildschirmgerätes besitzen max 180 Der maximale Kraftaufwand dafür muß weniger als 100 N betragen f Der Standfuß...

Страница 39: ... All recycling information is placed in the SWICO s website http www swico ch Recycling Information für Kunden in der Schweiz Alle Informationen zum Thema Recycling finden Sie auf der Homepage des Brancheverbandes SWICO http www swico ch Renseignements de recyclage pour les clients en Suisse Vous trouvez tous les renseignements pour le sujet de recyclage sur la page WEB de I UNION DE BRAN CHE SWIC...

Отзывы: