background image

Chapter 2  Basic Adjustment / Setting

This product enables users to change the brightness according to personal preference or to suit the usage 
environment and reduce power consumption to conserve energy.
This chapter describes the basic functions that can be adjusted and set using the switches on the front of the 
monitor.
For advanced adjustment and setting procedures using the Setting menu, se

“Chapter 3 Advanced 

Adjustment / Setting” (page 22)

.

2-1.  Switch Operation Method

1. 

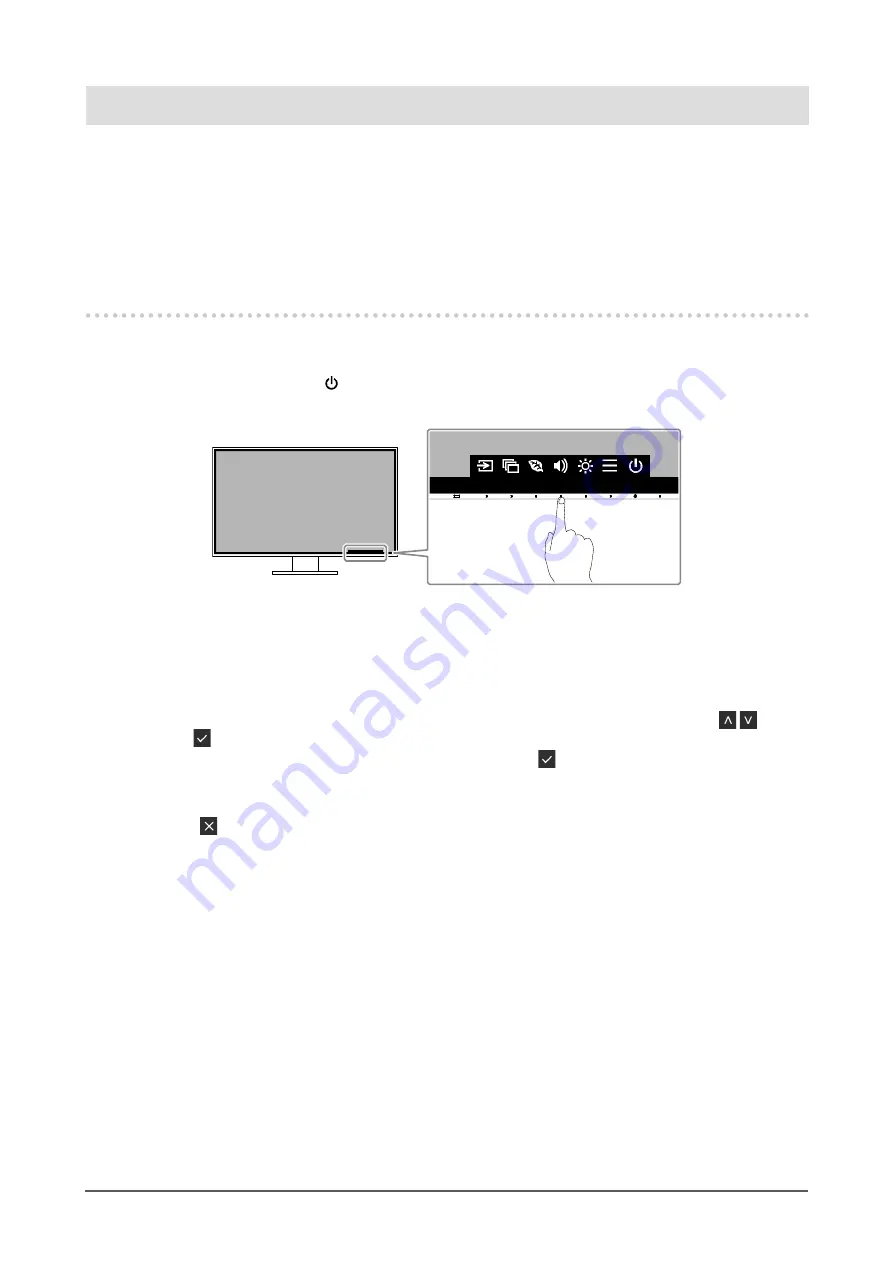
Displaying the operation guide

1.  Touch any switch (except  ).

The operation guide appears on the screen.

2. 

Adjusting / setting

1.  Touch a switch for adjustment / setting.

The Adjustment / Setting menu appears.
(A submenu may also be displayed. In this case, select the item for adjustment / setting using 

   and 

select  .)

2.  Perform adjustment / setting with the switches and select   to accept the changes.

3. 

Exiting

1.  Select   to exit the menu.

14

Chapter 2 Basic Adjustment / Setting

Содержание FlexScan EV3285

Страница 1: ...to familiarize yourself with safe and effective usage Refer to the Setup Guide for information on the installation connection of the monitor For the latest product information including the User s Ma...

Страница 2: ...ansmitted in any form or by any means electronic mechanical or otherwise without the prior written permission of EIZO Corporation EIZO Corporation is under no obligation to hold any submitted material...

Страница 3: ...nditions for the monitor display to stabilize Please wait 30 minutes or more after the monitor power has been turned on and then adjust the monitor Monitors should be set to a lower brightness to redu...

Страница 4: ...binet and LCD panel surface can be removed by moistening part of a soft cloth with water Attention Chemicals such as alcohol and antiseptic solution may cause gloss variation tarnishing and fading of...

Страница 5: ...pter 3 Advanced Adjustment Setting 22 3 1 Basic Operation of the Setting Menu 22 3 2 Setting Menu Functions 23 Color Adjustment 23 Signal Settings 26 Preference Settings 28 Language 29 Information 30...

Страница 6: ...xternal monitor of a notebook PC this product can supply power to the PC Video Signals Power Supply While displaying photos and motion pictures from a smartphone or tablet this product can charge the...

Страница 7: ...according to the white level of the input signal This function can reduce power consumption while maintaining the brightness specified by the input signal 1 Reference values Maximum power consumption...

Страница 8: ...ccording to the ambient brightness page 20 2 Operation switches Displays menus Operate the switches according to the operation guide page 22 3 Power switch Turns the power on or off 4 Power indicator...

Страница 9: ...connector 2 DisplayPort connector USB C connector USB upstream port 11 Lock button Use this button to remove the monitor from the stand 12 USB downstream port support for boost charging Connects to a...

Страница 10: ...0 900 60 000 1600 1200 60 000 1680 1050 59 954 1680 1050 59 883 1920 1200 59 885 1920 1200 59 950 2560 1440 59 951 1280 1600 59 910 3840 2160 59 997 2 3840 2160 29 981 2 1920 2160 59 988 2 1280 720 60...

Страница 11: ...59 910 3840 2160 59 997 3840 2160 29 981 1920 2160 59 988 2 1920 2160 29 952 1280 720 60 000 1280 720 59 940 1280 720 50 000 1920 1080 60 000 1920 1080 59 940 1920 1080 50 000 1920 1080 30 000 1920 1...

Страница 12: ...59 883 1920 1200 59 885 1920 1200 59 950 2560 1440 59 951 1280 1600 59 910 3840 2160 59 997 2 3840 2160 29 981 2 1920 2160 59 988 2 1280 720 60 000 1280 720 59 940 1920 1080 60 000 1920 1080 59 940 19...

Страница 13: ...tors including notebook PC screens are connected to the computer select Extend these displays in the Multiple displays menu and then click Apply Click Keep changes on the confirmation screen 5 Select...

Страница 14: ...edures using the Setting menu see Chapter 3 Advanced Adjustment Setting page 22 2 1 Switch Operation Method 1 Displaying the operation guide 1 Touch any switch except The operation guide appears on th...

Страница 15: ...ut signals windows can be displayed side by side dual screen or side by side and above and below quad screen Because multiple windows can be displayed on a single monitor the need for changing between...

Страница 16: ...playPort HDMI 1 HDMI 2 Select an input signal to be displayed on the lower left screen of the PbyP display quad screen Upper Right USB C DisplayPort HDMI 1 HDMI 2 Select an input signal to be displaye...

Страница 17: ...scription PinP Settings PinP Size Large Small Select the size of the small window PinP Position Upper Left Lower Left Upper Right Lower Right Select the position of the small window Input Large Window...

Страница 18: ...tones and contrast similar to that of paper to produce a printed paper effect It is suitable for displaying images from media such as books and documents Movie This mode displays moving images bright...

Страница 19: ...Eco Performance Level the higher the power saving level attained Power Reduction the reduction in the backlight s power consumption as a result of the adjusted brightness value CO2 Reduction converted...

Страница 20: ...he front of the monitor or color adjustment can be used to change the Brightness to suit your personal preference Moreover the manner in which the Auto EcoView function changes brightness also differs...

Страница 21: ...brightness is adjusted by changing the brightness of the backlight light source from the LCD back panel Setting Value 0 to 100 2 6 Adjusting Volume The volume of the speakers and headphones can be se...

Страница 22: ...elect The Setting menu appears 2 Adjusting setting 1 Select a menu to adjust set with and select The Sub menu appears 2 Select an item to adjust set with and select The Adjustment Setting menu appears...

Страница 23: ...ture Gamma Super Resolution Advanced Settings Overdrive Hue Saturation Gain Reset Attention It takes about 30 minutes for the monitor display to stabilize Please wait 30 minutes or more after power to...

Страница 24: ...of 500 K 9300 K is included Adjust the color temperature The color temperature is normally used to express the hue of White and or Black with a numerical value The value is expressed in degrees K Kel...

Страница 25: ...function may prevent some color gradations from being able to be displayed The minimum value 50 changes the screen to monochrome Gain 0 to 100 The brightness of each red green and blue color componen...

Страница 26: ...P display dual screen Upper Left The setting is applied to the upper left screen in PbyP display quad screen Lower Left The setting is applied to the lower left screen in PbyP display quad screen Uppe...

Страница 27: ...ut Color Format Auto YUV 4 2 2 1 YUV 4 4 4 1 YUV 2 RGB The color format of the input signal can be specified Try changing this setting if colors are not displayed correctly Note This setting is requir...

Страница 28: ...PC using a USB cable Power Save On Off The monitor can be set to enter power saving mode according to the state of the PC The monitor changes to power saving mode about 15 seconds after signal input...

Страница 29: ...display quad screen Lower Right Outputs the audio source from the lower right screen during PbyP display quad screen Large Window Outputs the audio source from the large window during PinP display Sma...

Страница 30: ...Monitor information product name serial number usage time resolution and input signal can be checked Example Single screen display Dual PbyP PinP display Quad PbyP display 30 Chapter 3 Advanced Adjust...

Страница 31: ...monitor 2 While touching the leftmost switch touch for more than 2 seconds to turn on the monitor The Administrator Settings menu appears 2 Setting 1 Select an item to set with and select The Adjustm...

Страница 32: ...ays images on the screen accordingly regardless of whether this function is set to On or Off just after the main power switch on the rear side of the monitor has been turned on When this function is s...

Страница 33: ...d Note If the HDMI signal that is being input is not displayed change this setting On Screen Logo On Off When the monitor is turned on the EIZO logo appears on the screen When this function is set to...

Страница 34: ...urn off the main power switch on the rear side of the monitor and then turn it on again 2 The message below appears This message appears when the signal is not input correctly even though the monitor...

Страница 35: ...image for extended periods of time Depending on the image an afterimage may appear even if it was displayed for a short period of time To remove such a phenomenon change the image or keep the power tu...

Страница 36: ...monitor Try using a different USB port on the PC Reboot the PC If the peripheral devices work correctly when they are directly connected to the PC contact your local EIZO representative Depending on...

Страница 37: ...this product when attaching the arm or stand Clearance between screw holes 100 mm 100 mm VESA mount of the arm or stand external dimensions 122 mm x 122 mm or less Plate thickness 2 6 mm Strong enoug...

Страница 38: ...e the VESA mounting screws supplied with this product when attaching the arm or stand Attaching the original stand 1 Lay the LCD monitor on a soft cloth spread over a stable and flat surface with the...

Страница 39: ...older 1 Slide the cable holder to the left and detach it from the stand Attaching the cable holder 1 Align the tabs of the cable holder with the attachment parts of the stand 2 Slide the cable holder...

Страница 40: ...cover A B 1 Align the tabs of A with the attachment parts of the stand A 2 Slide A downward to secure the tabs to the attachment parts of the stand 3 Check the tabs of B four locations indicated by a...

Страница 41: ...B and align B with A to fit in 5 Slide B downward and secure it to A Detaching the cable cover 1 Slide B upward and detach it from A 2 While holding down of A lightly slide A upward to detach it from...

Страница 42: ...SB C CC200SS USB C USB C USB C supplied supplied supplied Note You can select the input signal to display using the operation switch on the front of the monitor For details see 2 2 Switching Input Sig...

Страница 43: ...n you change the setting of Compatibility Mode page 32 remove any peripherals such as a USB memory device connected to the downstream port of the monitor When the main power of the monitor is off a de...

Страница 44: ...tion Mode 59 5 Hz to 60 5 Hz Max Dot Clock DisplayPort 540 MHz HDMI 600 MHz USB C DP Alt Mode 540 MHz USB Port Upstream port USB C x 1 Downstream port USB Type A x 2 The port supports boost charging S...

Страница 45: ...H D Net Weight Approx 11 kg Net Weight Without Stand Approx 7 6 kg Height Adjustment Range 195 mm Tilt 35 148 9 mm Tilt 0 Tilt Up 35 down 5 Swivel 344 Operating Environmental Requirements Temperature...

Страница 46: ...s are registered trademarks of Microsoft Corporation in the United States and other countries Adobe is a registered trademark of Adobe Systems Incorporated in the United States and other countries App...

Страница 47: ...o radio communications However there is no guarantee that interference will not occur in a particular installation If this equipment does cause harmful interference to radio or television reception wh...

Страница 48: ...Copyright 2018 EIZO Corporation All rights reserved 03V27413A1 UM EV3285 1st Edition July 2018...

Отзывы: