background image

9

English


Troubleshooting


No picture

If a problem still remains after applying the suggested remedies, contact your local dealer.

Problem

Possible cause and remedy

1.  No picture

•  Power indicator does not light.

•  Check whether the power cord is connected properly.
•  Press  .

•  Power indicator is lighting green.

•  Increase “Brightness”, “Contrast”, and/or “Gain” in the 

Adjustment menu.

•  Power indicator is lighting orange.

•  Switch the input signal. For details, refer to the User’s 

Manual on the CD-ROM.

•  Operate the mouse or keyboard.
•  Check whether the PC is turned on.

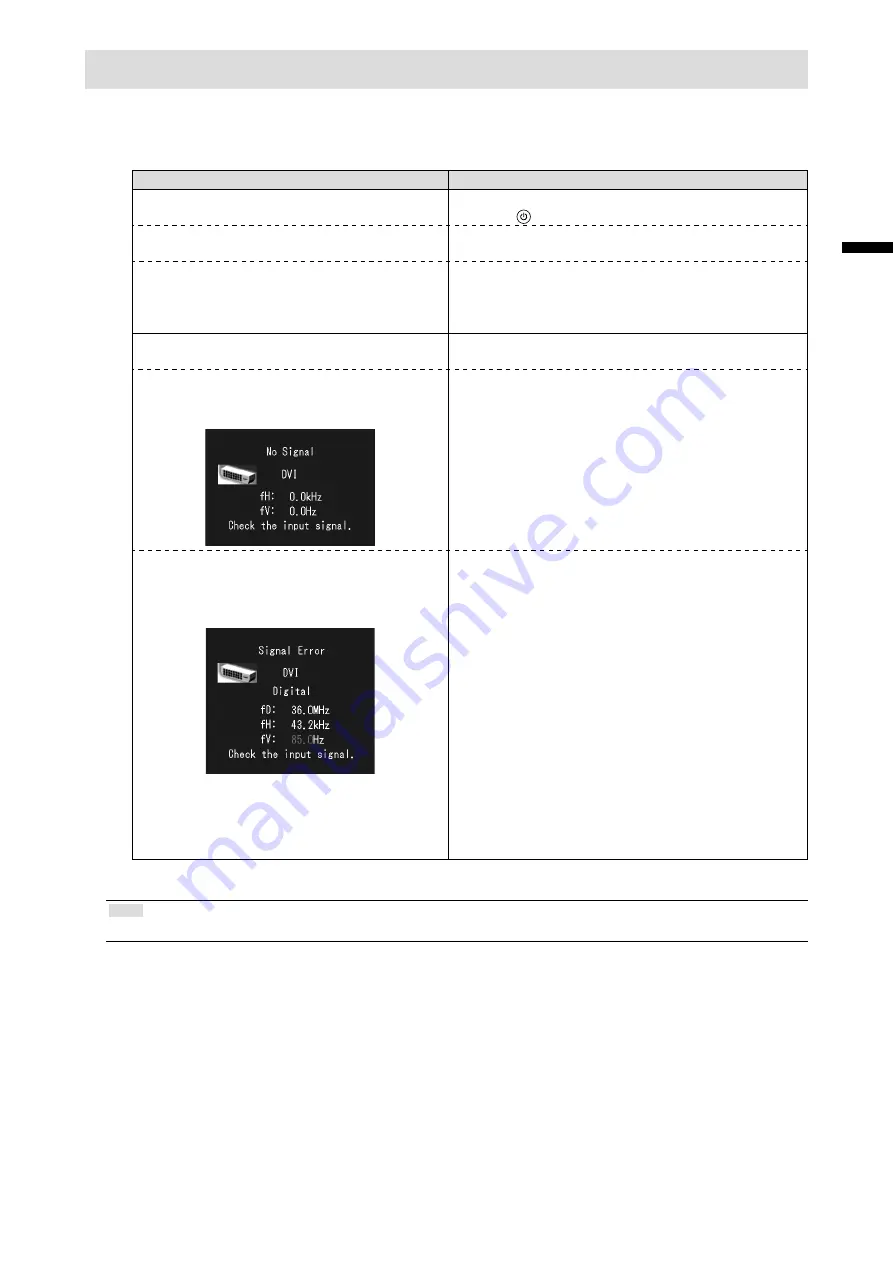
2.  The message below appears.

This message appears when the signal is not input 
correctly even when the monitor functions properly.

•  This message appears when no signal is 

input. 
Example:

•  The message shown left may appear, because some 

PCs do not output the signal soon after power-on.

•  Check whether the PC is turned on.
•  Check whether the signal cable is connected properly.
•  Switch the input signal. For details, refer to the User’s 

Manual on the CD-ROM.

•  The message shows that the input signal is out 

of the specified frequency range. (Such signal 
frequency is displayed in magenta.) 
Example:

fD:  Dot clock 

(Displayed only during digital signal input)

fH:  Horizontal scan frequency
fV:  Vertical scan frequency

•  Check whether the PC is configured to meet the 

resolution and vertical scan frequency requirements 
of the monitor. (“Compatible Resolutions” in the Setup 
Manual.)

•  Reboot the PC.
•  Select an appropriate display mode using the 

graphics board’s utility. Refer to the manual of the 
graphics board for details.

Note

•  If there is a problem with the image displayed or with the touch panel, refer to the Monitor User’s Manual (on the CD-ROM).

Содержание DuraVision FDU2101

Страница 1: ...ROM Setup Manual Important Please read this Setup Manual and the User s Manual stored on the CD ROM carefully to familiarize yourself with safe and effective usage Please retain this manual for futur...

Страница 2: ...VESA 85 Hz 1152 864 VESA 75 Hz 1280 960 VESA 60 Hz 1280 1024 VESA 85 Hz 1600 1200 VESA 60 Hz Digital Input Resolution Applicable Signals Vertical Scan Frequency Dot Clock 640 480 VGA 60 Hz 162 MHz Ma...

Страница 3: ...1 1 1 2 CD ROM PDF PDF Adobe Reader FDU2101T 1 EIZO EIZO 2 3 4 5...

Страница 4: ...2 EIZO EIZO EIZO 100VAC 100VAC 100VAC...

Страница 5: ...3...

Страница 6: ...MD C87 RS 232C FDU2101T EIZO LCD CD ROM FDU2101T 7 11 10 8 9 1 2 3 4 5 6 FDU2101T 1 Auto EcoView Auto EcoView 2 RETURN 3 UP DOWN 4 ENTER MENU 5 POWER 2 6 7 8 RS 232C FDU2101T RS 232C 9 D Sub15 DVI D...

Страница 7: ...1 0 04 9 0 35 1 0 04 18 0 71 18 0 71 407 9 16 1 326 12 8 0 5 0 02 95 2 3 75 4 9 0 19 469 18 5 427 16 8 1 0 04 27 1 06 1 0 04 35 1 38 35 1 38 35 1 38 35 1 38 35 1 38 13 4 0 53 90 3 54 1 0 04 90 3 54 1...

Страница 8: ...6 1 M6 8 8 1 3m 0 7m 434 17 1 0 3 0 01 469 18 5 223 8 8 484 19 1 0 3 0 01 503 19 8 407 9 16 1 95 2 3 75 19 5 0 77 8 6 5 0 26 0 05 0 002 M6 M6 mm...

Страница 9: ...7 1 D Sub DVI MD C87 DD200 2 1 2 1 2 P 9 FDU2101T...

Страница 10: ...8 FDU2101T 1 2 CD ROM CD ROM 3 RS 232C RS 232C RS 232C RS 232C 4 CD ROM 1 DMC DMC 2 3 COM 4 5 FDU2101T CD ROM...

Страница 11: ...9 EIZO 1 CD ROM 2 CD ROM fD fH fV CD ROM...

Страница 12: ...10 EIZO EIZO EIZO EIZO EIZO FAX 8 S N 12345678 OS http www eizo co jp registration...

Страница 13: ...onitor 1 Describes the application information of the monitor such as screen adjustments settings and specifications User s Manual of Touch Panel Driver 1 2 Describes the installation and use of the t...

Страница 14: ...tempt to service this product yourself as opening or removing covers may result in fire electric shock or equipment damage Keep small objects or liquids away from the unit Small objects accidentally f...

Страница 15: ...is poisonous if it enters the eyes or mouth If any part of the skin or body comes in direct contact with the panel please wash thoroughly If some physical symptoms result please consult your doctor Fl...

Страница 16: ...3 UP DOWN button Chooses and increases decreases adjustment settings for advanced adjustment using the Adjustment menu Pressing or directly allows you to adjust the brightness 4 ENTER MENU button Disp...

Страница 17: ...04 83 3 27 1 0 04 9 0 35 1 0 04 18 0 71 18 0 71 407 9 16 1 326 12 8 0 5 0 02 95 2 3 75 4 9 0 19 469 18 5 427 16 8 1 0 04 27 1 06 1 0 04 35 1 38 35 1 38 35 1 38 35 1 38 35 1 38 13 4 0 53 90 3 54 1 0 04...

Страница 18: ...compasses Otherwise an error may occur in the compasses The safe distance between the monitor and compass is shown below Standard compass 1 3 m or more Steering compass 0 7 m or more 434 17 1 0 3 0 01...

Страница 19: ...the power connector After the connection turn down the bracket and then fix the power plug 2 Connect the power cord to the power outlet Fall prevention bracket To power outlet Clamper Cable holder Aft...

Страница 20: ...32C cable to connect the monitor and the PC After connecting the cable tighten the screws of the connectors to secure the coupling Connectors on the monitor RS 232C port Connectors on the PC RS 232C p...

Страница 21: ...message shown left may appear because some PCs do not output the signal soon after power on Check whether the PC is turned on Check whether the signal cable is connected properly Switch the input sig...

Страница 22: ...10...

Страница 23: ...1 1 1 2 1 PDF Adobe Reader 2 FDU2101T EIZO Corporation EIZO Corporation EIZO Corporation EIZO...

Страница 24: ...2 100V 100V 100V...

Страница 25: ...3...

Страница 26: ...LCD Utility Disk CD ROM For Users of Touch Panel LCD Monitor FDU2101T 7 11 10 8 9 1 2 3 4 5 6 FDU2101T 1 Auto EcoView Auto EcoView 2 RETURN 3 UP DOWN 4 ENTER MENU 5 POWER 2 6 7 8 RS 232C FDU2101T RS...

Страница 27: ...1 0 04 9 0 35 1 0 04 18 0 71 18 0 71 407 9 16 1 326 12 8 0 5 0 02 95 2 3 75 4 9 0 19 469 18 5 427 16 8 1 0 04 27 1 06 1 0 04 35 1 38 35 1 38 35 1 38 35 1 38 35 1 38 13 4 0 53 90 3 54 1 0 04 90 3 54 1...

Страница 28: ...6 1 M6 8 8 1 3 m 0 7 m 434 17 1 0 3 0 01 469 18 5 223 8 8 484 19 1 0 3 0 01 503 19 8 407 9 16 1 95 2 3 75 19 5 0 77 8 6 5 0 26 0 05 0 002 M6 M6 mm...

Страница 29: ...7 1 PC D Sub DVI MD C87 FD C39 2 1 2 1 2 9 FDU2101T...

Страница 30: ...101T 1 2 CD ROM CD ROM 3 RS 232C RS 232C RS 232C RS 232C 4 CD ROM 1 Start All Program DMC DMC Touch Panel Configuration Properties 2 Add a serial device 3 Device COM port COM 4 Apply 5 Close FDU2101T...

Страница 31: ...9 1 CD ROM 2 CD ROM fD fH fV PC PC CD ROM...

Страница 32: ...opyright 2011 2018 EIZO Corporation All rights reserved 6th Edition June 2018 Printed in Japan 00N0L706F1 SUM FDU2101 3 8 5B Helmut Grashoff Strasse 18 41179 M nchengladbach Germany 153 Shimokashiwano...

Отзывы: