background image

9

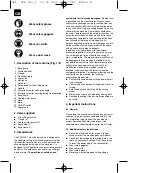
Replace immediately.

Never use segmented cutting wheels.

Caution!

The cutting wheel runs on after the

machine is switched off!

Never apply side pressure to the diamond cutting
wheel in order to bring it to a halt.

Caution!

The diamond cutting wheel must be

cooled with water at all times.

Always pull out the power plug before changing
the cutting wheel.

Use only suitable diamond cutting wheels.

Never leave the machine unattended in rooms
with children.

Always pull out the power plug before examining
the electric motor compartment system.

5. Technical data

Motor rating

800 W

Motor speed

2950 rpm

A.c. motor

230 V ~ 50 Hz

Insulation material class

Class B

Insulation

IP54

Cut length

520 mm

Jolly length

520 mm

Cut height 90°

max. 30 mm

Cut height 45°

max.  25 mm

Cutting table:

Dimensions

790 x 395 mm

Diamond cutting wheel

ø 200 x ø 25.4

Noise emission levels

The noise emitted by this saw is measured in
accordance with EN ISO 3744; EN ISO 11201 
The noise at the workplace may exceed 85 db
(A). The user will require noise protection
measures if this is the case. (Wear ear-muffs!)

With-load No-Load
operation operation

Sound pressure level 

72.2 dB(A) 

60.6 dB(A)

Sound power level 

85.2 dB(A) 

73.6 dB(A)

6. Before using for the first time

The machine must be set up so that it stands
firmly, i.e. it must be securely screwed to a work
bench, the base frame supplied in delivery, or
similar.

All covers and safety devices must be correctly
attached before the machine is used for the first
time.

The cutting wheel must rotate smoothly.

Check that the voltage on the rating plate is the
same as your supply voltage before you connect
the machine to the power supply.

7. Assembly and operation

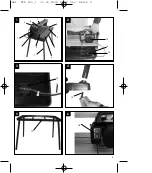
7.1 Assembly of the base frame and cooling
water pump (Fig. 2-4)

Fasten the feet (18) to the base frame (12) with
the screws (19).

Turn the base frame upright (see Fig. 5).

Place the trough (3) in the base frame (12).

Place the cooling water pump (13) in the trough
(3).

Fill with water until the pump (13) is full.

Place the complete tile cutting machine in the
trough (3) (see Fig. 2).

Unscrew the star grip screw (11) (for securing
during transportation!).

7.2 ON/OFF switch (Fig. 6)

To switch on, press the “1” on the ON/OFF
switch (16).

Before you begin cutting, wait until the cutting
wheel has reached maximum speed and the
cooling water pump (13) has started supplying
the cutting wheel with water.

To switch off, press the “0” on the switch (16).

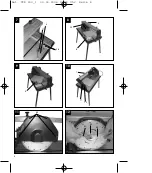
7.3 90° Cutting (Fig. 7/8)

Loosen the star grip screw (27).

Set the angle stop (5) to 90° and retighten the
star grip screw (27).

Retighten the screws (28) to fasten the angle
stop (5).

Move the machine head (29) to the far end with
the handle (9).

Position the tile against the rail fence (6) on the
angle stop (5).

Switch on the tile cutting machine.

Caution: 

Always wait until the cooling water has

reached the cutting wheel (2) first.

Move the machine head (29) slowly and
smoothly forward through the tile with the handle
(9).

Switch off the tile cutting machine after
completion of cutting.

7.4 45° Diagonal cut (Fig. 9)

Set the angle stop (5) to 45°.

Cut as described in 7.3.

GB

Anl. TPR 200_1  30.03.2004 13:53 Uhr  Seite 9

Содержание TPR 200/1

Страница 1: ...rmaskin K ytt ohje keraamisten laattojen leikkauskone Istruzioni per l uso della Taglierina per marmette Betjeningsvejledning Flise klippemaskine Naputak za uporabu Reza kerami kih plo a N vod k pou...

Страница 2: ...paginas de 2 a 3 Var v nlig ppna sidorna 2 3 Desdobre as p ginas 2 3 Aprire le pagine dalle 2 alla 3 Fold side 2 3 ud Molimo da ra irite stranice 2 3 Prosimo da strani 2 3 razgrnete Pros m nalistujte...

Страница 3: ...1 5 4 6 2 3 8 7 6 5 4 3 2 1 11 10 15 3 13 13 14 19 12 16 9 3 Anl TPR 200_1 30 03 2004 13 53 Uhr Seite 3...

Страница 4: ...7 10 8 5 6 29 9 28 27 9 17 10 7 4 11 12 5 30 31 35 34 Anl TPR 200_1 30 03 2004 13 53 Uhr Seite 4...

Страница 5: ...ie der Montageanleitung und der Betriebshinweise in der Bedienungsanleitung Personen die die Maschine bedienen und warten m ssen mit dieser vertraut und ber m gliche Gefahren unterrichtet sein Dar ber...

Страница 6: ...r erforderlich Geh rschutz tragen Betrieb Leerlauf Schalldruckpegel LPA 72 2 dB A 60 6 dB A Schalleistungspegel LWA 85 2 dB A 73 6 dB A 6 Vor Inbetriebnahme Die Maschine muss standsicher aufgestellt w...

Страница 7: ...nd S geblattschutz 8 abnehmen Schl ssel 31 an der Motorwelle ansetzen und halten Mit dem Schl ssel 34 die Flanschmutter in Laufrichtung der Trennscheibe 2 l sen Achtung Linksgewinde Au enflansche 35 u...

Страница 8: ...ntenance work on the machine must be acquainted with the above and be aware of all potential dangers In addition strict compliance with the accident prevention regulations in force in your area as wel...

Страница 9: ...ore the machine is used for the first time The cutting wheel must rotate smoothly Check that the voltage on the rating plate is the same as your supply voltage before you connect the machine to the po...

Страница 10: ...heel by following the above procedures in reverse and then tighten Caution Pay attention to the direction of rotation of the cutting wheel Mount the safety hood 8 for the blade again 8 Maintenance Cle...

Страница 11: ...ropri es pour la machine Il est interdit d utiliser toutes sortes de lames de scie Le respect des consignes de s curit et des instructions de montage ainsi que des informations de service dans le mode...

Страница 12: ...rant alternatif 230 V 50 Hz Classe d isolation Classe B Type de protection IP 54 Longueur de coupe 520 mm Longueur Jolly 520 mm Hauteur de coupe 90 max 30 mm Hauteur de coupe 45 max 25 mm Tablette de...

Страница 13: ...a coupe comme d crit au point 7 3 7 6 Changement de la meule de tron onnage diamant e fig 11 12 Retirez la fiche de la prise de courant Desserrez les quattre vis 30 et retirez le capot de protection d...

Страница 14: ...van de montage en bedrijfsvoorschriften van deze gebruiksaanwijzing hoort eveneens tot het doelmatig gebruik Personen die de machine bedienen en onderhouden moeten met haar vertrouwd en op de hoogte z...

Страница 15: ...dsemissiewaarden Het geluid van deze snijmachine wordt gemeten volgens EN ISO 3744 EN ISO 11201 aanhangsel Het geluid kan aan de werkplaats 85 dB A overschrijden In dit geval zijn geluidswerende maatr...

Страница 16: ...oals beschreven onder 7 3 7 6 Verwisselen van diamantsnijschijf fig 11 12 Netstekker trekken De 4 schroeven 30 losdraaien en beschermkap 8 van het zaagblad verwijderen Sleutel 31 op de motoras zetten...

Страница 17: ...tario es tambi n imprescindible observar las normas de seguridad as como las instrucciones de montaje y de servicio en este manual Las personas que utilicen y mantengan el aparato deben estar familiar...

Страница 18: ...sco de tronzar diamantado 200 x 25 4 Valores de emisi n de ruido El ruido producido por esta sierra ha sido medido seg n EN ISO 3744 EN ISO 11201 El ruido en el lugar de trabajo puede exceder los 85db...

Страница 19: ...lice el corte tal y como se describe en el punto 7 3 7 6 Cambiar la muela de tronzar adiamantada Fig 11 12 Desenchufe el cable de la red Suelte los 4 tornillos 30 y retire la cubierta de protecci n de...

Страница 20: ...nna till maskinen samt vara informerade om eventuella faror Dessutom m ste de g llande arbetarskydds f reskrifterna f ljas exakt vriga allm nna regler inom de arbetsmedicinska och s kerhetstekniska o...

Страница 21: ...dB A 60 6 dB A Ljudeffektsniv LWA 85 2 dB A 73 6 dB A 6 F re driftstart Se till att maskinen st r stabilt dvs fastskruvad p en arbetsb nk det seriem ssiga underbordet eller liknande Innan maskinen tas...

Страница 22: ...tern i delningsklingans 2 rotationsriktning med hj lp av nyckeln 34 Obs V nsterg nga Ta av ytterfl nsen 35 och delningsklingan 2 Reng r monteringsfl nsen noggrant innan du monterar den nya delningskli...

Страница 23: ...discos de corte pr prios para a m quina N o permitida a utiliza o de discos de serra Uma utiliza o adequada passa por respeitar as instru es de seguran a assim como as instru es de montagem e as indi...

Страница 24: ...e 520 mm Comprimento da meia esquadria 520 mm Altura de corte 90 m x 30 mm Altura de corte 45 m x 25 mm Mesa de corte Dimens es 790 mm x 395 mm Disco de corte de diamante 200 x 25 4 Valores de emiss o...

Страница 25: ...unho estrelado 10 Incline a l mina 7 para a esquerda a 45 da escala dos ngulos 17 Volte a apertar o parafuso com punho estrelado 10 Execute o corte tal como descrito no ponto 7 3 7 6 Substituir o disc...

Страница 26: ...golamentare anche l osservanza delle avvertenze sulla sicurezza nonch le istruzioni per il montaggio e le avvertenze sul funzionamento integrate nelle istruzioni d uso Le persone manovranti e manutenz...

Страница 27: ...25 4 Valori dell emissione del rumore Il rumore di questa sega viene rilevato a norma EN ISO 3744 EN ISO 11201 appendice Il rumore sul posto di lavoro pu superare 85 dB A In tal caso sono necessarie...

Страница 28: ...17 Serrare di nuovo la vite con la manopola a crociera 10 Eseguire il taglio come spiegato al punto 7 3 7 6 Sostituire il disco diamantato Fig 11 12 Staccare la spina dalla presa di corrente Allentar...

Страница 29: ...ejledningen m h t samlingen og anvendelsen af saven i instruktionsbogen overholdes De personer der arbejder med saven og vedligeholder den skal kende den og v re instrueret om den mulige risiko ved at...

Страница 30: ...saven m les if lge EN ISO 3744 EN ISO 11201 till g Saven kan frembringe en st j p over 85 dB A under arbejdet I s fald skal der s rges for st jafsk rmning for brugeren Brug h rev rn Drift Tomgang Lydt...

Страница 31: ...2 Tr k netstikket ud L sn de 4 skruer 30 og tag savbladsv rnet 8 af S t n glen 31 p motorakslen og hold den Ved hj lp af n glen 34 l snes flangem trikken i kapskivens 2 l beretning Vigtigt venstregevi...

Страница 32: ...aputak za monta u i upute za rad u naputku za uporabu Osobe koje rade na stroju i koje ga odr avaju moraju biti upoznati s njim i pou eni o mogu im opasnostima Osim toga va e i propisi za spre avanje...

Страница 33: ...opreme ili sl Prije pu tanja u funkciji svi poklopci i sigurnosne naprave moraju biti uredno montirani Rezna plo a se mora slobodno okretati Prije priklju ivanja stroja uvjerite se da su podaci na ozn...

Страница 34: ...ce 35 i reznu plo u 2 Prije monta e nove rezne plo e dobro o istite priklju nu prirubnicu Ugradite novu reznu plo u u obratnom redoslijedu i zategnite je Pa nja Pazite na smjer okretanja rezne plo e M...

Страница 35: ...yn jako t mont n ho n vodu a provozn ch pokyn v n vodu k pou it Osoby kter stroj obsluhuj a udr uj mus b t se strojem obezn meny a mus b t informov ny o mo n ch nebezpe ch Krom toho mus b t p esn dodr...

Страница 36: ...uveden m do provozu mus b t v echny kryty a bezpe nostn za zen spr vn namontov ny D lic kotou mus b t voln oto n P ed p ipojen m stroje se ujist te zda daje na typov m t tku souhlas s daji s t 7 Mont...

Страница 37: ...u a dr et Kl em 34 matku p ruby povolit ve sm ru d lic ho kotou e 2 Pozor lev z vit Vn j p ruby 35 a d lic kotou 2 sejmout Up nac p rubu p ed mont nov ho d lic ho kotou e pe liv vy istit Nov d lic kot...

Страница 38: ...tudi spo tovanje varnostnih napotkov pri delu z ago kot tudi navodil za monta o in napotkov za delo z ago ki so navedeni v navodilih za uporabo Osebe ki delajo s strojem in ga vzdr ujejo morajo pozna...

Страница 39: ...A V tak nem primeru mora uporabnik izvajati ukrepe za protihrupno za ito No enje za ite za u esa Obratovanje Prosti tek Nivo hrupa LPA 72 2 DB A 60 6 dB A Nivo hrupnosti LWA 85 2 dB A 73 6 dB A 6 Pred...

Страница 40: ...lika 11 12 Potegnite vtika iz elektri nega omre ja Odvijte 4 vijake 30 in snemite za ito za rezalno plo o 8 Namestite klju 31 na motorsko gred in ga dr ite S klju em 34 odvijajte prirobni no matico v...

Страница 41: ...ot e ktor s vhodn pre tento stroj Pou vanie p lov ch kot ov je zak zan S as ou spr vneho elov ho pou itia pr stroja je taktie dodr iavanie bezpe nostn ch predpisov ako aj n vodu na mont a pokyny k pre...

Страница 42: ...mm rezn st l rozmery 790 mm x 395 mm diamantov rozbrusovac kot 200 x 25 4 Hodnoty emisie hluku Zvuk tohto stroja je meran pod a DIN EN ISO 3744 EN ISO 11201 Hluk na pracovisku m e pri pr ci presiahnu...

Страница 43: ...to ni tak ako to je vysvetlen v bode 7 3 7 6 V mena diamantov ho rozbrusovacieho kot a obr 11 12 Vytiahnu k bel zo siete Uvo ni tyri skrutky 30 a odobra ochranu rozbrusovacieho kot a 8 Nasadi k 31 na...

Страница 44: ...iztons gi utas t sok valamint a haszn lati utas t sban lev sszeszerel si s zemeltet si utas t sok figyelembe v tele is A g pet kezel s karbantart szem lyeknek a g p haszn lat ban j rtasnak s a lehets...

Страница 45: ...O 11201 szerint m rik A munkahelyen a zajkifejt s t ll pheti a 85 db t A Ebben az esetben a haszn l r sz re zajv d int zked sekre van sz ks g Zajcs kkent f lv d t hordani zemeltet s resmenet Hangnyom...

Страница 46: ...f r szlapv d t 8 R rakni a kulcsot 31 a motortengelyre s tartani A kulccsal 34 a sz tv laszt t rcsa 2 fut si ir ny ba megereszteni a karimaany t Figyelem balmenet Levenni a k ls karim t 35 s a sz tv l...

Страница 47: ...eznaczeniem stosowania nale y r wnie przestrzeganie wskaz wek dotycz cych bezpiecze stwa oraz instrukcji monta u i wskaz wek eksploatacyjnych w instrukcji obs ugi Osoby kt re obs uguj i konserwuj urz...

Страница 48: ...itowany przez opisywan maszyn zosta zmierzony wg normy DIN EN ISO 3744 EN ISO 11201 Ha as w miejscu pracy mo e przekroczy 85 dB A W tym wypadku konieczne jest stosowanie przez u ytkownika rodk w wyt u...

Страница 49: ...yci gn wtyczk kabla zasilaj cego z gniazdka Odkr ci cztery ruby 30 i zdj os on ciernicy tn cej 8 Za o y klucz 31 na wa ek silnika i przytrzyma Kluczem 34 odkr ci nakr tk ko nierzow w kierunku obrot w...

Страница 50: ...1 1 2 1 2 3 4 5 6 7 8 9 10 11 12 13 14 15 16 17 2 3 13 5 1 3 4 4 1 GR 50 Anl TPR 200_1 30 03 2004 13 53 Uhr Seite 50...

Страница 51: ...lly 520 mm 90 max 30 mm 45 max 25 mm 790 mm x 395 mm 200 x 25 4 DIN EN ISO 3744 EN ISO 11201 85 db A LPA 72 2 dB A 60 6 dB A LWA 85 2 dB A 73 6 dB A 6 7 1 2 4 18 19 12 5 3 12 13 3 13 2 o 11 7 2 6 1 13...

Страница 52: ...7 3 90 7 8 27 5 90 27 o 28 5 29 9 6 5 2 29 9 7 4 45 9 5 45 7 3 7 5 45 Jolly 10 10 7 45 17 10 7 3 7 6 11 12 30 8 31 34 2 35 2 8 8 3 13 2 9 GR 52 Anl TPR 200_1 30 03 2004 13 53 Uhr Seite 52...

Страница 53: ...1 005 06 Anschlagschiene 43 012 50 01 006 07 F hrungsschiene 43 012 50 01 007 08 Trennscheibenschutz 43 012 50 01 008 09 Handgriff 43 012 50 01 009 10 Sterngriffschraube Winkeleinstellung 43 012 50 01...

Страница 54: ...en en normen El abajo firmante declara en el nombre de la empresa la conformidad del producto con las directrices y normas siguientes O signat rio declara em nome da firma a conformidade do produto co...

Страница 55: ...dell apparecchio da parte del cliente Le condizioni per la validit della garanzia sono una corretta manutenzione secondo le istruzioni per l uso cos come un utilizzo appropriato del nostro apparecchi...

Страница 56: ...rgado de su servicio regional de asistencia t cnica o dir jase a la direcci n de servicio t cnico indicada m s abajo CERTIFCADO DE GARANTIA Damos 2 anos de garantia para o aparelho referido no manual...

Страница 57: ...ljande underlag f r produkter ven utdrag r endast till tet med uttryckligt tillst nd fr n ISC GmbH Tuotteiden dokumentaatioiden ja muiden mukaanliitettyjen asiakirjojen vain osittainenkin kopiointi t...

Страница 58: ...Anl TPR 200_1 30 03 2004 13 53 Uhr Seite 58...

Страница 59: ...siin pid tet n Der tages forbehold f r tekniske ndringer Tekniske endringer forbeholdes Con riserva di apportare modifiche tecniche Technikai v ltoz sok jog t fenntartva Technick zm ny vyhrazeny Tehni...

Страница 60: ...Istanbul Tel 0216 4594865 Fax 0216 4429325 Vobler s r o Zupna 4 SK 95301 Zlate Moravce Tel 37 6426255 Fax 37 26256 1 Turkestan Investitions Baugesellschaft Christofor Stefanidi Belinskij 102 KZ 486000...

Отзывы: