background image

1

Software Installation Guide

Installing the software

To install the software into the computer with windows 2000, windows XP or 

windows NT, you should logon as administrator. Before installation, make sure that 

the other applications are closed, otherwise installation cannot be made properly.

Network Viewer & Capture 3 installation

1

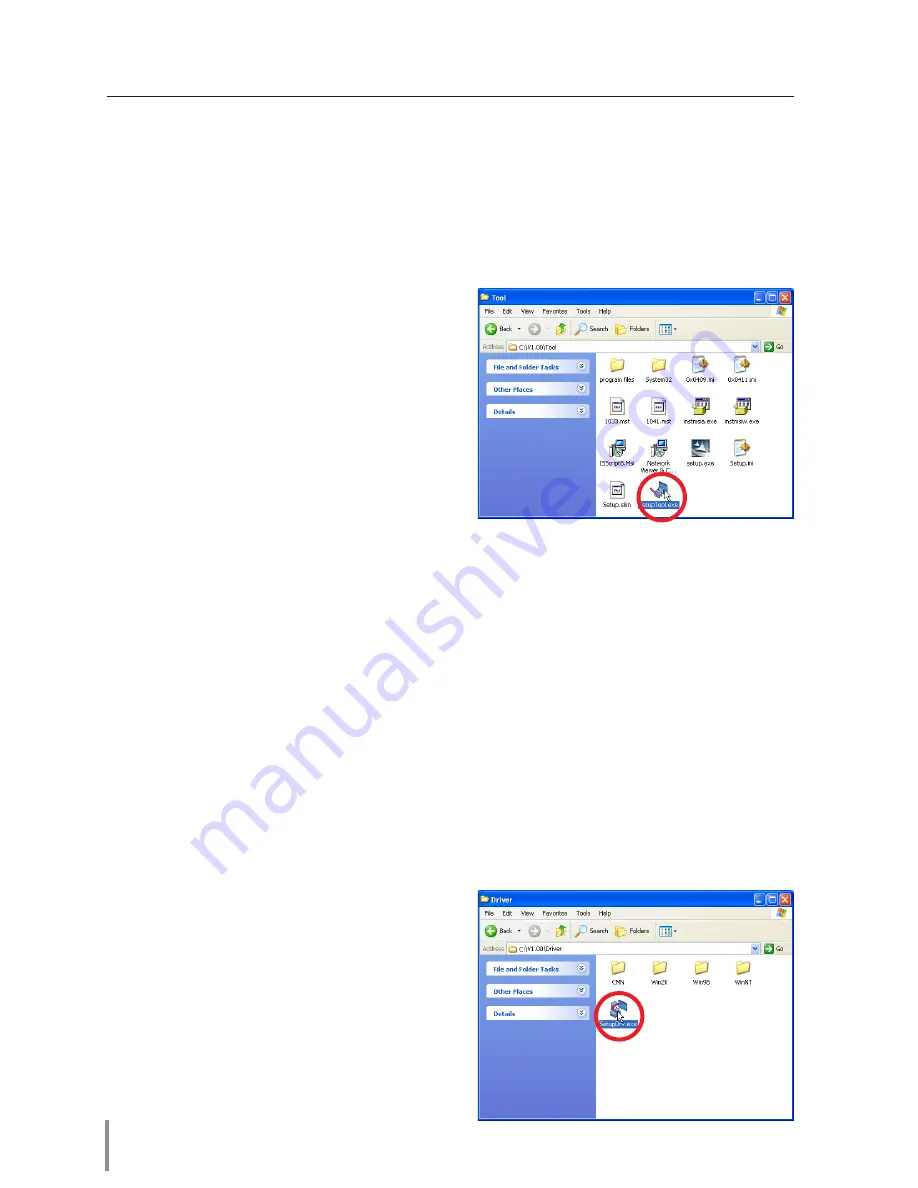
  Set the supplied Network Viewer & Capture 

3 CD-ROM into the CD-ROM drive of your 
computer. Double click 

SetupTool.exe

 icon 

in the "Tool" folder in the CD-ROM.

2


Select  "English  [United  States]"  from  the 
pull-down  menu  on  the  "Choose  Setup 
Language" window and click 

oK

 button to 

start installing and then follow the installa-
tion wizards.

Installed software

The following 3 software are installed on your computer.

 Network Capture 3:

Capture the displayed image of the computer and serve it to the projector via the network.
This software is registered into "startup folder" of the computer and the capture icon 
stays on the task bar after booting the computer.

 Network Viewer 3 (File Converter 1):

Converts to the JPEG data format which can be projected with the projector from the 
JPEG, bitmap and Power Point files.

 Network Viewer 3 (Program Editor) :

This is a tool to make the program which has a function to specify and order the pro-
jecting JPEG image data stored in the file servers.

File Converter 2 Installation

1

  Set the supplied Network Viewer & Capture 

3 CD-ROM into the CD-ROM drive of your 
computer. Double click 

SetupDrv.exe

 icon 

in the "Driver" folder in the CD-ROM.

2

  Select "English [United States]" from the 

pull-down menu on the language selection 
window and then click 

Install

 button to 

start installing.

Содержание PJNET-30

Страница 1: ...at To read the owner s manual set the docu ment CD ROM onto your computer and follow the guide on the screen To read the owner s manual you need the Adobe Reader Adobe Acrobat Reader version 6 0 or later software in your computer The Adobe Reader can be obtained from the Adobe website http www adobe com ENGLISH PjNET 30 OWNER S MANUAL LINK ACT ...

Страница 2: ...d on the user is encouraged to try to correct the interference by one or more of the following measures Reorient or relocate the receiving antenna Increase the separation between the equipment and receiver Connect the equipment into an outlet on a circuit different from that to which the receiver is connected Consult the dealer or an experienced radio TV technician for help Use of shielded cable i...

Страница 3: ...fety inspections periodically In this case you must pay attention to the change of environment in which you installed the projector It may cause fire or an accident depending on the change of environment The CE Mark is a Directive conformity mark of the European Community EC NOTES ON Lithium Battery CALIFORNIA USA ONLY This product uses a Lithium Battery which contains Perchlorate Material special...

Страница 4: ...nt CD ROM 1 piece Pj toNetDirectorOwner sManual PJNetworkManagerOwner smanual How to read the Owner s Manual on CD ROM The owner s manuals of PJ Net Organizer are included on the supplied document CD ROM as the PDF file format To read the owner s manual set the document CD ROM onto your computer and follow the guide on the screen To read the owner s manual you need the Adobe Reader Adobe Acrobat R...

Страница 5: ...em you use Plug Ins Adobe Flash Player version 6 0 79 0 6 0r79 or later Internet Mailer Microsoft Outlook Microsoft Outlook Express Netscape Mail Required the internet e mail application software to receive an e mail alert sent from this product If you do not use the function E mail Alert this application is not required FTP Service FTP server Windows 2000 Professional or Windows XP Professional T...

Страница 6: ...function is set ON in the projector menu LAN port Connecting the LAN cable Connector plug Connecting to the terminal on the pro jector Mounting screws Mount by using a coin etc LINK indicator This lights up red when the network unit is connected to the network correctly ACT indicator This turns on and off with green when sending or receiving of data Top View Bottom View ...

Страница 7: ...pare the Hub 10Base T or 100Base TX to distrib ute the network cable if required 1 Disconnect the AC plug from the projector 2 Connect the UTP straight cable to the LAN port on the network unit 3 Connect the UTP straight cable to the hub AC cord must be disconnected when mounting or removing this product otherwise it may dam age the product Use the UTP cross cable when you connect the computer and...

Страница 8: ...ase check item Mounting p 7 Configure the network Before performing the network configuration prepare network address numbers IP Address Subnet Mask Default Gateway DNS assigned to the projector Ask your network administrator for the network address For example the case where the following network address is set up is explained IP Address 192 168 1 201 Subnet Mask 255 255 255 0 Default Gateway 192...

Страница 9: ...d press SELECT button The network unit starts re booting and displays message Please wait on the screen until the re booting is complete Do not disconnect the AC cord during this period After that the network setting pallet will disappear on the screen Completing of installation Now the installation is complete The IP address of this projector is set to 192 168 1 201 1 In the network environments ...

Страница 10: ...display displays graphical menus and settings This mode is recommended for standard use LIGHT MODE Displays with 200 x 300 dots This mode is optimized for use of the handheld computer PDA etc It is also convenient if the network traf fic is heavy This mode has some limitations on the network viewer and multi control functions If the setting page has set the password the authentication window will ...

Страница 11: ...t have the Adobe Flash Player version 6 or later follow to the message on the control page to install the Adobe Flash Player For further product information or installing see the Adobe website http www adobe com Setting page Displays the control and setting items according to the selected menu Returns to Display Mode selection page p 10 Main menu For selection of control and setting items of the p...

Страница 12: ...talled on your computer Network Capture 3 Capture the displayed image of the computer and serve it to the projector via the network This software is registered into startup folder of the computer and the capture icon stays on the task bar after booting the computer Network Viewer 3 File Converter 1 Converts to the JPEG data format which can be projected with the projector from the JPEG bitmap and ...

Страница 13: ...lder in the CD ROM 2 Select English United States from the pull down menu on the Choose Setup Language window and click OK button to start installing and then follow the installation wizards What s PJ Network Manager PJ Network Manager is a SNMP manager software for the network equipment which supports the private MIB Management Information Base By installing the PJ Network Manager to the computer...

Страница 14: ...n Magnolia Plaza 2109 Shanghai 200023 China Tel 86 21 5396 0088 Fax 86 21 5396 0318 E Mail info eiki china com Eastern Europe EIKI CZECH spol s r o Umelecká 15 170 00 Praha 7 Czech Republic Tel 42 02 20570024 42 02 20571413 Fax 42 02 20571411 E Mail easterneurope eiki de Japan Worldwide EIKI Industrial Company Limited 4 12 Banzai Cho Kita Ku Osaka 530 0028 Japan Tel 81 6 6311 9479 Fax 81 6 6311 84...

Отзывы: