72
Appendix
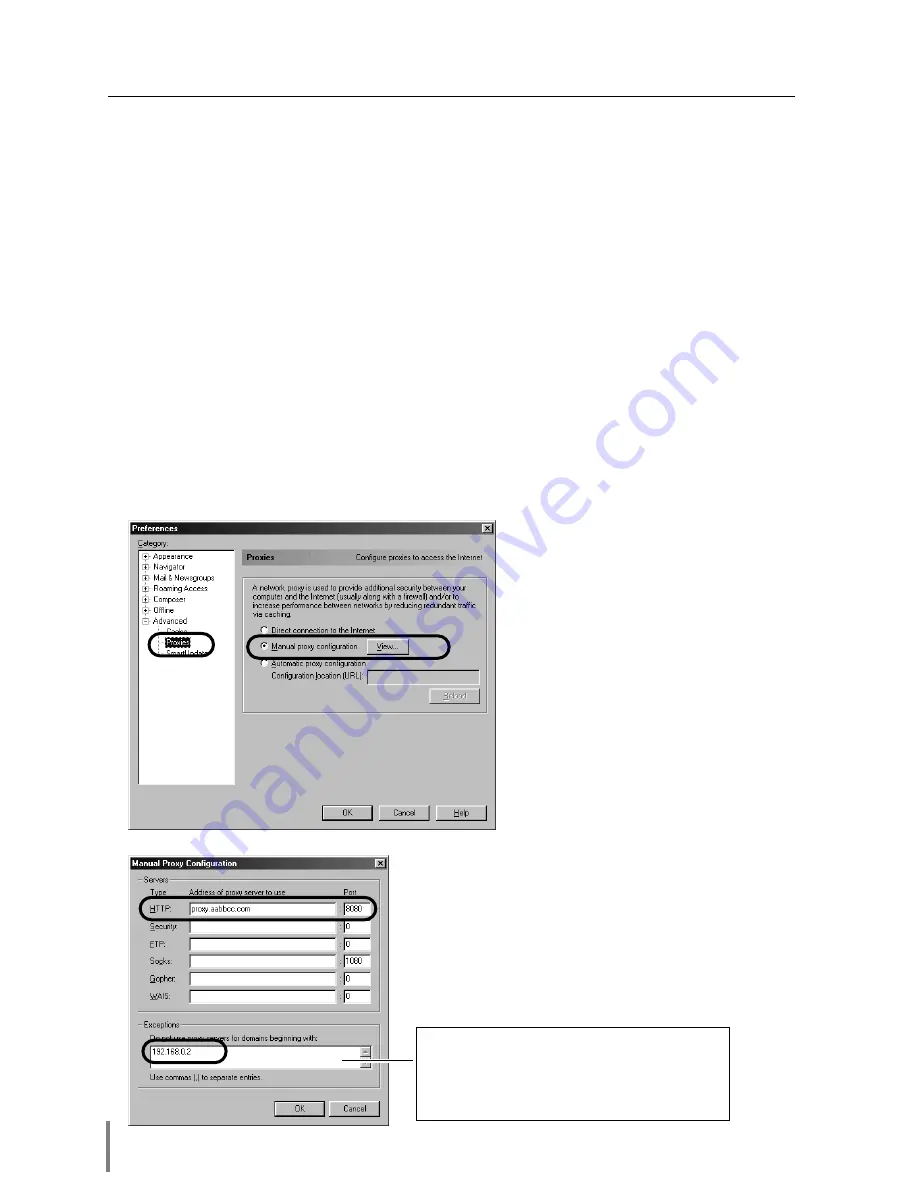
Proxy setting
Select the
Preference
menu from the
Edit
menu on the web browser and then select
the item
Advanced/Proxies
in the
Category
column. Properly set up your web brows-
er's the proxy server settings according to the local area network environment to
which the projector is connected.
- Using proxy server
When you use an external internet connection from the local area network, select the
item
Manual proxy configuration
and press the
View
button. The proxy setting win-
dow will appear. Enter the proxy server address and port number correctly on the
HTTP
item in the proxy settings window. For further instruction please consult your
network administrator.
- Not using proxy server
Select the item
Direct connection to the Internet
in the proxy setting window.
If you connect the projector to the computer directly with UTP cross cable, this must
be selected.
To designate proxy settings that will not use
the proxy server when accessing the projec-
tor installed in the local area network, enter
the IP address or domain name here.
Содержание PjNET-15
Страница 9: ...Installation 1 9 Network Unit OWNER S MANUAL ENGLISH...
Страница 25: ...Basic Setting and Operation 25 Network Unit OWNER S MANUAL ENGLISH 2...
Страница 35: ...Controlling the Projector 35 Network Unit OWNER S MANUAL ENGLISH 3...
Страница 50: ...50 Controlling the Projector...
Страница 51: ...Controlling the Multi Projectors 51 Network Unit OWNER S MANUAL ENGLISH 4...
Страница 57: ...Use of Serial Port 57 Network Unit OWNER S MANUAL ENGLISH 5...
Страница 65: ...Appendix A 65 Network Unit OWNER S MANUAL ENGLISH 6 Connection examples Web browser setting Technical data...
Страница 80: ...80 Appendix...
Страница 81: ...Appendix B FAQ 81 Network Unit OWNER S MANUAL ENGLISH...
Страница 89: ...89 Network Unit OWNER S MANUAL Appendix ENGLISH...


