background image

Pj-to NetDirector

OWNER'S MANUAL [X71 Series]

ENGLISH

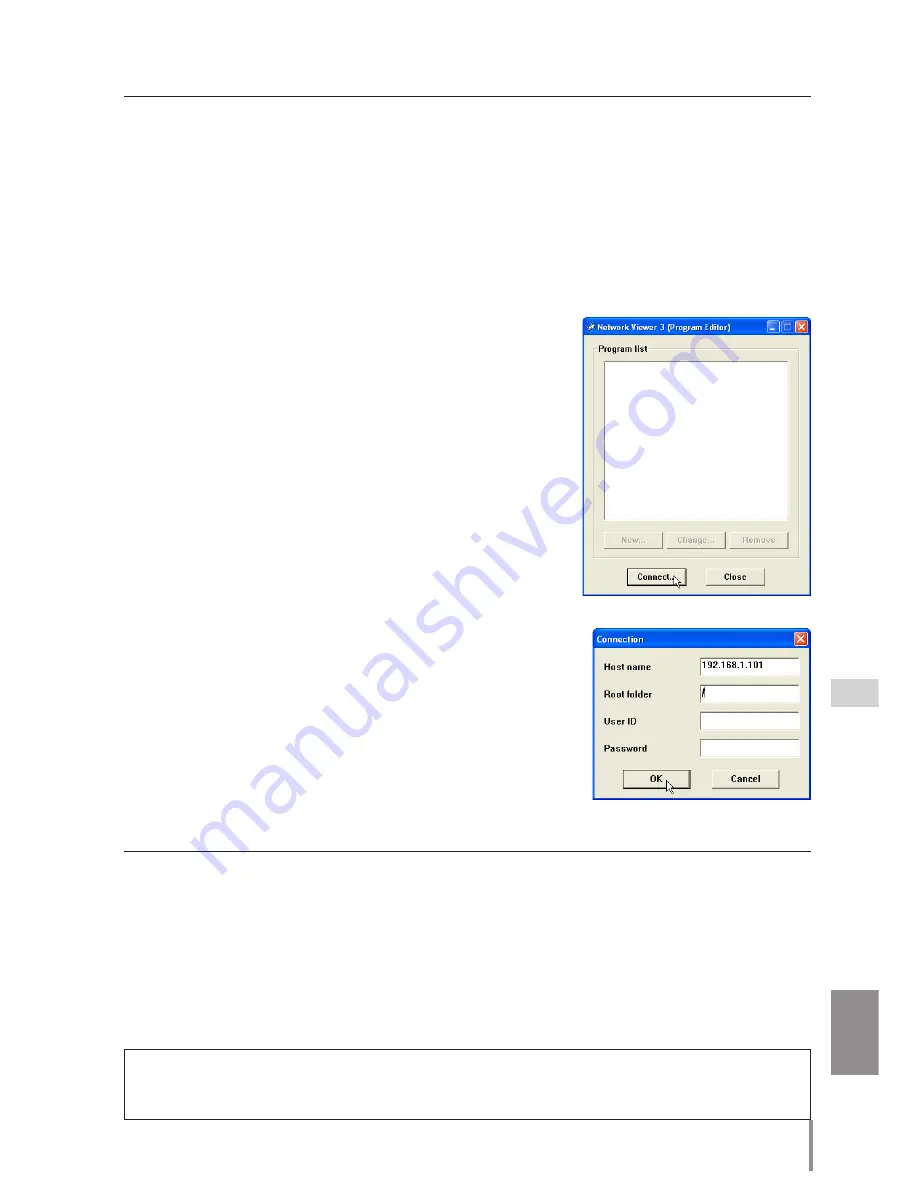
Creating a program file [Program Editor]

Network Viewer 3 (Program Editor) is a tool to make a program file which specifies the dis-
play order of the image and its file path in the file server (FTP server). The Program Editor 
makes a folder "DispParam" at the login root directory in the FTP server and makes files as 
each program name into this folder. These files are called "Program". By specifying the pro-
gram file with the Network Viewer function, you can have the programmed display with 
the projector .

Procedure of making program

1

  To launch the Program Editor, click "Network Viewer 3 

(Program Editor)" menu from "Start" - "All Programs" - 
"Network Viewer & Capture 3" menu.

2

 Click 

Connect

 button.

3

  If the connection setting window appears, enter the each 

item and then click 

Ok

 button.

The setting window disappears and then the programs 
are listed on the window if there are program files at 
the login directory in the connected FTP server.

iMPORtANt

it is required to set the write permission mode for the login directory of the FtP server. 

if only the read only mode, you will have an error when you register a new program.

Creating a program file [Program Editor]

item 

Description

Host name

 ............Enter the FTP server name or IP address

Root Folder

 ................. Specify the root directory of the FTP server. Normally use "/".

User ID

 .................... Enter your login account of the FTP sever or use blank when you login as anonymous 

account for the FTP server

Password

 ............... Enter your password (PIN code) or use blank when you login as anonymous account.

Содержание LC-X71

Страница 1: ...X71 Series PjNET 30 Pj to NetDirector Network Capture 3 Network Viewer 3 Network Communication OWNER S MANUAL LINK ACT ...

Страница 2: ... user is encouraged to try to correct the interference by one or more of the following measures Reorient or relocate the receiving antenna Increase the separation between the equipment and receiver Connect the equipment into an outlet on a circuit different from that to which the receiver is connected Consult the dealer or an experienced radio TV technician for help Use of shielded cable is requir...

Страница 3: ...m the safety inspections periodically In this case you must pay attention to the change of environment in which you installed the projector It may cause fire or an accident depending on the change of environment The CE Mark is a Directive conformity mark of the European Community EC NOTES ON Lithium Battery CALIFORNIA USA ONLY This product uses a Lithium Battery which contains Perchlorate Material...

Страница 4: ...he projector 30 1 Enter the IP address 30 2 Select a display mode and login 30 3 Display of main setting page 31 How to use the setting page 32 Initial setting 34 Network PIN code setting 35 PJLink and password setting 35 Date and time setting 36 Network configuration 37 E mail setting 38 Examples Type and contents of alert mail 40 SNMP setting 42 Chapter 4 Controlling the Projector 45 Power contr...

Страница 5: ...the Network Communication 81 Start the communication 81 Join the communication only for Sub PC 81 Exit from the communication only for Sub PC 81 End the communication 81 Acquire and release of editing authority 81 Edit capture image 82 Network Communication operation and change of state 84 Executing the forcing mode 85 Error information 86 Chapter 6 Network Viewer 87 Creating the available data Ne...

Страница 6: ... ...

Страница 7: ...Pj to NetDirector OWNER S MANUAL X71 Series ENGLISH Pj to NetDirector OWNER S MANUAL X71 Series ENGLISH 1 Chapter 1 Preparation Describes features and operating environment of this product ...

Страница 8: ...d in the network and project them by the projector PC4 PC3 PC6 Capture PC5 PC1 PC2 PC4 PC3 PC6 PC5 PC1 PC2 FTP file server JPEG Prog JPEG PJ2 PJ1 Network Communication function p 77 To communicate by sharing the captured image of a computer with multiple computers and a projector User can draw the text and figure on the captured image by using a drawing tool PC2 PC6 Capture PC5 PC1 PJ1 Capture a s...

Страница 9: ...C2 You ve got Mail PJ2 PJ1 Web Management function p 45 With this function you can monitor projector functions such as power status lamp status input mode signal condition lamp use time etc through the network by using the web browser installed on your computer PC4 PC3 PC6 PC5 PC1 PC2 Turn ON PJ2 PJ2 PJ1 Features SNMP Agent function p 42 To send the information of the projector to the SNMP manager...

Страница 10: ...jectors at specified date day and time by using the clock func tion Now it s 11 30 I am ready to turn ON and select Input 3 Video SNMP Manager function A function to manage the condition of projectors in the network by using the SNMP protocol The managing com puter needs to provide an SNMP managing software Refer to the owner s manual of the PJ Network Manager supplied separately for further detai...

Страница 11: ...Flash Player version 6 0 79 0 6 0r79 or later Internet Mailer Microsoft Outlook Microsoft Outlook Express Netscape Mail Required the internet e mail application software to receive an e mail alert sent from this product If you do not use the function E mail Alert this application is not required FTP Service FTP server Windows 2000 Professional or Windows XP Professional The FTP service provided wi...

Страница 12: ...your network administrator for further details 2 Category of LAN cable indicates the cable quality Normally a cable with category 3 or 5 is used for 10Base T network and a cable with category 5 is used for 100Base TX network Before use Package contains The package contains following items Check each item as you unpack the package If you have any of the following items missing contact the sales dea...

Страница 13: ...ent or application software please refer to the respective booklet Trademarks Ethernet is a registered trademark of Xerox Corporation Microsoft Windows Windows NT are registered trademarks of Microsoft Corporation Internet Explorer is a registered trademark of Microsoft Corporation Netscape Navigator and Netscape Communicator are trademarks or registered trademarks of Netscape Communications Corpo...

Страница 14: ...14 Chapter 1 Preparation ...

Страница 15: ...NetDirector OWNER S MANUAL X71 Series ENGLISH Pj to NetDirector OWNER S MANUAL X71 Series 15 ENGLISH Chapter 2 Installation 2 Describes how to install the network unit and software and config ure the network ...

Страница 16: ...ct onto the projector 2 Connect the LAN cable and join it to the network 3 Configure the network of the network unit 4 Set the Network PIN code Explains how to install the software Network Viewer Capture 3 into your com puter Flow of installation The preparation is completed to control the projector connected to the network At next step set up and control the projector via the network by using the...

Страница 17: ...is lights up red when the network function is set ON in the projector menu LAN port Connecting the LAN cable p 19 Connector plug Connecting to the terminal on the pro jector p 18 Mounting screws Mount by using a coin etc p 18 LINK indicator This lights up red when the network unit is connected to the network correctly ACT indicator This turns on and off with green when sending or receiving of data...

Страница 18: ...or otherwise it may damage the product Connect the AC cord after connecting the LAN cable and computer 2 Installation and network configuration Caution 1 Disconnect the AC plug from the projector 2 Remove the connector cover and screw covers 2 pieces from the projector and insert plug on this product to the option connector 3 Tighten two screws by using a coin etc Connector cover Screw cover ...

Страница 19: ...d 1 Disconnect the AC plug from the projector 2 Connect the UTP straight cable to the LAN port on the network unit 3 Connect the UTP straight cable to the hub Use the UTP cross cable when you connect the computer and projector directly not using the hub When you connect the projector into the 10Base T network use cable with category 3 or 5 When you connect the projector into the 100Base TX network...

Страница 20: ...led correctly Please check item Mounting p 18 Configure the network Before performing the network configuration prepare network address numbers IP Address Subnet Mask Default Gateway DNS assigned to the projector Ask your network administrator for the network address For example the case where the following network address is set up is explained IP Address 192 168 1 201 Subnet Mask 255 255 255 0 D...

Страница 21: ...e screen until the re booting is complete Do not disconnect the AC cord during this period After that the network setting pallet will disappear on the screen Completing of installation Now the installation is complete The IP address of this projector is set to 192 168 1 201 Item Description IP address Sets IP address of the projector Sub net Sets Subnet mask Normally sets 255 255 255 0 Gateway 1 S...

Страница 22: ...7 8 and then press SELECT button The screen 10 key pallet can be used for entering the Network PIN code See item How to enter the numbers with the screen 10 key pallet 23 It is recommended to set up the Network PIN code when you connect the projector to the net work This setting is carried out through the projector s menu and also it can be set through the network using the web browser For further...

Страница 23: ...omplete number on the column To change the number in a column select C and press SELECT button to clear the number in the column and then enter the number again 4 After entering the number in the column select a move key 7 8 e d located on the lower part of the pallet by using the point buttons and press SELECT button repeatedly to move the red frame 5 Repeat steps 3 to 4 for entering all the netw...

Страница 24: ...network setting menu on the projector Please see item Network configuration for fur ther information p 20 2 Make sure that there is no network equipment set with the same IP address in the net work before connecting to the network 3 When installing other projectors follow the above steps to change the IP address and connect to the network In case of installing the projector with network unit into ...

Страница 25: ...stallation make sure that the other applications are closed otherwise proper installation cannot be made Network Viewer Capture 3 installation 1 Set the supplied Network Viewer Capture 3 CD ROM into the CD ROM drive of your computer Double click SetupTool exe icon in the Tool folder in the CD ROM 2 Select English United States from the pull down menu on the Choose Setup Language window and click O...

Страница 26: ... data format which can be projected with the projector from the JPEG bitmap and Power Point files Network Viewer 3 Program Editor This is a tool to make the program which has a function to specify and order the pro jecting JPEG image data stored in the file servers To uninstall these software use Add Remove Program from the control panel 1 This product supports the JPEG image format This file is n...

Страница 27: ...e selection window and then click Install button to start installing Installed software and places Network Viewer 3 File Converter 2 is installed in the Printers and Faxes folder in the Control Panel Network Viewer 3 File Converter 2 This is a kind of the printer driver to convert to the JPEG data optimized to project by the projector from any of the documents created by the application software T...

Страница 28: ...28 Chapter 2 Installation ...

Страница 29: ...ANUAL X71 Series 29 ENGLISH Chapter 3 Basic Setting and Operation 3 Describes basic operations and settings for controlling the projec tor by using the web browser It is required that computer and projector is connected to the network and the network address is properly configured ...

Страница 30: ... For computer display displays graphical menus and settings This mode is recommended for standard use LIGHT MODE Displays with 200 x 300 dots This mode is optimized for use of the handheld computer PDA etc It is also convenient if the network traf fic is heavy This mode has some limitations on the network viewer and multi control functions If the setting page has set the password the authenticatio...

Страница 31: ...If your computer does not have the Macromedia Flash Player version 6 or later follow to the message on the control page to install the Macromedia Flash Player For further product information or installing see the Adobe homepage http www adobe com Setting page Displays the control and setting items according to the selected menu Returns to Display Mode selection page p 30 Main menu For selection of...

Страница 32: ...ting pallet appears when clicking the item Change the value by clicking s or t button or type the number onto the text box directly and then click Set button Each item has a valid setting range respectively Example of the Setting Page The value in the text box indicates current value Each item has a valid setting range The setting value exceeding this becomes invalid Some con trol items can not be...

Страница 33: ...ut ton The value changes quickly when keeping pressing s or t button Pull down menu setting Select an item with pull down menu button and then click Set button or Select an item by clicking s or t button Radio button setting Select an item by selecting a radio button Check box setting Select items by ticking on check boxes Type of the setting pallet How to use the setting page ...

Страница 34: ... product is mounted is displayed on the page Item Description Language Switches display language on the setting page English or Japanese Model name Indicates the model name of the projector pro vided with the network unit NetworkPINcode Sets the Network PIN code to login the setting page p 35 PJLink Switches PJLink password authentication on or off p 35 Password Password for PJLink function Temper...

Страница 35: ...e Only a four digit number is valid for the Network PIN code If you forget the Network PIN code to the projector you can check it by selecting Network PIN code sub menu from Network menu on the projector For further information please see item Network PIN code setting p 22 Initial setting PJLink and password setting This is to set the PJLink password authentication on or off If set On with the PJL...

Страница 36: ...e auto time setting Manual setting Click item Date or Time and enter date or time on the input box with adequate format Date is in year month day format ex 2006 04 25 Time is in 24 hour minute format ex 18 30 Item Description Time setting When clicking AUTO button the date and time set on your computer are set to the network unit Current time Indicates current date and time set on the net work uni...

Страница 37: ...you do not use the function E Mail alert 3 If you use the DNS server register the host name registered to the DNS server as a projector name You can access with this projector name from any computers in your network If you do not use the DNS server access with the assigned IP address to the projector All the network setting will reset to the default when setting 0 0 0 0 of the IP Address Item Desc...

Страница 38: ...erver name or IP address of the SMTP server 1 and administrator address The administrator address is set to Reply To address of the message sent from the projec tor 1 The SMTP server is a server for sending E Mail Please contact your network administrator to have this SMTP server address If the network unit sends an alert message due to the abnormality on the projector but the SMTP server is down ...

Страница 39: ...o item Examples Type and contents of alert mail described on the next page Check Delete Option 1 o When PJ lamp is off o When the life span of lamp is reached o When internal PJ power circuit is failed o When internal PJ temperature is too high o When PJ is turned off with power ON OFF button 2 o When Power management function turns PJ lamp off o When the signal is interrupted o When Auto Play is ...

Страница 40: ...r Model Name model name TCP IP 192 168 1 201 Projector Name Proj05 It sends you following message The Projector lamp is turned off because internal Projector temperature is too high Wait for Temperature Warning Indicator turned off and then turn the Projector on again If the Indicator continues flashing check the air filter for dust accumulation A 81 5 degrees fahrenheit B 134 degrees fahrenheit C...

Страница 41: ...jector Model Name model name TCP IP 192 168 1 201 Projector Name Proj05 It sends you following message The life span of lamp is reached Lamp replacement is required When lamp corres value reaches preselect use time The network unit sends a free message when the lamp use time Corresponding value reaches the preselected lamp use time It can be used for preparation of the lamp replacement and the mai...

Страница 42: ...group which communicates information each other with SNMP is called Community There are two access modes in a community Refer read only and Set read write This product allows to use Refer read only only The SNMP message informs the pro jector status called Trap to an administrator Click SNMP Setting on the main menu and set up each item Item Description Contact Enter user name of the projector etc...

Страница 43: ...blic Trap address Enter IP address of the SNMP manager computer to receive Trap Trap SNMP setting Check and delete the trap address Checking the registered trap address and deleting the address To delete the address tick check box in front of the IP address and click Delete button Up to 10 trap addresses can be registered Trap check delete ...

Страница 44: ...nd control page 3 p 101 Trap option Trap option setting Tick check boxes in front of the condition item to send the trap Click Set button if you tick or un tick the check box on a page 1 o When PJ lamp is off o When the life span of lamp is reached o When internal PJ power circuit is failed o When internal PJ temperature is too high o When PJ is turned off with power ON OFF button 2 o When Power m...

Страница 45: ...Director OWNER S MANUAL X71 Series ENGLISH Pj to NetDirector OWNER S MANUAL X71 Series 45 ENGLISH Chapter 4 Controlling the Projector 4 Describes controlling and setting of the projector by using the web browser ...

Страница 46: ...button PJ temp Inside temp A Displays the surrounding temperature of lamp in the projector Sensor B Inside temp B Displays the surrounding temperature of panel in the projector Sensor C External temp Displays the surrounding temperature of the intake vent Sensor A The warning icon will appear if the temperature exceeds a specified value Check if there is no object to obstruct the airflow around th...

Страница 47: ...normal temp and sets into standby mode Power failure Power failure has occurred inside the projector Projector is turned off Disconnect the AC cord and ask servicing to a qualified ser vice personnel If the power failure occurs on the projector Power failure is indicated on the status column and the information icon appears on the power column as shown below Click this icon to display further info...

Страница 48: ...y be different controls between the described items and actual control items on the page display For further information refer to the projector s owner s manual When the projector is in standby only the timer on the setting menu is effective others are inactive Item Description Input Selects input mode of the projector 1 to 4 Source Selects signal source of the input Input 1 RGB PC analog RGB Scar...

Страница 49: ...RGB PC digital input Item Description D XGA It automatically switches to the proper computer system of the input signal The computer system modes D VGA D SVGA D XGA D SXGA1 which meet the input signal are listed Available selection at the Video S video Scart input Item Description AUTO It automatically switches to the proper color sys tem of the input signal The selectable color systems are PAL SE...

Страница 50: ...ite balance the color temp indicates Adj Item Description Gamma Adjusts brightness of darker part of the picture 0 15 Noise reduction Switches noise reduction mode OFF L1 L2 Progressive scan Switches progressive mode ON OFF Film Reset Resets the Image adjustment to previous levels Store Stores the Image adjust ment values Select an item Image1 Image10 from the pull down menu and click Store button...

Страница 51: ...e from the speakers 0 63 Mute Suppresses the sound ON OFF Menu This function is to control the On screen menu of the projector Switches menu on off moves menu selection cursor and executes the selected menu item Item Description Display Switches the on screen display menu on or off by clicking ON or OFF button Cursor Moves cursor selection by clicking 7 8 e and d buttons and executes the selected ...

Страница 52: ... Totalsave1 Totalsave10 used in the item Save p 55 Auto PC adj Performs automatic adjustment Fine sync Performs Fine Sync adjustment 0 31 Total dots Adjust the number of total dots in the horizontal period Clamp Adjusts the phase of the clamp 1 255 Display area H orizontal Adjuststheimageareahorizontally Vertical Adjuststheimageareavertically Item Description Position Horizontal Adjusts the horizo...

Страница 53: ...mal Wide True Full There may not be available mode depending on the input mode as shown in the table below Ceiling Sets the image top bottom and left right reversed ON OFF Rear Sets the image left right reversed ON OFF Setting up the projector Input source Screen mode Video Computer Normal 4 4 Wide 4 4 True 4 Full 4 The mark 4 means that the available screen mode in the selected input source syste...

Страница 54: ...ction is disabled after the projector turns on Item Description Lamp control Selects lamp control mode Auto Normal Eco This function may be disabled depending on the projectors Lamp Corres Value h Displays the lamp use time Corresponding value Reset the time after lamp replacement Lamp Corres Value Reset 1 Select a Lamp 1 radio button and then click Reset button 2 Click OK button to execute the re...

Страница 55: ...ngs with the pull down menu button of the item Save Delete Name this set number onto the Memo text area Up to 18 characters can be used for the Memo 3 Click Save button to store the current setting and name into the selected set number To remove the saved setting select the set number with pull down menu button and then click Delete button Select a set number Type a memo for the selected set numbe...

Страница 56: ... S ele c t yo ur d esire d s et numb er Totalsave1 to Totalsave10 with the pull down menu button of Load Set and then click Load button The setting values of the selected set number are applied to the current settings Select a set number If the contents of the saved set are not matched for the inputs equipped on the projector the invalid alert message may be displayed Click Stop button to cancel t...

Страница 57: ...day Every week a day from Monday to Sunday To set the timer event on specified date select date entry with radio button and then type the date with Year Month Date for mat Ex Type 2005 12 20 if you specify December 20 2005 Timer setting This page is to set the timer to turn the projector off or on at a pro grammed day date and time Follow the steps below for setting Click Timer on the main menu Pr...

Страница 58: ...ctor function 4 Register an event Click Set button to register the set timer event Repeat steps 1 to 4 for another timer event setting Change the event mode On the event list appearing by clicking Check button click on the event you want to delete disable or enable Click Cancel Delete Timer ON or Timer OFF button on the popup pallet Check the timer events To check the set timer events click Check ...

Страница 59: ...lso turning on projector will not be effective because the projector is already turned on Similarly when the projector is turned off by event 5 event 6 OFF will not be effective in turning it off again But these secondary events event 4 and event 6 will become effective if a person turns off the projector after event 3 and before event 4 or turns on the pro jector after event 5 and before event 6 ...

Страница 60: ...ain menu Items Description Input Displays selected input and source System Displays selected signal system Signal Input signal status Yes No Screen Displays screen mode Lamp status Displays lamp status with an animation Refer to the table on the next page Security Displays the security PIN code lock status Yes No Click this button to update the information ...

Страница 61: ...use time replace lamp immediately Red Blue with X Lamp failure Lamp failure check lamp condition Red Red with X Lamp failure Lamp failure and lamp is being used over a specified use time replace lamp immediately Indication of the lamp status Items Description PJ time Displays the accumulated use time of the projec tor Lamp Corres Value Displays the use time Corresponding value of the lamp Timer Di...

Страница 62: ...trol the multiple projectors equipped with the network units that are connected to the network Click Multi Control on the main menu to display the control page Note To control the multiple projectors each projector must have the same Network PIN code PJ1 PC6 PC4 PC5 Select Input2 for PJ1 to PJ4 PJ2 PJ3 PJ4 Example of multi control ...

Страница 63: ...he multi control menu will appear when setting ON These items of menu are linked to the main menu The multi controllable menus are Power Status PC adjustment Control Setting E mail setting Timer SNMP setting and Network Viewer Click each menu and perform setting and adjustment The word MULTI CONTROL appears on the each control page while the multi control is operating This shows the multi con trol...

Страница 64: ...hange When you click on a listed IP address the login page for the selected projector will be dis played with a new window Items Description IP address Enter IP address of the projector to control Memo Enter projector name or installed location etc Multi control item Control Controlling the projector Both control Controlling and displaying images Visual control Displaying the images Status Confirm...

Страница 65: ...ecause of waiting for the response from each registered projector There are some disabled items in the multi control function for the light mode Change the mode of the registered projector To change the mode of the registered projector select a mode with the pull down menu button under the IP address of the target projector and then click Set button Status Description blank The projector is connec...

Страница 66: ...ied to the registered projectors sequentially This is effective only if the multi control item of the registered projector sets to either Both control or Control Setting all together E mail setting SNMP setting and Timer can be set all together Set ON the multi control setting and items of each menu The setting value is applied to the registered projectors sequentially This is effective only if th...

Страница 67: ...ntrol Network Viewer menu Set the display time periods and repeat times for the auto image display When clicking Start but ton the registered projectors start playing back the auto image display in sequential For further information of the Auto display see Using the net work viewer function p 98 This is effective only if the multi control item of the registered projector sets to either Both contro...

Страница 68: ...68 Chapter 4 Controlling the Projector ...

Страница 69: ...L X71 Series ENGLISH Pj to NetDirector OWNER S MANUAL X71 Series 69 ENGLISH 5 Chapter 5 Network Capture Network Capture is a function to display the screen image of the computer via the network Real Time Capture Network Communication ...

Страница 70: ...s of the computer which has a Network Capture 3 software by the projector through the network This function has 2 kinds of mode as the below Real Time Capture p 72 A function to display the screen image of the computer by the projector through the network in real time Network Communication p 77 This mode is to communicate by sharing the capture image of a computer with multiple computers and a pro...

Страница 71: ...s over the router Consult your network administrator for further details 5 Set the quality of the image Quality Selects from High Mid Low Image Scalling If checked the screen image size of the computer is automatically adjusted to the projector s screen size 6 Set capture start time in second unit This is effective in the communication mode only It sets up the time period from executing the comman...

Страница 72: ... p 37 2 Switch to Connection Setting page by clicking the page number tab 3 Enter the IP address of the com puter to the PC number and then click Set button Click Set button to register the IP address for each page The registered computer enables to start capturing if only the Network Capture icon appears on the task bar The transfer speed of the captured image using the Real Time Capture function...

Страница 73: ...l time To stop capturing click Stop real time capture on the popup menu The captured image of the com puter on the screen is frozen To restart capturing click Restart real time capture on the popup menu 3 To end capturing click End real time capture on the popup menu Start capturing from the PC1 Icon on the task bar Standby Capturing If the Network PIN code set on the projector dif fers from PIN c...

Страница 74: ...f the computer on the screen is frozen To restart capturing click ReStart button 3 To end capturing click End button The IP address of the connecting PC should be registered previously p 72 If the error message appears check item Parameter set up p 71 You can use the capture function by using the web browser or the projector if the Network Capture 3 software is installed into the computer correctl...

Страница 75: ...en press SELECT button PC4 PC3 PC6 Capture PC5 PC2 PJ2 PJ1 PC1 PC provides the Network Capture Project a screen image of PC1 with PC2 Start capturing of the PC1 from the projector PJ2 3 Control by the projector The IP address of the connecting PC should be registered previously p 72 If the error message appears check item Parameter set up p 71 Selectable computer from the projector is PC1 to PC10 ...

Страница 76: ...ment was created starts and the projector projects the pre sentation picture on the screen 4 Start the presentation By using wireless mouse function control the page browsing and some other operations for the PC1 For further instructions of the wireless mouse please refer to the projector s owners manual On the projected screen using with the network capture the shape of the mouse pointer differs ...

Страница 77: ...n the communication mode the Sub PC can become the Main PC anytime Using the Network Communication This Network Communication is to communicate by sharing the captured image of a com puter with multiple computers and a projector User can draw the text and figure on the captured image by using a drawing tool The data that has the captured image of a Main PC and communication information is sent to ...

Страница 78: ...e network By using the web browser display Communication Setting from menu Network Capture Page 2 Confirm that the item Auto search subject PC is ON If OFF change mode to ON Network unit can find up to 30 computers in the network 2 When serving the capture data to the specific subject computers in the network Set item Auto search subject PC is OFF described in the above and then display Connection...

Страница 79: ... unit Authority Acquire release the authority to edit the capture image Edit Tool Pencil Selects a pencil tool Eraser Selects an eraser tool Letter frame Selects a letter frame tool Form Free Draws line with freehand Shape Straight line Draws straight line Square Draws square Oval Draws oval Square Painting out Draws filled square Oval Painting out Draws filled oval Attribute Appears a attribute w...

Страница 80: ...t to the floating pallet by taking a drag and drop of the tool bars There are some disable buttons depending on the tools and authority mode In this case the but ton indicates with gray Capture transfer Authority End communication Save communication Attribute Oval Painting out Straight line Letter frame Square Painting out Square Eraser Pencil Free Oval Form tool bar Standard tool bar Width Large ...

Страница 81: ...re editing window will be closed This command is available with the Main PC only It cannot be ended the communication while other PC has the authority To end communica tion forcibly click the Capture 3 icon on the task bar and select Shut down on the popup menu How to use the Network Communication How to use the Network Communication Icon on the task bar Standby Communication Start the communicati...

Страница 82: ...ge to draw the figure Erase drawn object 1 Click Eraser button on the form tool bar 2 Select its attribute shape width from the form and attribute tool bar 3 Drag a mouse pointer on the screen image to erase the figure Hints of the drawing Straight line tool To draw the vertical line or horizontal line drag a mouse pointer with shift key pressed Square tool To draw the quadrate rectangle drag a mo...

Страница 83: ...on the form tool bar 2 Select a color of text with color tool bar 3 Drag a mouse pointer on the screen image to specify the area of the letter frame The letter input dialog window will appear 4 Enter the letter onto the window To change the letter attribute click Letter attribute button See item letter attribute setting below 5 Click OK button to fix the content The entered letter appears on the c...

Страница 84: ...ng es green G The color of authority status frame changes blue B x Acquiring the authority The color of authority status frame chang es red R The editing information on the Sub PC is reflected on the Main PC B c Editing the captured image using with the tools The editing information is automatically transferred to the subject PC R The color of authority status frame changes green G v Releasing the...

Страница 85: ...lick page 2 Communication Setting from the menu Network Capture Execute com mand by clicking the button Free Quit or Update Displays IP address of the Main PC Displays IP address of the computer has a editing authority Item Description Free Releases the editing authority forcibly Sets condition which all the users can acquire an authority Quit Quits the communication forcibly The capture editing w...

Страница 86: ...Communication End Communication Capture transfer Start real time capture or End real time capture The time out period is 10 seconds Check connection of the network cable Cannot receive data from PJ Cannot receive the data from the network unit when executing the Start Communication End Communication Capture transfer Start real time capture or End real time capture The time out period is 10 seconds...

Страница 87: ...ENGLISH 6 Chapter 6 Network Viewer Network Viewer is a function to display the image data stored in the file servers by the projector through the network Describes about file converter software File Converter 1 File Converter 2 and program creator software Program Editor and how to use Network Viewer ...

Страница 88: ...work Viewer 3 File Converter 1 The File Converter 1 is a software to convert from the JPEG bitmap or Power Point data to the optimized JPEG data for the projector Launch and quit the File Converter 1 To launch the File Converter 1 click Network Viewer 3 File Converter 1 menu from Start All Programs Network Viewer Capture 3 menu To quit the File Converter 1 click on the close box on the upper right...

Страница 89: ...not need to convert them again but if you change the size or image quality perform to convert them again Creating the available data Network Viewer 3 Menu Tree Menu Sub Menu Description View Update Updates contents of the preview window Preview size Sets size of the preview image Large Middle Small Tools Option Sets default of the output destination and conversion mode Conversion Convert a folder ...

Страница 90: ...ing and stores the optimized files into the output folder It enables you to select a local hard disk of your computer shared computer in the network a directory of the FTP server To change the conversion type or output destination click Change button If the power point file is included in the conversion object the Microsoft Power Point software will be launched and start converting automatically D...

Страница 91: ...t folder Specify a directory of the FTP server Conversion mode Resolution Selects output image resolution VGA to SXGA The image resolution higher than the projector s panel resolution cannot be dis played Image rotation Selects image rotation 0 90 180 270 Conversion Type Fit Converts as either width or height of the image sets to be the maximum screen width or height Justify both ends Converts as ...

Страница 92: ...inting dialog On the window select Network Viewer 3 File Converter 2 icon on Select Printer item and click Print button Set the option setting for the page layout or paper setting by clicking Preferences button if required 3 Select a folder and click Save button The file name is named with Image001 as the default If the converted image has 2 or more pages the file names are numbered from 001 to 99...

Страница 93: ... Programs Network Viewer Capture 3 menu 2Click Connect button 3 If the connection setting window appears enter the each item and then click OK button The setting window disappears and then the programs are listed on the window if there are program files at the login directory in the connected FTP server IMPORTANT It is required to set the write permission mode for the login directory of the FTP se...

Страница 94: ...or display time of the image individually For further information see item Setting up the display order and time of the images on the next page The order of the display is listed in the folder list window To change the order of the display change the list order of the folder list by using UP or DOWN button The programs are stored into the DispParam folder at the login root directory and this DispP...

Страница 95: ...When selecting Image from View menu the thumbnail of the image will be displayed default setting When selecting Icon the icon image will be displayed It takes a time to display thumbnails The number in front of the file name indicates the display order of the image Menu Sub menu Description File Exit Closes index window Edit UP Steps up the display order of the selected images DOWN Steps down the ...

Страница 96: ...me setting window Check Display time check box and set display time To cancel the display time un check the Display time check box Image frame on the index window Image frame on the index window has 3 kinds of display modes as follows No frame Shows that the image in the folder is unchanged Blue frame Shows that image is added into the folder newly Red frame Shows that image is deleted from the fo...

Страница 97: ...am For further information please see Using the Network Viewer func tion p 98 The limitation of the Program file There are several limitations for the program file as follows Number of programs in a root folder is less than 1000 Number of folders in a program is less than 100 Total characters of folder name is less than 255 Total characters of program file name is less than 63 Do not make a progra...

Страница 98: ...an register those folders as the program The network viewer function cannot be used when using the network capture function Condition to use the Network Viewer function Enables to use the FTP service with Windows 2000 Professional or XP Professional User must have a full access account to the FTP server or the FTP server allows anyone to use with Anonymous account which also has a full access mode...

Страница 99: ...nction should be used with the anonymous account usually Displays the path of the file or folder selected Selects the display type either the listed with file name or listed with thumbnail The thumbnail can be selected 4 divi sion 6 division or 9 division Item Description Host name Enter the host name or IP address of FTP server yourftp server etc Folder Path Use root directory in normal or enter ...

Страница 100: ...iew list of the selected folder or program is dis played on the window Button Operation Steps down the startup image in the auto display function Steps up the startup image in the auto diaplay function List Switches to the List mode Thumbnail Switches to the thumbnail mode Close Close the window The original image is displayed on another window by clicking on the preview image or file name Decides...

Страница 101: ...efer to the next page Display period 1 of the image 3 to 240 sec Repeat times 0 to 255 times 0 means endless play Click here to check the further information of the file error 4Auto Display setting and control page 3 Error info 1 When selecting the program file for auto display the display time of each image gives preference to the setting specified by the program file over the setting specified b...

Страница 102: ...ff during the multi control Click Error button to check the details Connection Error It may be displayed when the slave projector is using the Network Viewer or Capture function during the multi control Check which projector has an error see item Multi Control Conf Change p 64 65 2 Control by the projector Select input mode to Network pre viously 1 Select Network Viewer icon from Network menu Pres...

Страница 103: ...mes Sec Display period of the image 3 to 240 sec Times repeat times 255 times maximum means endless play Manual Manual display mode Controls image display browsing image backward or forward manually In the automatic displaying mode Auto when the left click on the remote control is pressed pro jector stops automatic displaying and sets into the manual displaying mode When pressing the right click i...

Страница 104: ...104 Chapter 6 Network Viewer ...

Страница 105: ...NetDirector OWNER S MANUAL X71 Series ENGLISH Pj to NetDirector OWNER S MANUAL X71 Series 105 ENGLISH Chapter 7 Use of Serial Port 7 Describes controlling the external equipment connected with the serial port ...

Страница 106: ... click Set button 1 Item Description Baud rate Communication speed for serial port select with the pull down menu 300 115200 Parity Parity check the ways for error detecting of the transferred data None Odd Even Stop bit Stop bit Select the end of communication 1 or 2 Flow control Ways for communication flow None Xon Xoff RTS CTS Data length Selects the length of data 7 or 8 Serial control Selects...

Страница 107: ... 1 of item Control examples p108 Serial Control Selects External Port number Sets according to the computer specified port no Do not use port number 10000 1 Other Settings Sets according to the communication condition of the equipment Setting for controlling the projector from the serial con troller connected to the serial port See example 3 of item Control examples p109 Serial Control Selects Pro...

Страница 108: ...olling AV equipment through network PC5 Playback DVD DVD Player Video Audio PJ2 Serial cable PC5 Turn on the PJ1 PJ2 PJ1 LAN cable Serial cable LAN cable Connect the serial cable between the seri al ports on the network unit and external equipment Connect the serial cable between the serial ports on the network unit and the projector you wish to control ...

Страница 109: ...rt Use proper serial cable depending on the connected equipment port specification Please refer to Port Specification of the serial port specification of this product p 122 PJ2 PJ1 PJ3 Serial controller Control examples Serial cable Connect the serial cable between the serial ports on the serial controller and the projector or network unit ...

Страница 110: ...menu with the web browser Display the setting pallet by clicking any of the items on the serial port setting page p 106 4 Change the serial port setting to be the same communication condition as the connected external equipment and then click Set button p 106 The following example setting is for our projector com munication condition When controlling our projector set as follows Control For exampl...

Страница 111: ... and press Enter key C00 is a command to turn the projector on The extra projector will be turned on To disconnect the communication press Ctrl key and key at the same time 1 Further instructions about the telnet application please see the on line guide on your computer 2 The commands are defined by each product independently so please consult the manufacturer or sales dealer for further informati...

Страница 112: ...rn Use the IP address assigned to the pro jector After the communication is established type the password PIN code and the command for controlling the projector and then press Enter key The table below shows the typical command lists for controlling the our projector and please consult your local dealer for further information of another commands Command Function C00 Power on C02 Power off C05 Sel...

Страница 113: ...Pj to NetDirector OWNER S MANUAL X71 Series ENGLISH Pj to NetDirector OWNER S MANUAL X71 Series 113 ENGLISH Chapter 8 Appendix 8 Connection examples Web browser setting Technical data Q A ...

Страница 114: ...Default Gateway DNS Computer Name PC05 IP Address 192 168 0 5 Subnet Mask 255 255 255 0 Default Gateway DNS Hub Projector Name PJ01 IP Address 192 168 0 2 Subnet Mask 255 255 255 0 Default Gateway 0 0 0 0 DNS 0 0 0 0 Computer Name PC05 IP Address 192 168 0 5 Subnet Mask 255 255 255 0 Default Gateway DNS UTP cross cable Connecting the projector PJ01 to the control computer PC05 via the hub When the...

Страница 115: ...ateway 192 168 200 1 DNS 192 168 201 1 IP Address 192 168 200 1 IP Address 192 168 10 1 IP Address 192 168 100 1 Computer Name PC05 IP Address 192 168 10 5 Subnet Mask 255 255 255 0 Default Gateway 192 168 10 1 DNS 192 168 201 1 Computer Name PC10 IP Address 192 168 10 10 Subnet Mask 255 255 255 0 Default Gateway 192 168 10 1 DNS 192 168 201 1 Computer Name PC51 IP Address 192 168 10 51 Subnet Mas...

Страница 116: ...er product informa tion see the Adobe homepage http www adobe com Even if your computer provides the Adobe Flash Player and the setting page does not appear on the web browser check that Flash Player Plug In Shockwave Flash is installed and set up correctly please see further instructions on the next page and it is depending on the web browser Proxy setting In some cases your web browser is set up...

Страница 117: ...button On the security setting window scroll down and find the Scripting item make sure that Enable is selected in item Active Scripting Flash Player enable ActiveX controls and plug ins setting Select Internet Options from Tools menu on the web browser and then select Security tab and click Customize Level button On the security setting window scroll down and find the ActiveX controls and Plug in...

Страница 118: ...orrectly in the proxy settings window For further instruction please consult your network administrator Not using proxy server Uncheck the item Use a proxy server If you connect the projector to the computer directly with UTP cross cable this must be unchecked To designate proxy settings that will not use the proxy server when accessing the projector installed in the local area network enter the I...

Страница 119: ...the item Advanced Scripts Plugins in the Category column Make sure that the Enable JavaScript for Navigator is checked Flash Player enable Flash Player Plug in setting Select About Plug ins from Help menu on the web browser The plug ins software provided on the browser are listed on the page Check that the Flash Player Plug in Shockwave Flash is installed and set up correctly as the below ...

Страница 120: ...e local area network select the item Manual proxy configuration Enter the proxy server address and port number correctly on HTTP Proxy item For further instruction please consult your network administrator Not using proxy server Select the item Direct connection to the Internet in the proxy setting window If you connect the projector to the computer directly with UTP cross cable this must be selec...

Страница 121: ...ation TCP IP Serial interface RS 232C Baud rate 0 3 1 2 2 4 4 8 9 6 19 2 28 8 57 6 115 2 Kbps Flow control Hardware flow control RTS CTS Xon Xoff Parity check Odd Even Terminal D sub 9 pin Male Power source Supplied from the projector Power consumption 3 0 watts Dimensions W x H x D 5 20 x 4 13 x 1 32 132 x 105 x 33 6 x mm Weight 0 57 lbs 258 g Built in battery Lithium battery Type CR2032 3 0V Ope...

Страница 122: ...ve data 4 not used 5 not used 6 RD Receive data 7 not used 8 not used 1 2 3 4 5 6 7 8 8 pin modular connector RJ 45 Pin No Signal Function 1 CD Carrier detection 2 RXD Receive data 3 TXD Transfer data 4 DTR Data terminal ready 5 Ground Ground 6 DSR Data set ready 7 RTS Request to send 8 CTS Clear to send 9 not used 1 2 3 4 9 8 7 6 5 D sub 9 pin connector RS 232C ...

Страница 123: ...0 4 Wrong network configuration of the computer Check the network configuration of the computer 5 The network unit is used with the default setting p 20 6 The proxy setting of the web browser is not set correctly p 116 7 The computer does not provide TCP IP protocol Q No setting page in my web browser Is the problem in the network or in the projector I would like to find out the problem whether it...

Страница 124: ...gateway router to restrict the accessing from the computer For further information please con sult your network administrator Q Can I access the projector installed on the company s local area network from a remote location A There are some ways to access to the projector in the LAN but you must consult your network administrator for security reason Use of modem Connect to the company s network fr...

Страница 125: ...l function A It has been designed to control up to 100 sets but it depends on the network envi ronment Password Login Q What should I do when I forget the password A Select Network PIN code sub menu from Network menu on the projector For fur ther information please see item Network PIN code setting p 22 Q Can I register the setting page as a web browser Favorites or Bookmarks A Please add Login pa...

Страница 126: ...k environment in which both the projector and computer are placed It may take much time to complete the page display if network traffic is heavy Please consult your network administrator You can select the Light mode for displaying pages quickly p 30 Q I use many of the projectors in the network How can I use names of the pro jectors to recognize each projector instead of IP addresses A You can ma...

Страница 127: ...uired for the authentication depending on the SMTP server This prod uct does not support this kind of SMTP server Others Q Can I develop a driver to control external serial equipment A This product does not provide any driver software To control the external equipment connected to the extra serial port it should be required to clarify the commands and communication condition defined by each equipm...

Страница 128: ...ossible to update the firmware through the network It is required to have a spe cial tool for the updating For further information please consult your local dealer The version number of the firmware is indicated on the lower part of the Initial Setting page Version of the firmware ...

Страница 129: ...f the IP address is set 192 168 x x the Subnet Mask should be set 255 255 255 0 for example Rule2 The start address xxx xxx xxx 0 and the last address xxx xxx xxx 255 of the IP address must not be assigned to any other equipment These address numbers are reserved Rule3 The IP address must correlate to a network number If network numbers are different between the equipment they cannot establish com...

Страница 130: ... There are also some port limitations on the net work equipment such as router Please consult your network administrator Network capture Network Viewer Q Images from the file server don t appear on the screen A 1 Make sure that the input mode of the projector is Network 2 Check the account setting of the FTP server p 99 3 The files in the FTP server must be optimized JPEG and converted by using th...

Страница 131: ...rt to the JPEG format from the following image format Bitmap format bmp JPEG format jpeg jpg Microsoft power point format ppt File Converter 1 Q Sometime I have the white frame images converted by the File Converter 2 A It may have images with white frame due to the paper margin of the print driver depending on the image data File Converter 2 ...

Страница 132: ...1 Dapu Road Golden Magnolia Plaza 2109 Shanghai 200023 China Tel 86 21 5396 0088 Fax 86 21 5396 0318 E Mail info eiki china com Eastern Europe EIKI CZECH spol s r o Umelecká 15 170 00 Praha 7 Czech Republic Tel 42 02 20570024 42 02 20571413 Fax 42 02 20571411 E Mail easterneurope eiki de Japan Worldwide EIKI Industrial Company Limited 4 12 Banzai Cho Kita Ku Osaka 530 0028 Japan Tel 81 6 6311 9479...

Отзывы: