6
5
Installation
1. Select the soil plot area.
Leave the soil plot unimpaired.
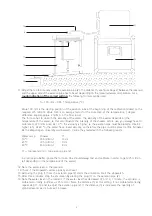
2. Install the ground frame (C) using the four nails. A waterproof connection between the soil and the ground
frame (C) can be made using clay.
3. Fill the soil wetting jar with water and place the lid.
4. At the bottom of the slope, a small trench is made, in which the sample collection box for the collection of
runoff and soil-loss is placed.
5. Install the gutter so that all of the runoff and soil-loss will flow in the sample collection box. Clay can be
used to provide a waterproof connection between the gutter and the soil plot. Be carefull no added clay will
rinse in the sample collection box (20).
6. Install the adjustable support on the ground frame. Use the two levels (16) and four knobs (18) to install the
support level to the desired height.
6
The use
1. If not already done, fill the sprinkler and turn the sprinkler around to its sprinkling position on the support
(B).
2. Ascertain that the ground frame (C), gutter (19) and sample collection box (20) are in place.
3. Note the water level in the reservoir (3).
4. Check if the stopwatch works properly and reset.
5. Removing the plug (1) from the aeration pipe (2) starts the simulation. Start the stopwatch.
6. During the simulation, move the sprinkling head sideways in all horizontal directions, to make sure that the
drops emerging from the capillaries are equally and randomly distributed over the test plot. This can be
done by hand, as the sprinkling head slides easily on the upper rim of the support over predetermined
distances.
7. After three minutes, place the plug (1) in the aeration pipe (2) to stop the simulation.
8. Sediment left behind in the gutter (19) is added to the contents of the sample collection box (20) with the
aid of a wiper.
9. Put al the material left in the sample collection box (20) in the sample bucket. Now the material can be
transported easily to the laboratory, where the amounts of runoff and sediment are determined by weighing
and drying.
10.Note the water level in the reservoir (3).
11.Before storage or transportation, all parts have to be clean.
7
Application
The rainfall-simulator can be used in the field as well as in the laboratory.
The results obtained allow to compare different soil types and crusts on:
1. Erodibility
2. Runnoff (as a percentage of total simulated rain)
8
Troubleshooting
In case of windy circumstances, it is possible the wind affects the simulation. To prevent this, in most cases
it is sufficient to place yourself between the frame and the wind direction.

