Ehrlund ACOUSTIC PICKUP + PREAMPLIFIER Скачать руководство пользователя страница 13

13

4.

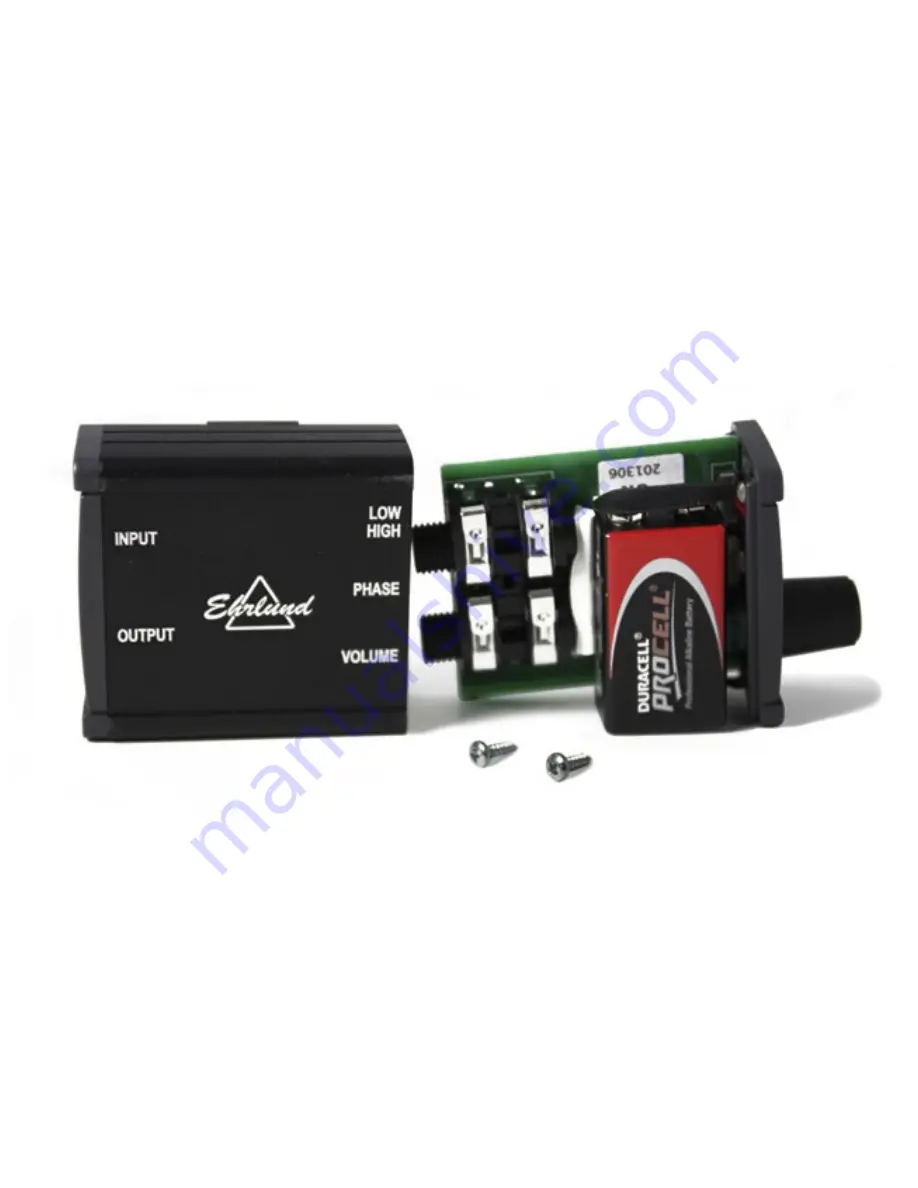
   The Preamp will open on the volume control side. Carefully pull away  


the cover until you reach the battery. You can now replace the battery.

5.

   If you pull the entire circuit board from the case, it is important that  


the card is replaced in the correct slots in the case.

Содержание ACOUSTIC PICKUP + PREAMPLIFIER

Страница 1: ...1 EHRLUND ACOUSTIC PICKUP PREAMPLIFIER MANUAL ENG...

Страница 2: ...ion High Low 11 Volume control 11 Replacing the battery 12 THINGS TO BEAR IN MIND 14 The pickup is connected to the preamp at the IN PUT jack socket The mixer amplifier is connected to the OUTPUT jack...

Страница 3: ...ly set to maximum The volume is usually controlled by the connected amplifier mixer 5 If you think the sound is strange for example due to feedback this may mean that the phase switch needs to be chan...

Страница 4: ...4 TECHNICAL SPECIFICATIONS PICKUP Length 28 mm Width 25 mm Height 5 mm Weight 4 g Length of cable 150 cm Weight with cable and connector 42 g...

Страница 5: ...pickup reproduces a flat frequency response The pickup captures the vibrations of the acoustic instrument enabling the microphone to provide excel lent separation even in what are normally impossible...

Страница 6: ...first time you do this it can take some time before you find the best position We know from experience that it is worth the time it takes to find the ideal position for the pickup so that the people...

Страница 7: ...ach the pickup is sometimes queried However violinists who have been using the pickup for many years say that they cannot see any marks on their instruments Use only the white adhesive that is supplie...

Страница 8: ...8 TECHNICAL SPECIFICATIONS PREAMP Length 92 mm Width 60 mm Height 37 mm Weight 150 g Battery 9V 6LR61 6LF22 MN1604 Power consumption 0 5 mA Minimum supply voltage 7 2 V...

Страница 9: ...s The preamp is fitted with a belt clip and can easily be attached to the waistband It is powered by a 9 V battery has a long operating time of at least 600 hours and switches off when the output cabl...

Страница 10: ...The unit can be adjusted for high low input from the microphone PHASE SWITCHING It should also be remembered that the switch for phase can make a big difference because the speaker can work with or a...

Страница 11: ...position and everything has sounded good During the recording the musician has then played so loud that the preamp saturated and the sound gets distorted due to clipping When the switch was then set t...

Страница 12: ...12 REPLACING THE BATTERY 1 Remove the two nuts on the INPUT OUTPUT side 2 Unscrew the two screws on the volume control side 3 Place your fingers on Input and Output and press...

Страница 13: ...lume control side Carefully pull away the cover until you reach the battery You can now replace the battery 5 If you pull the entire circuit board from the case it is important that the card is replac...

Страница 14: ...with what you want to hear To counteract this you can make a loop 30 50 mm diameter on the cable as close to the pickup as possible Then attach the cable using a soft material where it leaves the ins...

Страница 15: ...om loud speakers The sensitivity to these sounds will be significantly lower however than with a normal microphone The sound from strikes and impacts on your own instrument will also be captured by th...

Страница 16: ...y is based on knowledge of the properties of sound that dates back thousands of years Just as a circular shape gives sound resonance a triangle muffles resonances fast An association that no microphon...

Отзывы: