background image

ExtraLab Plus – Cork Extraction Force and Torque Measuring System 


  47 / 59 


2.1.5. 

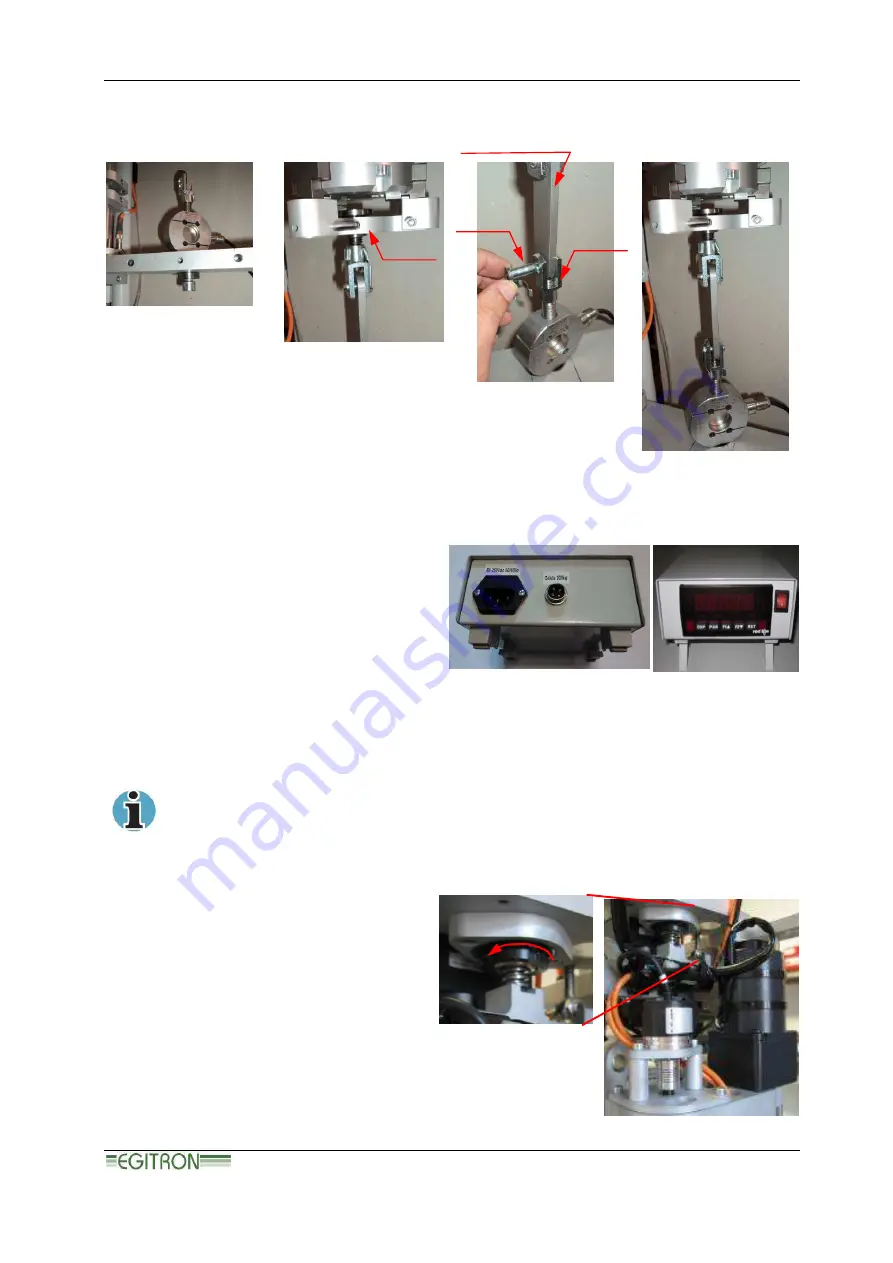
Fix the “star” of the extraction set on the gripper holders (Figure 2-1B). 

2.1.6. 

Lower  the  gripper  using  the  down 

arrow key at the calibration menu until 

you  can  center  the  interconnection 

bar  on  the  rod  clevis  .  Fix  the 

interconnection  bar  with  the  hinged 

spring pin (Figure 2-1C). 

2.1.7. 

Connect  reading  unit,  power  cable  and  load  cell  (Figure  2-2).  Turn  On  the  reading  and 

ExtraLab Plus and allow both units to stabilize during 30min. 


To apply load on the load cells, use the hook wrench supplied with the calibration kit, or 

using an Allen key size 4mm rotate the gear at the top of ExtraLab Plus. Slowly rotate the 

lock  nut  in  the  clockwise  direction  or  the  gear  in  the  counterclockwise  direction,  to  raise  the 

measurement unit (see figure below).  


2.2.  Readings acquisition procedure. 

2.2.1. 

Assuring the reference load cell has 

only  the  load  of  the  necessary 

attachments, TARE it.  

2.2.2. 

Pre-load the system with an end-of-

scale value near to 95 daN.  

2.2.3. 

Release  the  system  and  start  the 

Annex C . Figure 2- 1 

Annex C . Figure 2-1


Annex C . Figure 2-2


“Star” 

Hinged 
spring pin 

Interconnection bar 

Rod Clevis 

Содержание ExtraLab Plus

Страница 1: ...stem OperationManual Version 2 0 0 Valid for PC interface software version 1 4 0 Valid for firmware version 3 0 0 Rua Central da Vergada 1280 4535 166 Mozelos VFR PORTUGAL Tel 351 227 471 120 Fax 351...

Страница 2: ......

Страница 3: ...urpose without EGITRON written permission TRADE MARKS Excel Windows and Microsoft are Microsoft Corporation registered trademarks Other trademarks or registered trademarks not listed above can be used...

Страница 4: ...actice at the time This is valid with the exception of the first onsite displacement or equipment transport if required within the first month of the warranty period which will be free In this last ca...

Страница 5: ...EGITRON is not responsible for its improper use In case of malfunctioning or request for technical support Before asking for EGITRON support read the Problems Resolution chapter call your company tec...

Страница 6: ...Configuration 19 3 2 4 4 Set clock 20 3 2 4 5 Set date 20 3 2 4 6 Language 20 3 2 4 7 About 20 3 2 5 Calibration screen 20 3 2 6 Initialization 22 3 2 7 Stopping movements 23 3 3 PC PROGRAM 23 3 3 1...

Страница 7: ...1 ANNEX B ACCESSORIES 43 1 ANTI SPLASH PROTECTION APPLICATION 43 2 CLAMPS ERROR BOOKMARK NOT DEFINED ANNEX C CALIBRATION 45 1 CALIBRATION SETUP 45 2 CALIBRATE EXTRACTION 46 3 TORQUE CALIBRATION 49 ANN...

Страница 8: ...t allows the user to Monitor the equipment Collect the tests data from the ExtraLab Plus and present them graphically Save the tests into a database for later use Print reports in several languages Se...

Страница 9: ...ion A warning signal informs that an improper equipment use or not following the instructions can cause personal and or equipment damages Please read This is a suggestion or advice which can help you...

Страница 10: ...are inactive including the option of performing tests However the user can still see the existing tests on the Database and print some reports The most common causes for communication failure are 1 Eq...

Страница 11: ...ly on the back of the equipment and tight it with the existing screws 2 3 2 Connecting a Connect the ExtraLab Plus equipment to the pneumatic feeding thru the pneumatic connection on the back panel Th...

Страница 12: ...perform tests On the next subchapters the most important aspects to consider when operating ExtraLab Plus will be analyzed so that after a careful reading the user will be able to fully operate the eq...

Страница 13: ...measurement unit composed by two load cells used to measure the extraction force and torque In this unit there is also a motor and a sensor for the torque movement Finally there is a gripper and a set...

Страница 14: ...rrent values Over the right side there is the plug for compressed air where the pneumatic connection is done And there are also two pressure gauges that indicate the pressure for the elevation cylinde...

Страница 15: ...to perform tests Calibration Mode accessible through the option CALIB in the main menu Figure 8 In this mode are provided some features for calibration and for performing manual movements Configurati...

Страница 16: ...le of this key will also depend on the active mode On Test Mode the function is for OK and the equipment will perform a test or start the equipment depending on the equipment status On Calibration mod...

Страница 17: ...ormation about memory state on the example we have Test 1 that has been visualized in a TOTAL of 1 test in memory C Current test configuration in this example we have the Test Type T E chapter 3 2 4 2...

Страница 18: ...ration menu Figure 12 Before we present each menu it is important to have in mind the following concepts concerning the navigability within the menus As seen in 3 2 1 the keys up and down allows the n...

Страница 19: ...rque detaching test followed by Extraction test Torque and Extraction T E Torque detaching test performed simultaneously with the Extraction test Overtorque O Overtorque test Torque Overtorque T O Tor...

Страница 20: ...HH MM SS in an 24 hours format example 13 10 00 to 13 hours 10 minutes and 0 seconds 3 2 4 5 Set date In this menu the user can set the date thought a value introduction template This must be complete...

Страница 21: ...s value is important for the calibration procedure and to verify calibration value see procedure for calibration on ANNEX C Calibration For Mom This is the result of the digital value ADC conversion i...

Страница 22: ...not verified the user should initialize the system During initialization the following operations are executed Reposition the movable parts in their original positions Check the system sensors positi...

Страница 23: ...ntinue the testing without initializing the system 3 3 PCProgram The software was developed having in mind that it could be used by any person not requiring much computer knowledge Hard work was evolv...

Страница 24: ...e is an info toolbar at the bottom of the main window with short messages which shows information on the equipment status Still on the right side there is also a section where some test configuration...

Страница 25: ...anguage should be introduced For more information please see the chapter Printing Reports 3 3 2 Report Configuration Select Reports on the menu Configuration to open the Reports Configuration window F...

Страница 26: ...tabs Maximum Values Figure 22 tab where it is possible to see the maximum force and torque values of all tests accordingly to the test configuration Here it is possible to see a table which contains...

Страница 27: ...test like number of collected values and test velocity There are two graphics showing the moment and force evolution during the detaching and extraction tests accordingly to the test configuration At...

Страница 28: ...if saving a new report or select an existing report If the report already exists press Add and in this case all tests will be added to the selected report Instead of adding press Save to replace the...

Страница 29: ...s which allows the introduction of filtering parameters such as Year Code and Client Supplier This eases the process of report finding To filter the reports to visualize use the characters or for any...

Страница 30: ...translation of the field Comments must be inserted in the Save Report window 3 3 7 Export to Excel Selecting the option Export Excel from the menu Report the Export values to Excel window will open Fi...

Страница 31: ...rd on the menu Configuration To open Calibration window select calibration on the main menu Afterwards it is necessary to type the password in order to validate the user see note above After that the...

Страница 32: ...t memory choosing the Import button This functionality is quite useful mainly in the case of the machine losing its conversion function One of the most important ExtraLab Plus characteristics is the p...

Страница 33: ...activated These states can never occur simultaneously Following we will describe the functionalities that are available either through the interface program or through the operator interface at the c...

Страница 34: ...ser between 5 and 30mm 24 mm for machines with serial number before 005 If the test have Torque it is possible to configure the equipment to acquire the Torque 2nd Peak the percentage for the calculat...

Страница 35: ...all tests values will be copied into the PC Afterward the user has the possibility to see the statistical calculations graphics export to Excel save into a database and print reports on different lan...

Страница 36: ...ull The extraction test value was null Torque Test Null The torque test value was null Memory Full The maximum number of test has been reached 99 tests In this situation the user should acquire the va...

Страница 37: ...ase note that this equipment does not have any sensor to detect the closure nonexistence So if the user initializes the test in this condition the bottle can be broken by the pneumatic gripper 3 5 3 C...

Страница 38: ...he test duration time the measurement unit will be positioned in an intermediate position a few millimeters above the test ending The test results will be then available at the display like show in Fi...

Страница 39: ...ization of inappropriate products may damage the equipment and this is not warranty covered 2 Check if there are darker areas on the compressed air tubes This could indicate presence of oil on the pne...

Страница 40: ...ed function and send it to ExtraLab Plus 5 2 COMMUNICATION ERROR Description The PC control software could not communicate with the equipment Resolution Check if the communication settings on the soft...

Страница 41: ...on Abort return to level 1 Test Type CHAMP_CAP SCREW CAP BREAKAGE STILLWINE Configuration Test mode Extraction Torque Torque Extraction Torque and Extraction Overtorque Torque Overtorque Insertion EXI...

Страница 42: ...ExtraLab Plus Cork Extraction Force and Torque Measuring System 42 59...

Страница 43: ...very carefully avoiding damaging any component especially the optical fibers 1 2 Removing a To remove the anti splash protection execute step a from the previous point 1 1 b Remove the anti splash pr...

Страница 44: ...mps substitution a If the anti splashes protection is installed remove it as previously explained Annex B chapter 1 2 b Remove the three position pins from the clamps and after take out the three inst...

Страница 45: ...edge should perform this operation 1 Calibrationsetup The equipment must be turned on thirty minutes before initializing this procedure 1 1 Connect the equipment and enter on calibration mode Press th...

Страница 46: ...ed 2 1 Setup accessories 2 1 1 Accessories list 1 screw and special positioner to hold the load cell 1 Hook wrench 1 Extraction set 1 centering bar load cell support bar 1 Load Cell 1 Reading unit 2 1...

Страница 47: ...ilize during 30min To apply load on the load cells use the hook wrench supplied with the calibration kit or using an Allen key size 4mm rotate the gear at the top of ExtraLab Plus Slowly rotate the lo...

Страница 48: ...iation comparatively to the values on the reference unit within the range of acceptance we suggest that the value for deviation should not be over 0 3daN it will be not necessary to change the values...

Страница 49: ...ation on EGITRON model use the After adjustment table 2 5 2 Fill the table and check the deviation If the deviation is out of the acceptance range collect the readings again 2 2 If the deviation conti...

Страница 50: ...e 3 2 3 Fix the torsion set star on the gripper holders By hand rotate the gripper all the way in the clockwise direction 3 2 4 Move the gripper using the up down arrow keys in order to insert the cen...

Страница 51: ...ximum allow load between 9 5 10 kg 3 3 3 Remove the load and check if the system recovered to a value close to Zero 3 3 4 Start the readings acquisition according to the Excel sheet for calculating th...

Страница 52: ...p in the opposite direction the pulley should on the right when looking to the display Also the gripper must be turned all the way around 270 until the mechanical stop is reached For this the back scr...

Страница 53: ...System 53 59 3 10 1 Remove all weights 3 10 2 Disassemble the pulley support 3 10 3 Remove the centering bar 3 10 4 Remove the torsion set 3 10 5 Re apply the acrylic protections If required further...

Страница 54: ...The folder must have the following files clRFU exe ColdLoad bin Flash ini Pilot bin RFU bat SetUp bat ExtraLabPlus bin 2 Disconnect any application that is in communication with the COM port where the...

Страница 55: ...ues presented on the tests are determined by conversion functions If these are not correct the readings of the equipment will be incorrect TROUBLESHOOTING Message Resolution Error Could not open seria...

Страница 56: ...raction Force and Torque Measuring System 56 59 ANNEX E Communication cable PC ExtraLab Plus Ext Champ PC DB9M DB9F ExtraLab Champ PC 1 1 DSR DTR 4 4 GND GND 5 5 DTR DSR 6 6 CTS RTS 7 7 RTS CTS 8 8 9...

Страница 57: ...ion 20 to 45 cm minute Cork Length up to 60 mm Extraction force Range 0 daN to 100 daN Resolution 0 1 daN Readings Interval 1mm Electronic command with graphic display VGA 320x240 pixies and navigatio...

Страница 58: ...ExtraLab Plus Cork Extraction Force and Torque Measuring System 58 59 EGITRON reserves the right of changing this document without previous notice NOTES...

Страница 59: ...Lab Plus Cork Extraction Force and Torque Measuring System 59 59 Rua Central da Vergada 1280 4535 166 Mozelos VFR PORTUGAL Tel 351 227 471 120 Fax 351 227 471 129 E mail info egitron pt URL www egitro...

Отзывы: