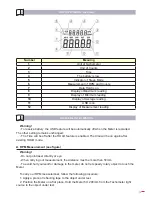
EGAmaster EGAtronik 51265 Скачать руководство пользователя страница 12

12

UNPACKING INSPECTION

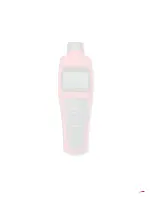
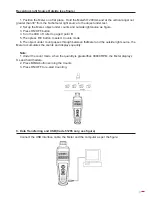
Open the package case and take out the Meter. Check the following items carefully to see 

any missing or damaged part:
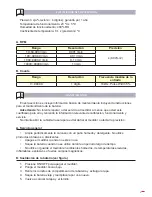
Item

Description

Qty

1

English Operating Manual

1 piece

2

Reflecting Tape

10 pieces

3

USB Interface Cable (Code 51265 only)

1piece

4

Software (Code 51265 only)

1 piece

5

1.5V Battery (LR6)

4 pieces

In the event you find any missing or damage, please contact your dealer immediately.
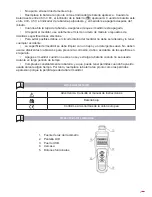
SAFETY INFORMATION

This Meter complies with the standards IEC61010-031, IEC61326, : in pollution degree 2

Use the Meter only as specified in this operating manual, otherwise the protection provided 

by the Meter may be impaired.

In this manual, a Warning identifies conditions and actions that pose hazards to the user, or 

may damage the Meter or the equipment under test.

A Note identifies the information that user should pay attention to.

International electrical symbols used on the Meter and in this Operating Manual are explained 

on page 13.

RULES FOR SAFE OPERATION

- Before using the Meter inspect the case. Do not use the Meter if it is damaged or the case 

(or part of the case) is removed. Look for cracks or missing plastic.

- Do not use or store the Meter in an environment of high temperature, humidity, explosive, 

inflammable and strong magnetic field. The performance of the Meter may deteriorate after 

dampened.

ENGLISH

Содержание EGAtronik 51265

Страница 1: ...MANUAL DE INSTRUCCIONES OPERATING INSTRUCTIONS TAC METRO DIGITAL DIGITAL TACHOMETER COD 51265 ESPA OL 2 ENGLISH 12 GARANTIA GUARANTEE 21...

Страница 2: ...ci n provista por el instrumento podr a verse afectada En este manual una Advertencia identifica condiciones y acciones que pueden representar riesgos para el usuario o puede causar da os al medidor o...

Страница 3: ...cualquier accidente La superficie del medidor se debe limpiar con un trapo y un detergente suave No deben usarse disolventes ni abrasivos para prevenir la corrosi n da o o accidente de la superficie e...

Страница 4: ...l bot n M M A para seleccionar MAX MIN AVE y el valor normal de medici n Mientras est en modo USB LED SR AOFF CLK pulse este bot n para configurarlo a 0 o 1 CONFIGURACI N A Configuraci n del USB Al en...

Страница 5: ...ura Maxima 9 Pantalla de lectura Minima 10 Pantalla de lectura de la media 11 USB encendido 12 Pantalla de lectura de medida OPERACI N DE MEDIDA Advertencia Para no gastar bater a el modo USB se apaga...

Страница 6: ...yor que 30 4 La pantalla LCD mostrara la lectura RPM Nota 1 Cuando se mide RPM la pantalla muestra 0 0000 si no hay una se al continua durante 7 segundos 2 Cuando la lectura RPM es mayor que 99999 la...

Страница 7: ...objeto bajo conteo y la fuente de luz exterior como aparece en la figura 5 3 Presione el bot n ON OFF 4 Apague el LED como se explica en la hoja 9 punto B 5 Despues pulse el bot n R C para selecciona...

Страница 8: ...de 5 milisegundos a 255 milisegundos Tipo de transductor Fotodiodo y Laser Distancia de medida 50mm 200mm Ensayo de ca da un metro Potencia 4piezas x bater as de 1 5V AA Dimensiones 184x56x34mm Peso...

Страница 9: ...e usted este cualificado para ello y teniendo la informaci n relevante de calibraci n funcionamiento y servicio No intente abrir la cubierta trasera para evitar da ar al medidor o afectar la precisi n...

Страница 10: ...en el futuro tiene que deshacerse de este producto no se deshaga de l junto con la basura dom stica P ngase en contacto con su distribuidor para proceder a su reciclaje de manera gratuita cuando sea...

Страница 11: ...11...

Страница 12: ...ting manual otherwise the protection provided by the Meter may be impaired In this manual a Warning identifies conditions and actions that pose hazards to the user or may damage the Meter or the equip...

Страница 13: ...any accident Soft cloth and mild detergent should be used to clean the surface of the Meter when servicing No abrasive and solvent should be used to prevent the surface of the Meter from corrosion dam...

Страница 14: ...R C button to select SR feature after turning on the Meter Then press M M Abutton to setup 005 255 Press and hold M M A button to access quick setting D AOFF setup Press R C button to select AOFF fea...

Страница 15: ...s restarted The other setting remains unchanged The Time will be off after the HOLD feature is enabled The time will be on again after existing HOLD mode A RPM Measurement see figure Warning Do not po...

Страница 16: ...ater than 99999 the LCD displays OL B Counts Self lighted Counts see figure 1 Position the Meter on a flat place Hold the Meter 50 200mm and at the vertical angel not greater than 30 from the Tachomet...

Страница 17: ...er to page 9 point B 5 Then press R C button to select Counts mode 6 The object under count passes through between theMeter and the outside light source the Meter accumulates the counts and displays q...

Страница 18: ...year Operating temperature 23 C 5 C Operating humidity 80 RH Temperature Coefficient 0 1 x accuracy C A RPM Range Resolution Accuracy 10 99 999 r min 0 001 r min 0 04 2 100 999 99 r min 0 01 r min 10...

Страница 19: ...nformation Do not attempt to open the back housing to avoid damaging to the Meter or affecting accuracy A General Service B Replacing the Battery see figure 1 Press ON OFF to turn the Meter off 2 Turn...

Страница 20: ...se ones must be collected and arranged separately If you have to throw them out please do not use the usual rubbish Please contact your distributor for free recycling GUARANTEE The maker guarantees to...

Страница 21: ...A PARTIR DE LA DATE D ACHAT EJEMPLAR PARA EGA MASTER COPY FOR EGA MASTER EXEMPLAIRE POUR EGA MASTER ARTICULO ITEM ARTICLE N DE SERIE SERIE N N SERIE DISTRIBUIDOR DISTRIBUTOR DISTRIBUTEUR PAIS COUNTRY...

Страница 22: ......

Страница 23: ......

Страница 24: ...C ZORROLLETA 11 POL IND JUNDIZ 01015 VITORIA SPAIN P O B APTDO 5005 TEL 34 945 290 001 FAX 34 945 290 141 info egamaster com www egamaster com...

Отзывы: