


4
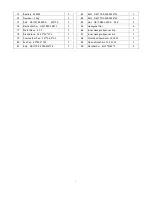
NO.
Description
Qty.
NO.
Description
Qty.
1
Main Frame
1
37
Belt Wheel
Φ
200*18
1
2
Front Stabilizer
1
38
Elastic Washer GB/T 859-1987 8
4
3
Rear Stabilizer
1
39
Spacer
Φ
30*
Φ
25.05*9
1
4
Tube Plug material:PP
4
40
Bearing 6005ZZ
2
5
Flat Washer GB/T 95-2002
Φ
8
4
41
Left Belt Cover 500*13*284
1
6
Bolt M8*65
4
42
Screw GB/T 15856.1-2002 ST4.2X19
5
7
Foot Pad
Φ
52*43
4
43
Flat Washer GB/T 95-2002
Φ
5
4
8 L/R Pedal JD-301
(
9/16"
)
1 SET
44
Spacer
Φ
30*
Φ
25.05*41.1
1
9 L/R Nut 9/16"
1 SET
45
Nut M25*1
1
10
Seat Slider
1
46
Meter JS10372
1
11
Bushing material:PP
2
47
Bolt M5*10
4
12
Seat Post
1
48
Tube Plug material:PP
1
13
Bushing material:PP
1
49
Brake Knob M10*225
1
14
Transport Wheel φ69X26
2
50
Plastic Sleeve material:PA6
1
15
Bearing 608ZZ
4
51
Flat Washer
Φ
16*
Φ
10.2*1.5
1
16
Screw M6
2
52
Spring δ1.8X40
1
17
Bolt M6*12
2
53
Square Nut 16.0*16.0*δ8
(
M10
)
1
18
Handlebar
1
54
Spring
Φ
1.0X55
1
19
Handlebar Post
1
55
Flat Washer
Φ
14*
Φ
6*2.5
1
20
Knob
φ59*80.5(M16*1.5)
3
56
Domed Nut GB/T 802-1988 M6
1
21
Plastic Plug
Φ
14*14
5
57
Seat KX004
1
22
Bolt M10*20
2
58
Sensor Wire 1 L=420
1
23
Pulse Sensor LT16
2
59
Sensor Wire 2 L=1400
1
24
Screw GB/T 845-1985 ST4.2X25
2
60
Pulse Wire 1 L=420
1
25
Plastic Plug
Φ
28*6.5
2
61
Pulse Wire 2 L=700
2
26
Hexagon Flange Nut M12X1.25
2
62
Magnet c-02Z
1
27
Bolt GB/T 5780-2000 M4*12
2
63
Sensor SR-212
1
28
Right Crank 9/16"
1
64
Inductor Seat LTF8163
1
29
Left Crank 9/16"-LH
1
65
Bottle Holder
Φ
6
1
30
Right Belt Cover 700*46*288
1
66
Domed Nut M12X1.25
2
31
Nut GB/T 889.1-2000 M8
4
67
Bolt M6*70
2
32
Screw GB/T 845-1985 ST4.2*13
4
68
Hexagon Nut GB/T 41-2000 M6
2
33
Screw ST4.8*16
2
69
Flat Washer GB/T 95-2002
Φ
12
2
34
Belt 3PL1320mm
1
70
Decorative Cover
Φ
59*35
1
35
Bolt GB/T 70.3-2000 M8*18
4
71
C Clip GB894.1 Φ17
2
36
Middle Axle
Φ
25*167
1
72
Bottom Bracket Axle Φ17*130
1
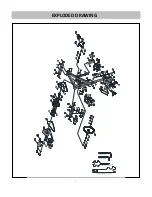
PARTS LIST


