Efinix Trion T20 Скачать руководство пользователя страница 8

AN 014: Using the Trion T20 Dual-Camera MIPI Example Design

Set Up the Raspberry Pi Cameras

In this step you connect the cameras and enable them. After you connect the cameras, you

power the Raspberry Pi computers up one at a time and enable their connection to the

respective cameras.

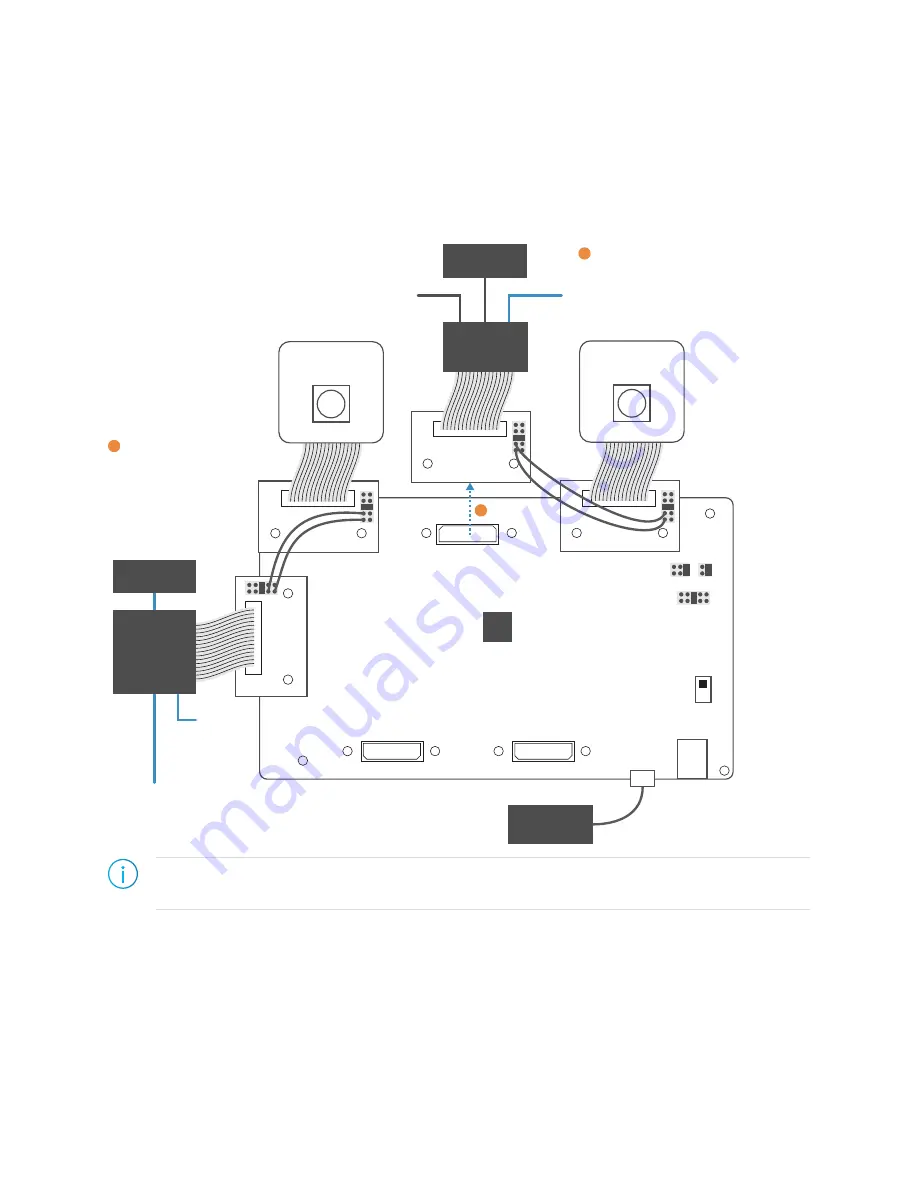
Figure 7: Setting Up Cameras

MIPI CSI RX

Channel 0

MIPI CSI TX

Channel 1

MIPI CSI RX

Channel 1

M

IP

I C

S

I T

X

C

ha

nn

el

 0

USB

Power

Off

VSUP1

Computer

LVDS TX

LVDS RX

Raspberry Pi

Computer

Monitor

BGA169

Trion T20 MIPI Development Board

T20

Raspberry Pi

Computer

Monitor

USB Keyboard

USB Mouse

Power

Raspberry Pi

v2 Camera

USB Keyboard

USB Mouse

Raspberry Pi

v2 Camera

Power

Set Up MIPI Channel 1

Raspberry Pi and Camera

1

Set Up MIPI Channel 0

Raspberry Pi and Camera

3

Detach

2

Note: 

 These instructions assume that you have already set up your Raspberry Pi computer. If this is the

first time you are using them, 

follow the instructions on the Raspberry Pi web site to set up the board.

1.

Connect the Raspberry Pi cameras to the MIPI RX channel 0 and 1 connectors.

2.

Connect a power cable to the TX 1 Raspberry Pi computer. The Raspberry Pi boots to

the Raspbian desktop.

www.efinixinc.com

8

Содержание Trion T20

Страница 1: ...y 2020 www efinixinc com Copyright 2020 All rights reserved Efinix the Efinix logo Quantum Trion and Efinity are trademarks of Efinix Inc All other trademarks and service marks are the property of the...

Страница 2: ...mpers and Cables 6 Connect Raspberry Pi Computers and Monitors 7 Set Up the Raspberry Pi Cameras 8 Program the Trion T20 MIPI Development Board 9 Run the Example Design 10 Use the Efinity Debugger to...

Страница 3: ...passes through the T20 FPGA to the MIPI CSI 2 TX interfaces which send the video to Raspberry Pi computers The computers display the video on monitors Figure 2 T20 Dual Camera MIPI CSI 2 Example Desi...

Страница 4: ...e the Sobel lter only uses grayscale data the design converts the RAW10 data to YUV uses the Y component for the lter and then converts back to RAW10 Finally because the MIPI TX controller wants six 1...

Страница 5: ...ction correctly essentially the Raspberry Pi computers need to sync up with the cameras before you turn on the development board Figure 4 Completed Hardware Setup MIPI CSI RX Channel 0 MIPI CSI TX Cha...

Страница 6: ...d is turned off before connecting any cards or cables 1 If you have not already done so attach stando s to the Trion T20 MIPI Development Board and Raspberry Pi Camera Connector Daughter Cards 2 On he...

Страница 7: ...l 1 MIPI CSI TX Channel 0 USB Power Off VSUP1 Computer LVDS TX LVDS RX Raspberry Pi Computer Monitor BGA169 Trion T20 MIPI Development Board T20 Raspberry Pi Computer Monitor USB Keyboard USB Mouse 1...

Страница 8: ...rion T20 MIPI Development Board T20 Raspberry Pi Computer Monitor USB Keyboard USB Mouse Power Raspberry Pi v2 Camera USB Keyboard USB Mouse Raspberry Pi v2 Camera Power Set Up MIPI Channel 1 Raspberr...

Страница 9: ...X channel 1 and connect them to the computer attached to TX channel 0 7 Connect a power cable to the TX 1 Raspberry Pi computer The Raspberry Pi boots to the Raspbian desktop 8 Enable the camera attac...

Страница 10: ...g video from the TX channel 0 camera 5 Press SW5 to switch the feed from the RX channels After 3 seconds the channels switch back automatically 6 Press SW4 to toggle the Sobel lter on and o The defaul...

Страница 11: ...o any speed from 1 to 1 5 Gbps Note Do not change the lane mapping in the Interface Designer because it is mapped for the example design s hardware The Interface Designer contains settings for the TX...

Страница 12: ...rry Pi computer and connect them to the other computer 3 Type Ctrl C to stop streaming video on the camera 4 Press SW2 to reset the system Important Do not reset the system when the cameras are stream...

Отзывы: