DSL
1
0BASE-T U
SB P
WR-
Before you begin:
Install Line Filters
Step
Step
1
Verify that the following items came with your DSL kit:
2
3
1
1
2
Choose an Installation Method
Step
Step
Line filter(s)
PCI Ethernet adapter
Wall-mount
line filter
2
3
2
3
1
Two-to-one
adapter(s)
Ethernet Installation Method
Option A:
3
USB Installation Method
Option B:
Documentation
Software CD-ROM
SpeedStream
Wireless DSL Gateway
RJ-11
DSL cable
Power supply
Spee
dStre
am®
Safety a
nd Certi
fications
xxxx
SpeedStream®
Safety and Certifications
xxxx
SpeedStrea
m
®
Safety and C
ertification
s
SpeedStream
®
RJ-45
Straight-through
Ethernet cable
USB cable
Power Supply
RJ-11 DSL cable
Internet Connection
Internet Connection
w/two-to-one adapter
Hub
Optional:
Use Crossover (Xover) cable
when connecting to a hub or
switch without an “Uplink” port
Ethernet Connection
to computer RJ-45
Straight-through
Ethernet cable
RJ-11 DSL cable
Internet Connection
Internet Connection
w/two-to-one adapter
3
4
4a
Power Supply
5
1
USB Connection
to computer
2
Devices such as fax machines, caller ID boxes, or phones that share the same phone line as your DSL
account require a line filter, which prevents noise from disrupting the DSL signal on the phone line. Filters can
be in the form of a stand-alone line filter or a wall mount filter. A filter can also be plugged into a two-to-one
adapter if your SpeedStream DSL gateway will share the same phone jack with another device.
Stand-alone Line Filter
For each device that shares the DSL phone line:
1.
Unplug the device’s cord from the phone jack.
2.
Plug the filter into the phone jack.
3.
Plug the phone cord (or other device cord)
into the filter.
Wall Mount Filter
For a wall mount phone, install a wall mount filter:
1.
Remove the phone.
2.
Connect the wall mount filter to the
wall plate.
3.
Reconnect the phone.
Two-to-One Adapter
If your SpeedStream DSL gateway and another
device will share the same phone jack, install
a two-to-one adapter:
1.
Plug adapter into the phone jack.
2.
Plug a line filter into one of the sockets of
the two-to-one adapter. The other socket will
be used to connect the DSL cable.
3.
Plug the telephone (or other device) cord into the line filter.
If you are using the USB port to install the gateway, you will need to provide your CD-ROM drive letter
during software installation. To find the drive letter, double-click the
M
Myy C
Co
om
mp
pu
utte
err
icon on your desktop.
Look for the CD icon and note the letter next to it. This letter is your CD-ROM drive letter.
Your service provider may include a wall-mount filter, two-to-one adapter(s), line filter(s), and an
Ethernet adapter in your DSL kit. If you received any of these items, follow the instructions provided in
this guide for basic installation. If you need further assistance installing these items, please contact
your service provider.
The SpeedStream
®
DSL gateway may be connected to either an existing USB port or an Ethernet port. If you
choose to attach the SpeedStream
®
gateway via the Ethernet interface, it is only necessary to complete
the steps in Option A. Otherwise, proceed directly to Option B for USB installation.
Install Ethernet Adapter
You will need to install an Ethernet adapter if your computer does not already have one installed.
Refer to your Ethernet adapter manufacturer’s documentation for complete installation instructions.
Connect the SpeedStream DSL Gateway
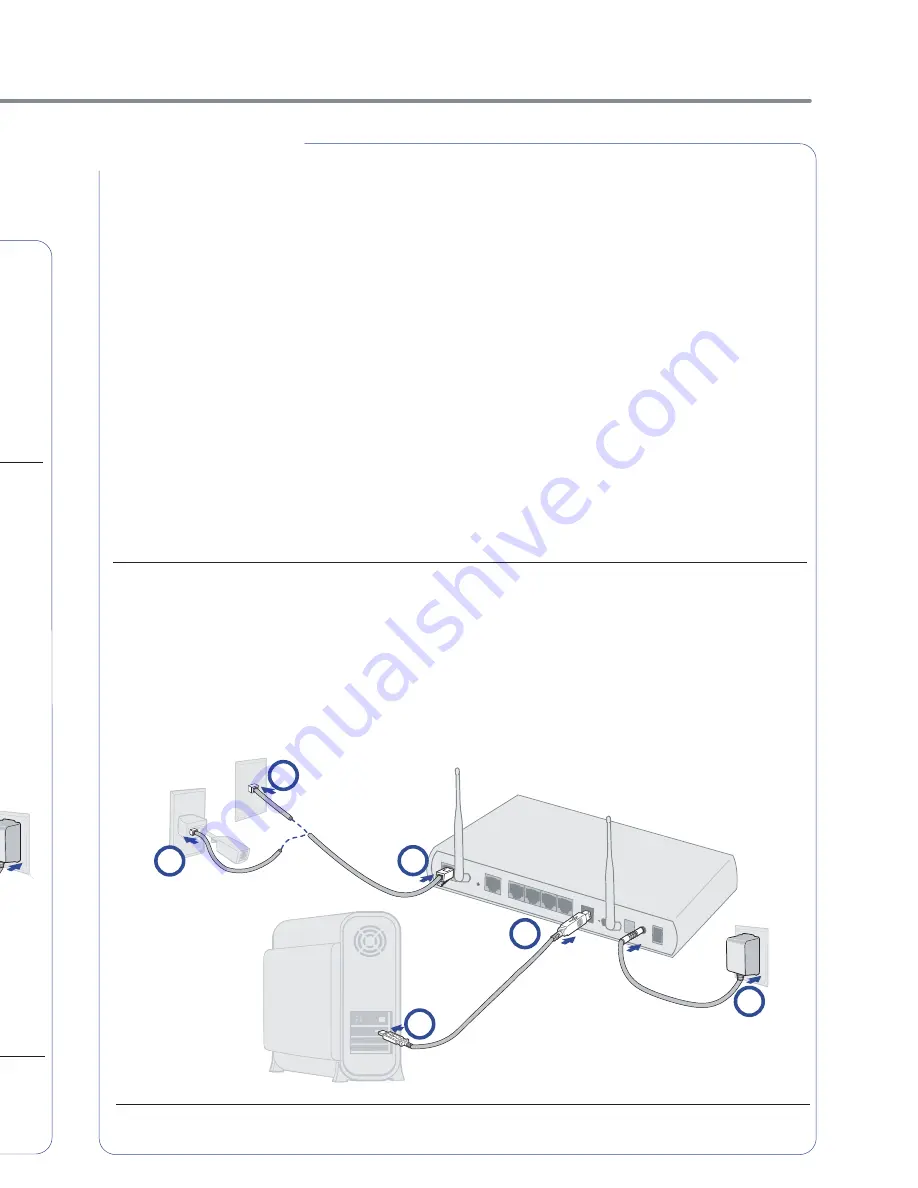
1.
Connect the straight-through Ethernet cable to the Ethernet port on the gateway.
2.
Connect the other end of the straight-through Ethernet cable to the Ethernet port on your computer.
3.
Plug the DSL cable into the DSL port on the gateway.
4.
Plug the other end of the DSL cable into the phone jack.
4a. If using a two-to-one adapter, plug the cable into the open socket of your two-to-one adapter.
5.
Plug the power adapter into the power outlet and gateway.
You have completed the installation of your SpeedStream
®
hardware; there is no gateway software installa-
tion required when using the Ethernet connection method. Proceed to Step 3 to configure your gateway and
connect to the internet.
Software Installation
Before installing the software, make sure your PC is equipped with the following:
• Windows
®
98, Windows
®
98 Second Edition (SE), Windows
®
2000 Professional,
Windows
®
Millennium Edition (Me), or Windows
®
XP
• 32 MB RAM
• Pentium-compatible 166 MHz processor or faster processor
• 12 MB available hard disk space
1.
Insert the SpeedStream
®
Installation CD into your CD-ROM drive.
2.
Click the
Start
button on the Windows
®
taskbar.
3.
Select
Run
from the
Start
menu.
4.
Type
“
e:\setup.exe
”
where
“
e
”
represents your CD-ROM drive.
Note: your CD-ROM drive letter may not be
“
e.
”
5.
Click the
OK
button.
6.
The software installation program will start. Follow the on-screen directions to complete the software
installation. When prompted to attach the gateway, please refer to the instructions below.
Connect the SpeedStream DSL Gateway
1.
Connect the USB Cable to the USB port at the rear of the gateway.
2.
Connect the other end to the USB port on your computer.
3.
Plug the DSL cable into the DSL port on the gateway.
4.
Plug the other end of the cable into the phone jack.
4a.
If using a two-to-one adapter, plug the cable into the open socket of your two-to-one adapter.
5.
Plug the power adapter into the power outlet and gateway.
6.
Power on the computer.
You have completed the installation of your SpeedStream
®
DSL hardware. Proceed to Step 3 to configure
your gateway and connect to the internet.
Содержание SpeedStream 007-0826-001
Страница 1: ...bsite eedStream ames and t to make Wireless Gateway Quick Start Guide SpeedStream Part 007 0826 001...
Страница 2: ......
Страница 3: ......
Страница 4: ...are ure...
Страница 6: ......
Страница 7: ......
Страница 8: ......


