background image

Company website

www.eertvision.nl


snapshots; 

3. Set the grab waiting interval, the unit is ms; 

4. Click Start, and when the current progress value is consistent with the number of 

snapshots, the interface will display a picture. There is a hint when the synthesis is completed, 

and the depth of field synthesis is completed. 

5. Save the synthesized picture: The synthesized picture is displayed on the screen, and then 

click the "Save" 

icon in the menu, specify the path and name, and click OK. 


6. When operating the depth of field synthesis function, the focus mode will automatically 

switch to manual mode. The image display area shows the currently synthesized image. For 

example, Tab2*, click "UVC_Camera" to switch to real-time video display. Then click 

"Configuration Management" to set the focus mode. 

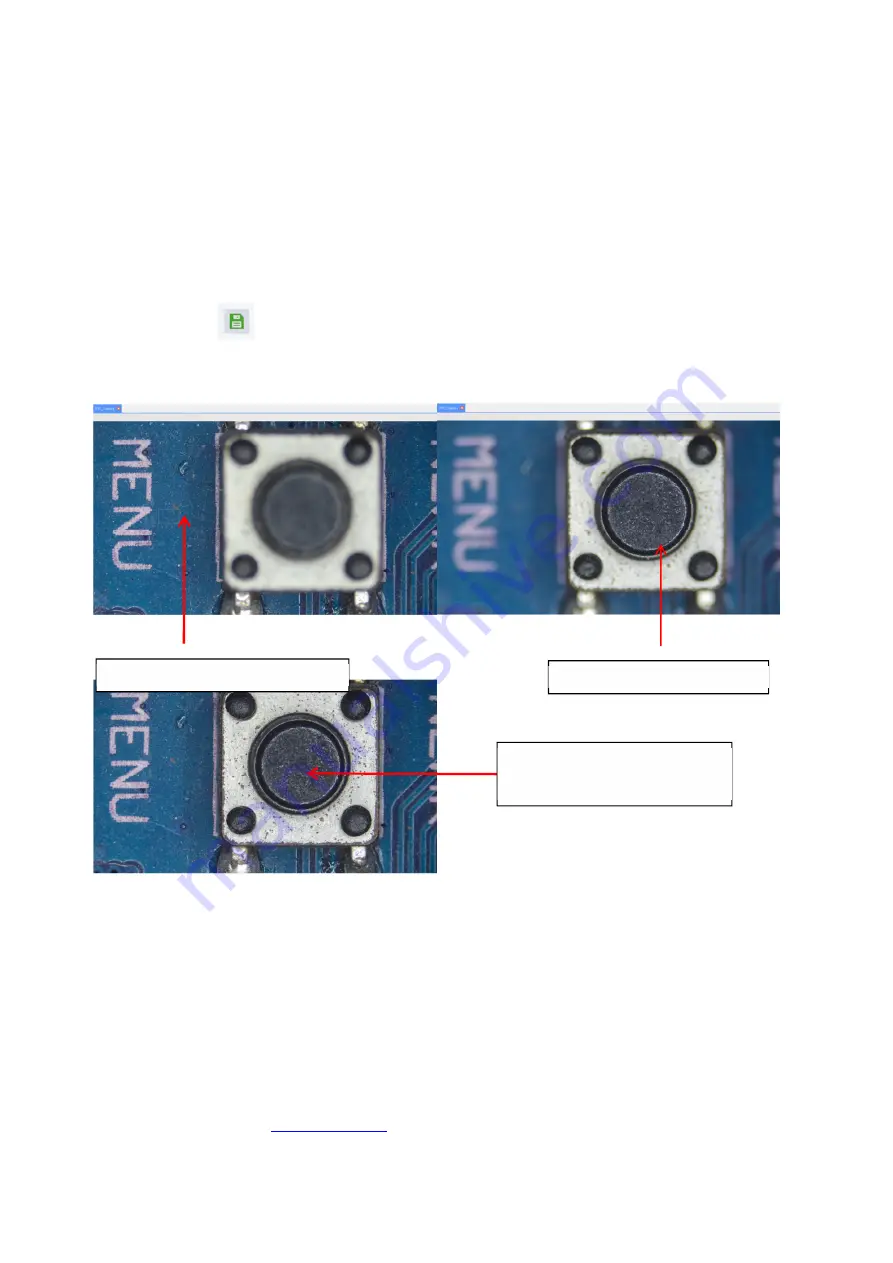
Clear side of the starting position. 

Clear side of the end position. 

Clear  picture  with  large  depth  of 

field after synthesis.


Содержание C304

Страница 1: ...Company website www eertvision nl Eert C304 User Manual V1 0...

Страница 2: ...tallation 5 2 1 2 Connect Camera 6 2 2 Functional Area 7 2 3 Operation 7 2 3 1 Config 7 2 3 2 Extended Depth of Focus 11 2 3 3 Video Stitch 13 2 3 4 Photograph Operation 13 2 3 5 Recording 15 2 3 6 Me...

Страница 3: ...13 System Settings 36 3 1 14 Freeze 36 3 1 15 Flip Mirror 36 3 1 16 HDR 37 3 1 17 FBL 37 3 1 18 Anti screen flicker 37 3 1 19 Black and White Mode 37 3 1 20 Default 37 3 1 21 Version 38 3 2 Measuremen...

Страница 4: ...ncy It can seamlessly interface with a variety of image processing software A rich SDK development kit is also provided Mainly used in the fields of biomedical industry industrial testing monitoring s...

Страница 5: ...Installed memory RAM 2 00GB and above 1 3 HDMI Mode Matching Device Front end matching C mount microscope or C mount lens Back end matching With HDMI it can support 1080P 50Hz or 1080P 60Hz displays...

Страница 6: ...ompany website www eertvision nl 2 1 2 Connect Camera Open Device and click UVC_Camera to connect the device After the device is successfully connected it prompts Connected and you can start operation...

Страница 7: ...unctional Area 2 3 Operation 2 3 1 Config 2 3 1 1 Focus Mode Focus mode automatic manual OneKey Camera control area Menu toolbar Measurement data list area Connection status Frame rate resolution stat...

Страница 8: ...ick the right mouse button to switch from automatic focus mode to manual focus mode If you need to switch back to auto focus mode click the Select Focus Area tool Focus area Large focus frame Small fo...

Страница 9: ...utter Default The default is automatic exposure 2 3 1 3 White Balance White balance automatic manual Auto Realize automatic white balance under different color temperature conditions Hand Pull the red...

Страница 10: ...arpness 0 15 adjustable The default value is 4 2 Resolution There are three groups of resolutions that can be switched in the resolution options Every time you switch the resolution the camera will re...

Страница 11: ...Depth of Focus This function can replace the clear part of the image with different focal planes for the unclear part thereby obtaining a clear picture with a large depth of field During image fusion...

Страница 12: ...synthesized picture is displayed on the screen and then click the Save icon in the menu specify the path and name and click OK 6 When operating the depth of field synthesis function the focus mode wil...

Страница 13: ...tching speed There are fast middle slow options for speed Click start to stitch the images and the moving speed should be kept at a constant speed not too fast otherwise the composite image will be bl...

Страница 14: ...thod can save the primitives The picture will display the primitive information when the software is opened again For example the measurement data information is displayed on the image Automatically p...

Страница 15: ...start recording The interface will display the icon in the video click the Video icon again to end the video The video is automatically saved and the default path is the software installation path Th...

Страница 16: ...ext 11 parallel lines 22 crosshair 2 3 6 2 Calibration 1 Click the yellow triangle in the lower right corner of the calibration tool and select straight line calibration or circle calibration 2 Activa...

Страница 17: ...w eertvision nl deleted and click the red circle to delete the calibration group 2 3 6 3 Measurement Setup Before measurement you can click Set to set the measurement tool Click the red circle to dele...

Страница 18: ...accuracy of measurement data Set the line spacing you can set two sets of lines When both sets of values are set to 0 parallel lines cannot be displayed Set the distance between concentric circles you...

Страница 19: ...chor point of the measurement with the mouse After clicking and releasing the mouse the measurement data is displayed in the measurement data list area 3 After the measurement is completed the data in...

Страница 20: ...time you cannot use the mouse to directly click the focus mode to switch to the automatic mode You must click the select focus area tool with the left mouse button to select the focus mode in the foc...

Страница 21: ...s the inverse of the set color and the corresponding primitive data is displayed in gray shade in the data list 4 The data in the single selection or multi selection measurement data list is displayed...

Страница 22: ...picture 2 3 6 8 Crosshair Tool Click the cross line tool the image shows the cross line to set the number of horizontal and vertical lines After the setting is completed select Display to display the...

Страница 23: ...e area Then enter the annotation content in the pop up window and press OK to complete the annotation In the measurement mode double click any line with the left mouse button to pop up a property wind...

Страница 24: ...s of the camera connection successful or connection failed 2 3 8 Resolution status After switching the resolution each time the resolution status bar in the lower right corner of the software displays...

Страница 25: ...Company website www eertvision nl 3 Detailed HDMI Mode Operation 3 1 Control...

Страница 26: ...Company website www eertvision nl...

Страница 27: ...and pull the focus progress bar to adjust the focus value In manual mode place the mouse on the focus progress bar and scroll the mouse wheel to adjust the focus position 3 1 4 Focus Area Focus area...

Страница 28: ...Click to focus only works in small frame mode Double click the left mouse button in the image area to set the color of the focus frame 3 1 5 Exposure Exposure automatic manual When the AE exposure is...

Страница 29: ...Sharp Saturation Ezoom Contrast 1 15 value can be adjusted The default value is 0 Sharp 0 15 adjustable The default value is 4 Saturation 1 254value can be adjusted The default value is 128 Ezoom Supp...

Страница 30: ...ool Slect Cross mark Image area display cross tick marks Set the number of horizontal and vertical lines In the measurement mode press and hold the left button to drag the crosshairs Note Do not press...

Страница 31: ...fter the color is set draw the crosshair again to take effect the color of the crosshair drawn before does not change 3 1 9 Photograph 3 1 9 1 Photograph Operation Click the Capture icon an icon appea...

Страница 32: ...the photo according to the time select Custom to enter a name to save 3 1 10 Recording Click the Video icon The interface prompts Capture start click OK to start recording During recording a flashing...

Страница 33: ...card in H264 format The maximum length of a single recording is about 2 hour and the size is about 4G More than 2 hours will automatically stop recording 3 1 11 Open Picture Click on open icon The in...

Страница 34: ...ure Press and hold the left mouse button to move the picture position 4 Click Browse tool to browse the previous and next pictures 5 Click Rotate tool you can change the picture direction clockwise or...

Страница 35: ...rison picture interface the left side of the screen is the real time video interface and the right side is the selected picture Realtime picture Compare picture Click compare picture icon again closed...

Страница 36: ...ully Click the Close to close the time setting interface 3 1 14 Freeze Click Freeze icon The current image interface can be frozen and the image window remains static which makes it easy to observe th...

Страница 37: ...mera moves up and down for 16mm Click FBL sensor moves to the middle position 3 1 18 Anti screen flicker Anti screen flicker effect is achieved after ticking 3 1 19 Black and White Mode Checked for bl...

Страница 38: ...to perform measurement operations After the measurement operation is completed if the menu needs to be displayed when the menu lock is locked click the right mouse button in the image area to display...

Страница 39: ...Company website www eertvision nl 3 2 1 Assist Tools 3 2 1 1 Color Setting Click Color Setting icon and pop up setting interface...

Страница 40: ...focus mode and focus area 3 2 1 3 Edge Detection Click Edge Detection icon When selected the icon turns blue It will automatically find the edge when measuring a picture 3 2 2 Measurement Tool straig...

Страница 41: ...imitives to a template pops up and click OK to create a new template After entering a name in the name window click save icon to save the template Click Delete icon Can delete this template Clcick Edi...

Страница 42: ...bration list select the calibration group to be deleted and click the delete icon to delete this group of calibrations 3 2 5 2 Measuring The measurement tool includes a variety of stitch measurements...

Страница 43: ...data will be automatically saved in the csv file in the TF card The user can input the file name Delete measurement data In the measurement data list select the data you want to delete right click you...

Страница 44: ...nd lock the selected primitives The locked primitives can no longer be operated 3 2 5 4 Selected Graph Double click the image element in the image area a dialog box will pop up You can modify the line...

Страница 45: ...on with the left mouse button to pop up the detailed data dialog box to view all the current detailed measurement data 3 2 5 6 Mark Tool Click Text icon Draw the position to be marked in the image are...

Отзывы: