background image

COMMISSIONING YOUR HEATER

IMPORTANT

Before switching “on” the power at the main circuit breaker panel make sure that the hot
water circuit is free of air pockets or premature failure of the heating element will occur.
To do this open all hot water faucets one at a time for a minute or two until the water flow
is continuous and free from “gulping” and from visible air pockets.

1) With inlet and outlet BALL VALVES fully open, turn on a hot water outlet.

2) Run for 1 minute.

3) Switch on electric supply at circuit breaker panel.

4) The power indicator light should now come on (see Fig. 1), pulsing at first. Allow  40

seconds for the lights to stay full on, the heater is now operating at full power.
NOTE: At this point water temperature may not be hot.

5) Using the OUTLET BALL VALVE slowly reduce water flow  until desired temperature is

achieved at hot water outlet.
NOTE: The water temperature is regulated by the flow  through the heater. The lower the
flow the higher the temperature and vice versa.

MINIMUM SETTING

MAXIMUM SETTING

THE TEMPERATURE CONTROLLING
POTENTIOMETER IS A PRECISION
COMPONENT. ADJUST GENTLY AND
DO NOT TURN BEYOND THE MIN.
AND MAX. STOP POINTS

6) Now  turn the temperature adjustment screw on the first module counter clockwise about

1/8 of a turn, wait for 10-15 seconds and see if the indicator light begins to pulse. If  it does
not, turn another 1/8 of a turn, wait and again see if the lamp begins to pulse. Repeat until
the light is pulsing regularly which indicates that the temperature has stabilized at the set
temperature. Repeat with modules two and three. Check that the outlet temperature is at

6

Sold by www.GadgetsGo.com Authorized Dealer

Содержание EX180 T3

Страница 1: ...ION THE WARRANTY SHALL BE VOID IF THE DESIGN OR STRUCTURE OF THE WATER HEATER HAS BEEN ALTERED IN ANY WAY WHATSOEVER THE MANUFACTURER OF THIS WATER HEATER WILL NOT BE LIABLE FOR ANY DAMAGES BECAUSE OF FAILURE TO COMPLY WITH THE INSTALLATION AND OPERATING INSTRUCTIONS OUTLINED ON THE FOLLOWING PAGES IF YOU REQUIRE ANY HELP OR HAVE ANY QUESTIONS RELATING TO THE INSTALLATION OR PERFORMANCE OF THIS HE...

Страница 2: ...low switches could jam in the on position The unit must be connected to its own individual electric circuit protected by a suitably rated three pole breaker The maximum voltage which can be applied across any heating module is 208 volts WARNING Improper installation adjustment alteration service or maintenance can cause DEATH SERIOUS BODILY INJURY OR PROPERTY DAMAGE Refer to this manual for assist...

Страница 3: ...lacement of the elements 5 The heater should be fixed to the wall using screws in the four mounting holes at each corner of the backplate 6 The unit should be installed in the plumbing system in such a way that there is no tendency for the unit to be starved of water for example by an excessive draw off of cold water just before the unit Also do not fit an unrestricted hot water draw off point bel...

Страница 4: ... type on both inlet and outlet pipes This allows unit to be isolated for maintenance purposes see Fig 1 4 When all plumbing is complete fully check the system for water leaks at all plumbing connections If leak is present take corrective action If leak is at compression fitting slowly tighten compression nut until it stops Fully open both inlet and outlet ball valves Run all hot water outlets fed ...

Страница 5: ...sing four wires three live and one ground of the appropriate rating protected by the correctly rated three pole breaker DANGER FAILURE TO GROUND THE SYSTEM MAY RESULT IN DEATH OR SERIOUS INJURY IMPORTANT BEFORE SWITCHING ON THE POWER AT THE MAIN CIRCUIT BREAKER PANEL MAKE SURE THAT THE HOT WATER CIRCUIT IS FREE OF AIR POCKETS OR PREMATURE FAILURE OF THE ELEMENT WILL OCCUR TO DO THIS OPEN ALL HOT W...

Страница 6: ...ay not be hot 5 Using the OUTLET BALL VALVE slowly reduce water flow until desired temperature is achieved at hot water outlet NOTE The water temperature is regulated by the flow through the heater The lower the flow the higher the temperature and vice versa MINIMUM SETTING MAXIMUM SETTING THE TEMPERATURE CONTROLLING POTENTIOMETER IS A PRECISION COMPONENT ADJUST GENTLY AND DO NOT TURN BEYOND THE M...

Страница 7: ...OWING THROUGH THE UNIT For expected temperature rise at various rates of flow see chart 8 It is possible that drawing off cold water at comparatively high rates of flow elsewhere in the building at the same time that the heater is working could cause premature element failure Care should be taken not to starve the unit of cold water To prevent this from happening open fully the main valve on the c...

Страница 8: ...al for the correct value If the resistance is much greater than the correct value call your supplier for a replacement element SYMPTOM NO HEAT OR LOW TEMPERATURE WITH INDICATOR LIGHT ON 1 WATER FLOW TOO HIGH Reduce the water flow by using an outlet ball valve See page 5 for temperature rise at various flow rates 2 INCORRECT POWER SUPPLY Make sure that the unit is connected to the voltage supply sp...

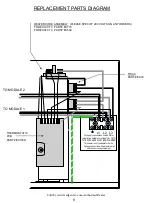
Страница 9: ...nly suitable for 3 wire 3 phase connection with a maximum of 208 volts across each element REPLACEMENT PARTS DIAGRAM THERMOSTATIC PCB PART EX100D HEATER CORE ASSEMBLY PLEASE SPECIFY 208 VOLTS ON ANY ORDERS FOR EX180 T3 PART EX770 FOR EX240 T3 PART EX560 TRIAC PART EX18 TO MODULE 2 TO MODULE 1 9 Sold by www GadgetsGo com Authorized Dealer ...

Отзывы: