


(Step 2) Connect your ADC-4U15
Analog to Digital Converter to any available USB port on your computer using a
CC-USBB cable (1 to 15 foot). A high percentage of systems will be up to date and you will not see any activity or a
pop-up message (allow up to 30 seconds for any system message). If your USB Com driver is out of date, you may
receive a message that your system is being updated or a new driver is being installed. Allow the update to occur
before you move to the next step. If you do not see activity or receive a system message, proceed to step 3.
(Step 3) Insert the installation CD or USB flash drive
and wait for the security message (with a USB flash drive, you
may need to browse to the drive icon from your My Computer link). OK or click the startup.exe file to start the installer
dialog.
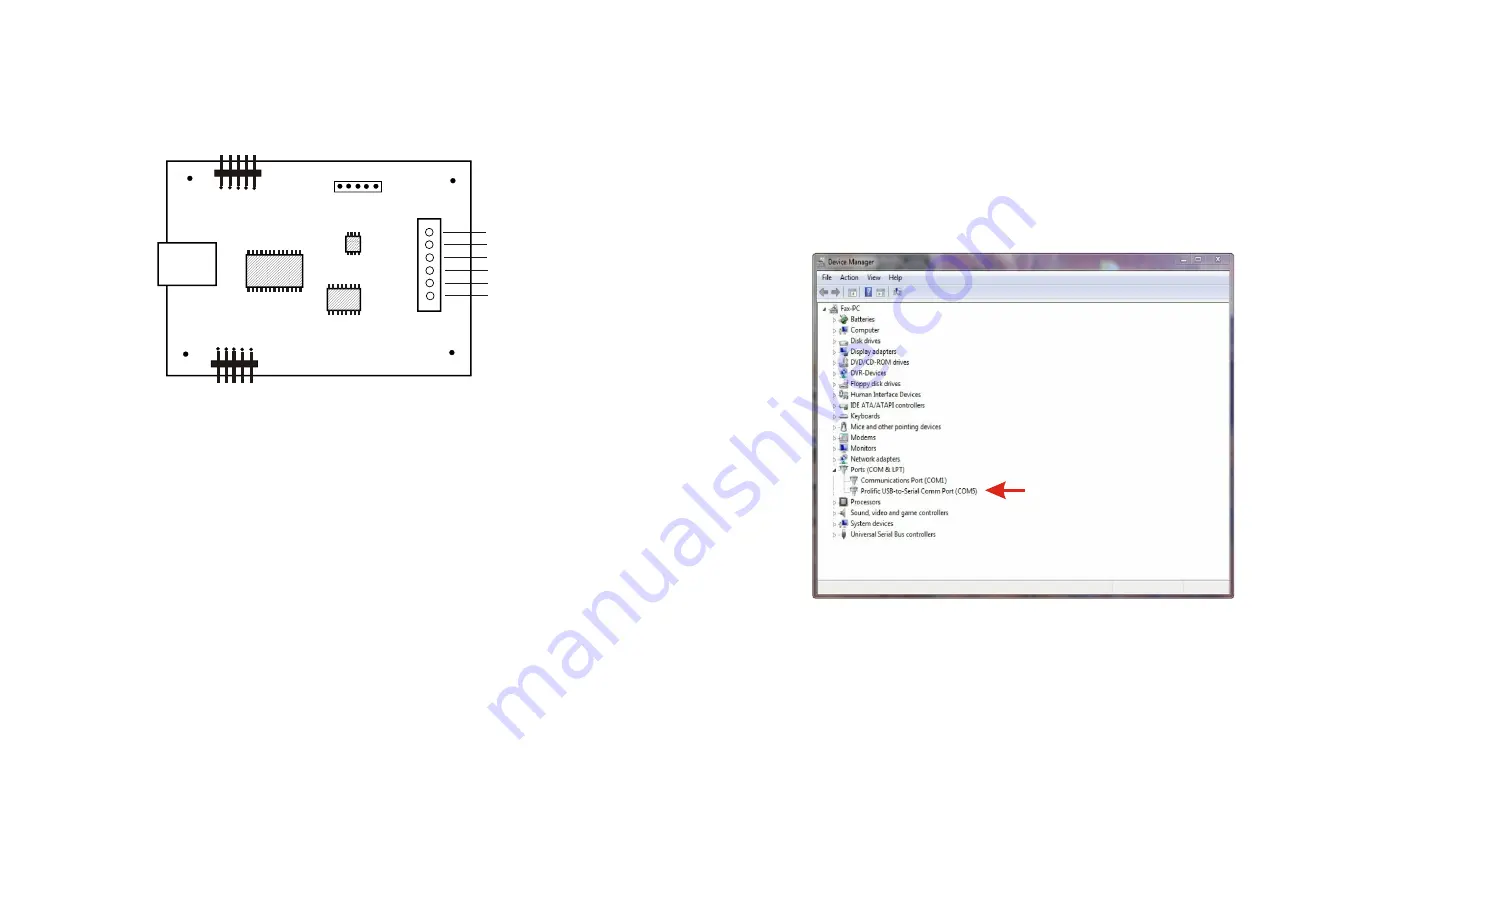
(Step 4) Check your USB Com driver
by clicking on the "Open Device Manager" button in the installer dialog window
and expanding the "Ports (COM & LPT)" category (expand the category by clicking on the + or arrow, see Device
Manager on page 5 or go directly to Device Manager from Control Panel). If you see a "Prolific USB-to-Serial Comm
Port" entry, this is your USB Com
driver* and the com port assigned is
to the right of the entry. Right click
on the entry and select
"Properties"and click the "Driver"
tab. Your USB Com driver must be
Prolific version 3.4.62.293 or higher
(dated 10/17/2013 or later). If your
USB Com driver is not up to date,
right click on the entry and select
"Update Driver Software". If your
USB Com driver is up to date then
please note the Com port number
assigned and jump to step 5.
*verify that this is the com port
assigned to the ADC-4U15 by
unplugging the ADC-4U15 from
your USB port and watching the
entry in device manager. The entry
should disappear and then reappear
when you plug the ADC-4U15 back
in.
If you do not have an Internet
connection or are having problems
with the USB Com driver installation, disconnect the ADC-4U15 USB cable from your computer and install the USB
Com driver from your CD by clicking on the "Install USB Com Driver" button. Please note that you may have to remove
any out of date Prolific Com drivers on your system before the current driver will install correctly. It is important that you
use the remove feature on your CD (not the remove feature in Device Manager). The remove feature is shown after
clicking the "Install USB Com Driver" button from the installer dialog window (allow up to 30 seconds for the installer to
load and appear).
(Step 5) After you have verified
or installed the up to date USB Com driver, reconnect (if not already connected*)
your ADC-4U15 Analog to Digital Converter to the same USB port and install the ADC-4U15 device driver** by clicking
the "Install EECI Device Driver" button from the installer dialog window (if you have auto start disabled, you may
browse to the Windows Driver folder and double click on setup.exe). A desktop icon for the ADC-4U15 will be created.
When installing the ADC-4U15 device driver on a Windows XP or Vista computer, double click on setup.exe in the XP-
Vista folder. *if you reconnect your ADC-4U15 to a different USB port, a different com port may be assigned.
**Please note that the Microsoft .Net Framework must be installed on your system. The .Net Framework is already
Page 3
CONNECTION DIAGRAM
A D C - 4 U 1 5 A N A L O G TO
D I G I T A L C O N V E R T E R
DESCRIPTION
The ADC-4U15 Analog to Digital converters connect to any available USB port on your Windows desktop or laptop
PC (including some tablets and phones). Four analog inputs channels are provided for conversion to 15 bit digital
format. The converters may be set to two channel fully differential mode with 16 bit resolution if required. Three
optional expansion ports are available for connection of up to 144 relays, 144 status inputs or combinations of relays
and inputs.
24 HOUR TECHNICAL SUPPORT
Technical support for our products is available by calling (937) 349-6000. If a technical adviser is not available, please
leave your name, phone number and a time that you can be reached. Your call will be returned as soon as possible
and within 8 hours. Calls received during normal business hours are usually returned within minutes.
WARRANTY AND CARE OF THE ADC-4U15
The ADC-4U15 Analog to Digital Converters are warranted against factory defects for a period of 90 days from the
date of purchase. The ADC-4U15 has proven to be extremely reliable in actual operation during field tests. We
recommend that the ADC-4U15 and associated hardware be installed in a suitable enclosure (4 mounting holes are
provided on the circuit board) and that reasonable precautions be taken to protect the circuit from static discharge,
electrical storm transients and over-voltage to the inputs.
SET-UP AND TESTING
Upon receiving your ADC-4U15, you should connect and test the operation of the hardware to verify proper
operation. Please set-up and test the ADC-4U15 as follows (Windows XP*, Vista, Windows Server, Windows 7, 8.1,
Windows 10 or Windows 11) *service pack 3
(Step 1) Connect to the Internet.
This permits any security or software updates to occur during installation. If you do
not have an Internet connection, you may skip this step.
Page 2
USB
Expansion Port A
Expansion Port B
AUX Header
analog input #1
analog input #2
analog ground (ref -)*
analog input #3
analog input #4
analog ground (ref -)*
*the two analog ground
terminals are tied together
and are used to connect
all four inputs
Single-ended Analog
Connections
(see page 9 for
differential connections)


