
EESGI
guarantees this product to be free from defects in material & workmanship for (1) year.
This warranty does not apply to damage from misuse or incorrect installation/ connection. This warranty does not cover accessories, bulbs, batteries, accidents, alterations, unauthorized use or repair, neglect, misuse,
abuse, damages or defects resulting from normal wear and tear (including chips, fading scratches, abrasions or discoloration due to usage or sun exposure), or failure to follow instructions for care and maintenance, fire,
flood, and Acts of God. This warranty does not include liability for incidental or consequential damages.
EESGI
is not responsible for any damages in excess of the retail purchase price of the product under any
circumstances. The consumer is responsible for the installation of, removal of, and reinstallation of the product.
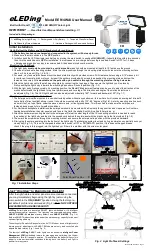
AC-DC Power Adapter/charger (EE-DPS-0.8A) : Must be switch type (digital) 12VDC/0.5-1.5A with current limited power supply (Fig. 1-10). Solar
panel 15' extension cable (EE-SPEC-15F). Folding Table Stand (EE836DTS): For use as a table reading, camping, party and emergency back-up
light (Fig.1-10)
Illuminating coverage: Up to 160º angle by CREE LED head
Detecting Range: 180
°
, up to 60’x 60’ (L-10’, M-35’, H-60+’)
Light Head: 5W 3rd Gen CREE-USA COB LED (color 5000K)
Energy Storage: 17WH Li-poly battery
Solar Panel: 14VDC/4W Tempered Glass (with 10' cable)
AI/SMART Mode: 8+hrs max set to 80+hrs Moon bright set
Weight: 1.0 LBs (Light Body, White or Black)
Operation Temp.: -4ºF to 125ºF, Weatherproof IP64
Brightness: =70W Halogen Lamp/900+Lm (On Peak)
Complies with: FCC Part 15 Class B and ICES-003:2004
User Tips
(video reference: www.eleding.com)
SMART
A
(default setting) is currently upgraded with
AI SMART Firmware
it will
extremely improve the lighting performance for
overcoming poor weather condition. When night time/darkness is sensed it will turn on to higher brightness and will stay for the first up to 3
hours regardless of motion sensing, after the 3 hours early evening activities period time past, it will dim to lowest brightness (Moonlight Soft
Glow profile: Nice for friendly neighborhood safety environment condition during the night time and prevent light pollution in the residential
communities, and match most Dark Sky City Standard). Now for the rest of the night, motion will bring it to full brightness until motion detecting
disappears, then dim to lowest brightness. Brightness pot/knob setting has no affect in SMART A mode. This Mode is highly recommend for
most locations as factory default setting with
AI SMART
based on seasons and Geographical environment automatically adjustability!
SMART B
(selectable as option, refer: Fig 1-4): There is no 3 hours fixed lighting profile and motion activated will bring it to full brightness and
it will dim back down to the pot/knob setting level as Moon Light and Safety illuminating profile. This mode is recommend for Dark Sky City
Standard or the community requires highly reduced light pollution in all light long.
AUTO Mode
(
as old-dated lighting profile is unsafe during the area darkness condition and not recommended
. selectable only under
SMART B mode, refer: Fig 1-4; 2): Set the pot/knob all the way to minimum it will act in AUTO mode and there will be no light until motion
detected. It will be full bright for a fixed 60 seconds after motion stops, then turn off.
WALK TEST
(initial setup for adjusting with light head and sensor direction, etc.): Fixed 5 minutes as AUTO mode profile only, motion will
trigger the light if battery is not low. It will stay on as long as motion detected (led will flicker to indicate motion being detected and light up) and
then turn off 12 seconds later. If walk test is done during night time using
SMART A
, then when walk test expires there will be no 3 hours
window for that first night. The 3 hours fixed higher lighting window will start on the next night automatically.
LOW BATTERY
RED-LED 3 flashes when it turns on to help indicate it is in low battery status
SUN-LIGHT CHARGING
(built-on RED LED indication as advanced features)
- 1 flash to indicate battery is charging
- 2 flashes to indicate battery is close to fully charged
- no flashes mean it is either fully charged, or there is insufficient charge current may caused by solar panel, cable connection issue.
- It can take up to 10 minutes of constant charging before the LED will start to flash.
ADJUSTMENTS
(Fig 2)
- Right knob: Sensitivity/Range adjustment is up to 60' with 180 degree coverage. Default set it up with 80-90% of Max in most lighting
applications. For disable the ePIR in needed to set it at minimums, by turning it all the way to the left.
- Left knob: Illuminating dimming adjustment is capable setting from 10% to 50% of Max brightness level without motion triggered and AUTO
mode when SMART B mode selected. The default setting with 10%/lowest level is recommended, otherwise, it will reduce a lot of discharging
performance in winter season based on sunlight and weather condition. The higher of minimum soft glow level is set, the more stored battery
energy will be more consumed.
AI SMART Benefit
If the
AI
processor detects that the weather is getting critical poor condition and battery does not have enough charging
capacity to support the lighting normal profile, it will automatically convert under few steps: reduce fixing 3hrs of high power profile (1-3hrs
depends); then to
SMART B
mode; then into
AUTO
profile to provide safety lighting until it receives enough sunlight/recover with good weather
to operate the feature correctly with normal and capable of always all night long illumination.
In All Modes
if the
IPM
detects that the battery does not have enough capacity to run either profile in critical conditions, it will automatically
disable illuminating function leaving only the charger active to protect the battery damage from over discharge. Once enough sunlight is
received to charge the battery, the unit will go back to
AUTO; SMART B then SMART A
profile
properly.
Product Specifications
Patented Technology
Please do not dispose of battery in fire as this may result in an explosion. Do not expose the light to fire or intense heat as the battery may explode. Do not immerse
in water. Never look directly into the light or shine it into another person’s eyes. Follow proper safety tips to prevent injury such as falling from a ladder during
installation. Consult your local Bi-Laws or local safety guide lines for installing the light fixture on a building.
Important Safety Information
Optional Accessories:
Note: Installation with factory default settings is recommended for most applications
One Year Limited Warranty
Installation Special Considerations
1. In order to avoid light self-excited oscillation: reflection to flashing. Not suitable for making a test in a small enclosed room/space, or pressing
the light head facing down to directly illuminate to the sensor head (with Jumper 1 open).
2. In front of the motion detector that may affect detecting performance. Avoid installing the unit near air conditioners, central heaters, fan or high
voltage systems. Avoid placing the motion detector head towards street traffic or other high movement areas which cause excessive triggers,
resulting in shorter battery reserve capacity. If this situation is unavoidable, decrease the sensitivity to achieve optimal balance. Motion detector
is more sensitive to motions across the device and less sensitive to motion moving towards or away from it.
3. The solar panel should be mounted where maximum sunlight can be collected. Typically, the solar panel should face south and avoid facing
north (for Northern Hemisphere only, opposite way for Southern Hemisphere) with 35°- 80° tilt up direction (Refer to Fig. 1-5) It’s fine facing to
West or East where sunlight can directly charge the panel for at least 4 hours per day on average without any thing block on top even a small
shadow.
4. Clean the solar panel by water once a year, and remove the snow right after snowing weather.
Rev. EE814WAI 052020 Page 2
Customer Service: 1-(877)579-3889 (M-F, 10am-5pm PST)/[email protected], www.eleding.com