EDS - RK90R - OPTICAL BEAM SMOKE DETECTOR - USER GUIDE
12
8 - SETUP OF THE OBSCURATION CIRCUIT
Setting operations of the electric signal must be perform according to the following sequence:
8.1
- do not power up the detector
8.2
- set up JP7 according to the distance between detector and FX with reference to the table fig.7
(FX01-FX02-FX03 ecc.)
8.3
- move the jumper of Initial Set JP1 (fig.9) in ON position 2- 3 (Alignment) to activate the phase
of initial setting
8.4
- power up the detector
8.5
- the blue led and the red one will start to work in the way described ahead in the cap. 8.12. Before
passing here to this chapter read what follow
8.6
- the P1 trimmer (regulation of the signal level) is factory preset to the 50-60% and it corresponds
to a signal of 5V at the maximum distance
8.7
- to get the best results in the following operations, we recommend the use a measuring instrument
(Multimeter), preferably an analog hand type, for better control of the variations of the signal during
the setup. Good results are also obtained using analog meter STS01 (optional), designed for this
application, that must be inserted on the special connector CN4, set on the printed circuit of the detector
(v. fig. 11). If you don’t have a Multimeter or the STS01, you can perform the setup operations
anyway evaluating the signal level with the frontal Leds indications as described in chap.8.12
8.8
- if available, connect a 5V fullscale multimeter between the SIG terminal and the negative power
supply one and read the analog output signal. Instead of the multimeter it is possible to use the
STS01 meter (optional - fig. 11). If the output signal is very low, it means that the operations of optical
alignment, described in chapter 5, have not been performed in the right way and therefore must be
repeated
8.9
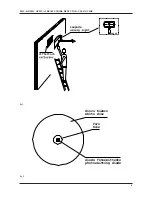
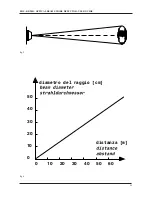
- the transmitter of the detector emits a conic beam which form and dimension, in relation with the
distance between detector and FX, are explained in figures 5 -6. It’s important that the FX is in the
center of the detector’s conic beam because, under these conditions, even if some small movements of
the wall, on which the transmitter is mounted on, happen (caused by deformations), the reflector
remains always within the beam and therefore active.
To obtain this, the operations of fine centering with output signal measuring, explained below,
must be performed with care.
8.10
- adjust the signal around 3V acting on the trimmer P1 (fig.9)
8.11
- search for the maximum output signal optimizing the optical alignment of the detector acting
slowly and in sequence on the 3 screws of regulation V1-V2-V3 present on the optical block. This
procedure takes some time but, if performed well, it assures a perfect operation of the detector for
many years. We suggest to use the following procedure:


