background image

2-7

Editor Description

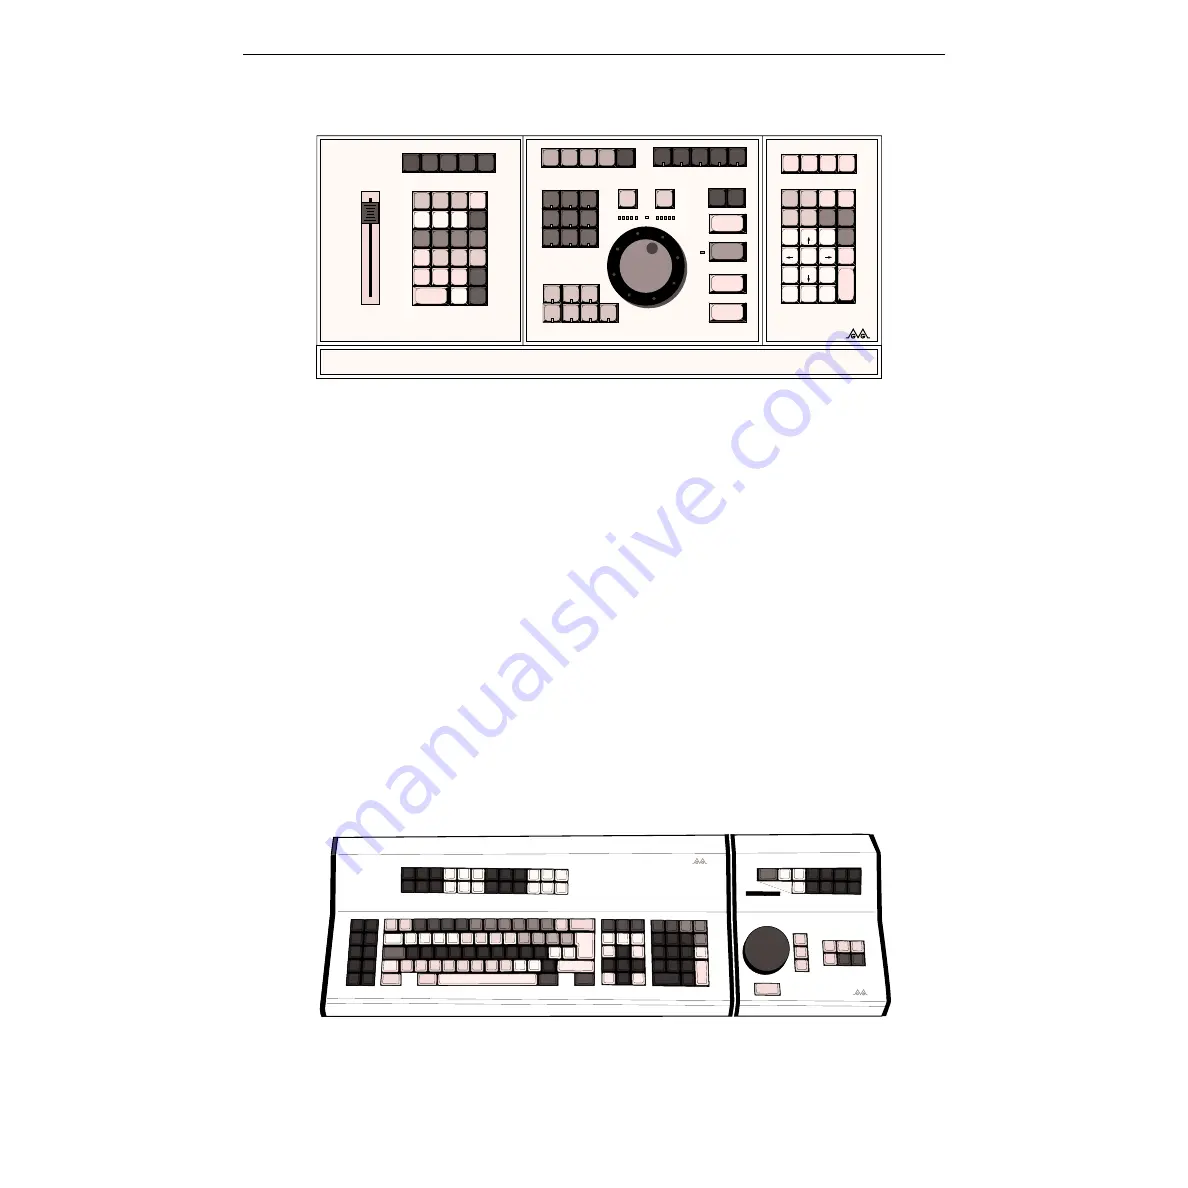
Figure 2-5.   K3 Dedicated Functions Keyboard

K5 Keyboard (VPE-351 Only)

The K5 Keyboard, illustrated in Figure 2-6, consists of an expanded 
keyboard and a separate Jogger panel. The expanded keyboard has special 
function keys which replace multiple keystrokes which would otherwise 
be needed with other keyboards. This Keyboard has three connectors on its 
rear panel. One is for the cable which connects to the Expansion Chassis 
and one is for the cable from the Jogger panel. The third connector is for 
power to the Keyboard and, through the Keyboard, to the Jogger panel.

The Jogger panel has a Jog Knob and keys which are duplicates of those on 
the Keyboard.  It also has a direction (forward/reverse) and speed 
indicator.  The Jogger panel is normally connected to the Keyboard and, 
when so connected, receives  power from it.  However, the Jogger panel 
may be connected to the Jogger connector on the Expansion Chassis and 
then receives power from the Editor.

Figure 2-6.   K5 Keyboard with Jog Panel

SHIFT

ALT

CTRL

REC
OFF

MULTI

FILL

TITLE

NOTE

RESET

ENTER

AUTO
ASMB

OPEN

END

SAVE

MARKS

INPUT

EDL

OUTPT

EDL

UNDO

EDL

ALT

TC

DEL

MOVE

RPPL

PEGS

GANG

SLVS

ASGN

INIT

INSRT

REPL

PKUP

RECAL

SET
OUT

TRIM

IN

SRCH

CONST

CLR

BKSP

SET

IN

TRIM

OUT

VTR

SLOW

VAR

REW

FF

PLAY

CUE

ALL STOP

PREVIEW

RECORD

REPLAY

MATCH

MENU

PMTCH

MARK

IN

MARK

OUT

AUTO

M4

LEARN

M0

DIR

M1

LOAD

M2

OUTPT

M3

SPLIT

CUT

DISS

WIPE

KEY

A4

V

A1

A2

A3

BVB

VBV

YES

NO

A

VTR

B

REC
VTR

VVV

CLEAR

RESET

-

VTR

D

VTR

E

AUX

VTR

C

BLK

VTR

F

STOP

SET

DUR

7

BEGIN

2

3

PG DN

0

00

4

5

SEEK

6

1

END

FR

:

8

9

PG UP

GRASS VALLEY GROUP

0353-355

VPE

GRASS VALLEY GROUP

Содержание VPE-300 Series

Страница 1: ...Manual Number TP0801 00 Issue A1 Date June 1995 VPE 300 Series Installation Information...

Страница 2: ...iption 2 2 Computing Chassis 2 2 Single Board Controller SBC 2 3 Hard Drive 2 3 Floppy Disk Drives 2 3 Fan 2 4 DC Power Supply 2 4 Backplane 2 4 Expansion Chassis 2 5 Keyboard 2 5 K2 Keyboard 2 6 K3 K...

Страница 3: ...Panel Status Indicators 3 27 Program Execution 3 28 SBC Switches 3 28 SBC Jumpers 3 29 Appendix A System Differences Appendix B Port Availability With Options Appendix C K3 Keyboard Information Intro...

Страница 4: ...quipment Rack 3 6 3 5 Expansion Chassis Installation 3 7 3 6 Computing Chassis Rear Panel Connectors 3 11 3 7 Expansion Chassis Connectors 3 13 3 8 K5 Keyboard Connectors 3 14 3 9 Super Edit Main Menu...

Страница 5: ...Baud Rate Selection Jumpers 3 33 A 1 VPE Series Editing Systems Hardware Differences A 1 A 2 VPE Series Editing Systems Software Differences A 2 B 1 VPE SystemVTR Port Availability With GVG Model 100...

Страница 6: ...han that contained in the operating instructions unless you are qualified to do so Symbols and Their Meanings The lightning flash with arrowhead symbol within an equilateral triangle alerts the user t...

Страница 7: ...ponents A residual voltage may be present immediately after unplugging the system due to slow discharge of large power supply capacitors Wait 30 seconds to allow capacitors to discharge before working...

Страница 8: ...and injure you To avoid fire hazard use only components of the the specified type voltage and current rating as referenced in the appropriate parts list Always refer fuse replacement to qualified serv...

Страница 9: ...quipment read the instructions in this document for proper input voltage range selection Danger of explosion if battery is incorrectly replaced Replace only with the same or equivalent type recommende...

Страница 10: ...olded grounding receptacle IEC 320 C13 at one end and stripped conductors 50 5 mm at the other end Conductors are CEE color coded light blue neutral brown line and green yellow ground Other IEC 320 C...

Страница 11: ...this manual when information or discussions are inclusive of all the models listed above the VPEs are referred to as the Editor Where differences exist they are so noted In addition a table listing t...

Страница 12: ...ce with enough room to move the containers around as needed In the Manual Set container locate the Manual Set Inventory sheet Remove all the remaining manuals and the Floppy Disk software set Compare...

Страница 13: ...Others contain the Keyboard cables and any other installation hardware See Figure 1 1 One or more options may be in any of these containers Carefully remove the contents of each container and place on...

Страница 14: ...If there are no discrepancies and either no damage or GVG advised correction action is made continue with this manual Facility Checklist The following checklist is a synopsis of information found in...

Страница 15: ...r ease of use the manual is divided into topical sections Sections are identified and briefly described below General Information This section provides introductory material about your Editor It inclu...

Страница 16: ...lation However it is recommended that you become more familiar with your Editor by continuing with this section Editor Description Your Editor is designed to control videotape machines video switchers...

Страница 17: ...dels use a Hard Disk Drive mounted on the SBC board for long term EDL storage Floppy Disk Drives Two 3 5 inch floppy disk drives mounted on the SBC board and designated DRIVE DF and DRIVE 1 DF1 are st...

Страница 18: ...chassis The interior side of the Backplane has connectors which interface power and signals for the Computing Chassis components For all the Editors inputs outputs for external devices are interfaced...

Страница 19: ...here the top row of letters from the left begins with the letters QWERTY An optional K3 style keyboard is available for all models and an optional K5 Keyboard is available for the VPE 351 NOTE The K2...

Страница 20: ...ects to the KEYBOARD connector Key layout is designed for maximum speed This Keyboard is an option for your Editor The Jog Knob function is identical to the one on the K2 keyboard See Appendix C for a...

Страница 21: ...reverse and speed indicator The Jogger panel is normally connected to the Keyboard and when so connected receives power from it However the Jogger panel may be connected to the Jogger connector on th...

Страница 22: ...Chassis K2 Keyboard K3 Keyboard K5 Keyboard Jogger Panel 3 5 8 9cm 1 6 4 1cm 2 0 5 1cm 2 0 5 1cm 4 0 10 2cm 4 0 10 2cm 17 0 43 2cm 17 0 43 2cm 21 53 3cm 21 53 3cm 21 8 55 2cm 8 20 3cm 19 0 40 0cm 1 0...

Страница 23: ...also been designed to conform to the emission standards of FCC Part 15 sub part J for Class A computing equipment Environmental Requirements Your Editor has been designed to operate efficiently in an...

Страница 24: ...alling your Editor For more complete information consult the appropriate Installation Planning Guide The Computing Chassis for your Editor is designed such that it may either be mounted in a standard...

Страница 25: ...E 331 7 for the VPE 341 14 for the VPE 351 Editor Installation Installing your Editor consists of installing the Computing Chassis and for a VPE 351 the Expansion Chassis placing the Keyboard in the w...

Страница 26: ...all the rubber feet refer to Figure 3 1 and perform the following procedure 1 Locate the bag containing four grey mounting feet and remove them from the bag 2 Carefully turn the Computing Chassis over...

Страница 27: ...ation of the Chassis into the rack To attach the hardware and install the Computing Chassis into the equipment rack refer to Figure 3 2 3 3 and 3 4 and proceed as follows 1 Position the Handle Face Pl...

Страница 28: ...at Step 6 to attach the other mounting bracket Figure 3 3 Handle Mounting Bracket Attachment NOTE Due to differences in racks screws for attaching equipment to the rack are not provided 0354 00 308 Ha...

Страница 29: ...he rear of the mounting brackets on the Computing Chassis into the support brackets attached in Steps 8 and 9 and secure it to the equipment rack with two screws on each side at the handles This compl...

Страница 30: ...ssis Figure 3 5 illustrates installation of the Expansion Chassis To install the Expansion Chassis refer to Figure 3 5 With the Chassis at a convenient height use two rack mounting screws on each side...

Страница 31: ...in a central location where other equipment is both visually and physically at hand Ensure that it is within 16 meters approximately 52 feet of the Computing Chassis and if using the optional K5 Keybo...

Страница 32: ...sure that the routing of signal cables and power cords does not present a hazard to personnel or equipment 1 Ensure that power switches of all equipment to be connected are OFF 2 Connect AC power cord...

Страница 33: ...Video Switcher or the 8466 Preview Switcher The AC Power Cord Connector For Connection of the Character Generator PORT 7 CHAR GEN For Connection of a peripheral such as a Zaxcom NOTES For Connection...

Страница 34: ...mputing Chassis Rear Panel Connectors 0354 00 010 PORT 6 PORT 5 PORT 4 CFID IN SYNC IN COLOR MONITOR For Connection of an Optional Printer For Connection of the Color Frame ID CFID For Connection of t...

Страница 35: ...12 Attach a cable with BNC connectors from a composite video Sync generator to the SYNC IN connector 13 If a CFID signal is available attach a cable with BNC connectors from the CFID source to the CF...

Страница 36: ...ditor However if you are using a K5 Keyboard continue with K5 Keyboard Connections listed on the following page Otherwise proceed to the Start up Sequence Figure 3 7 Expansion Chassis Connectors 1 2 3...

Страница 37: ...s 2 Attach the power cable from the POWER connector on the Key board to an AC Power outlet 3 Attach the cable from the Jogger panel to the JOG connector on the Keyboard Figure 3 8 K5 Keyboard Connecto...

Страница 38: ...and peripheral equipment The Editor Computing Chassis After power up the Super Edit Main Menu illustrated in Figure 3 9 appears on the screen Super Edit is the software program for your Editor If the...

Страница 39: ...nformation e g FROM DRIVE TO DRIVE etc Pressing with the cursor in the left column places the system in the RT 11 operating system environment To return to the Main Menu with a K2 Keyboard type MENU a...

Страница 40: ...ities System Utilities Diagnostics tests Index of menu items Use arrows for up or down to select to deselect Press the RESET key for help information here DIAGNOSTICS SELFTEST V4 0 TP0353 24 VIDEO DIS...

Страница 41: ...hlighted and then press ENTER After a few seconds the Main Menu appears This concludes the Turning Power On procedure Continue on to Making Basic Checks DIAGNOSTICS BOOT DEVICE SELECTION MENU TP0353 4...

Страница 42: ...manufacturer to the software These assignments are made from the Assignment Page and must be done prior to editing An example of an Assignment Page is illustrated in Figure 3 13 Figure 3 13 Machine As...

Страница 43: ...ctory default setting You may exit the Assignment Page by pressing either RESET or an invalid key at any time as long as you are not at a prompt Cable connections between the VTRs and the video switch...

Страница 44: ...gure 3 15 which corresponds to the VTR you are using for the selected VTR and press ENTER For example if the R VTR is a VPR 3 you would enter 01 The model code you entered appears on the line with the...

Страница 45: ...crosspoint and press ENTER Your entry appears on the display 11 Super Edit provides PAL users the opportunity to assign a color frame offset Enter the desired color frame offset value from 0 to 3 and...

Страница 46: ...line by line This mode is activated by selecting a column with the or keys and pressing ENTER You may now enter data vertically in the selected column To go from one line to the next in the column eit...

Страница 47: ...the desired machine and then press ENTER The system prompts PORT 2 Enter the port number the selected machine is connected to and press ENTER The port number you selected appears on the display next t...

Страница 48: ...on the video switcher and the audio mixer 3 Press SHIFT and the dark grey RESET key 4 Alternately press the dark green R VTR A VTR and B VTR keys The Mark Table cursor moves from source to source and...

Страница 49: ...ly displayed in the A VTR s POS column appears in its IN column 10 Press the yellow MARK OUT key The time code currently displayed in the A VTR s POS column appears in its OUT column 11 Press the FF R...

Страница 50: ...ftware Installation procedure Chassis front panel status indicators Program failed to execute Switches not set correctly Jumpers not placed correctly NOTE Make notes of all troubleshooting activities...

Страница 51: ...tion Check for the possibility that the program failed to execute This can be done by re booting the Editor from the Distribution Floppy Disk See Appendix F System Software Installation SBC Switches T...

Страница 52: ...r to Figure 3 17 below which illustrates removal of the SBC All the jumpers are shown in Figure 3 18 and listed in Table 3 2 The table describes the default settings of the jumpers which are set at th...

Страница 53: ...3 30 Section 3 Installing The Editor Figure 3 4 SBC Jumper Locations 0799 00 01 J8 J5 J6 J7 J9 J10 J23 J1 J11 J12 J4 J3 J2 J20 J21 J22...

Страница 54: ...ts RS 422 block at pins 1 2 or RS 232 block at pins 2 3 as the Port 6 serial interface J9 1 Jumper block at pins 1 2 With jumper J10 selects RS 422 as the Key board Port serial interface J10 1 Jumper...

Страница 55: ...al Interface Selection These two 3 pin jumpers which must agree select the type of interface for Port 7 per the following jumper placements 1 2 selects RS 422 2 3 selects RS 232 J7 J8 Port 6 Serial In...

Страница 56: ...d at the 2 3 position Selection is per the following jumper placements 1 2 selects 50 Hz 2 3 selects 60 Hz J12 Keyboard Port Baud Control Select This jumper consists of four sets of two pins each Pins...

Страница 57: ...DISK CHANGE drive feature Jumper off disables the DISK CHANGE drive feature J23 EVENT Signal Source Selection This 3 pin jumper is used to select the source of the EVENT signal to the microprocessor 1...

Страница 58: ...itor models of the VPE series The tables are included here as a convenience for you Table A 1 VPE SERIES EDITING SYSTEMS HARDWARE DIFFERENCES VPE 331 VPE 341 VPE 351 RAM 1 5Mb 2Mb 4Mb VTRs Assignable...

Страница 59: ...System Differences Table A 2 VPE EDITING SYSTEMS SOFTWARE DIFFERENCES VPE 331 VPE 341 VPE 351 VTRs Controlled 4 7 14 EDL Lines 2001 8004 16008 Bins 1 4 8 SWAP yes yes Pvw Preselector yes yes Configs i...

Страница 60: ...number of ports available for VTRs are correspondingly reduced Table B 1 VPE System VTR Port Availability With GVG Model 100 110 200 Family GVG Model 300 1000 3000 4000 GVG Kadenza or Ampex Vista OPT...

Страница 61: ...B 2 VPE System VTR Port Availability With GVG TEN XL Performer GVG Model 1600 1680 Ross CDL Ampex AVC or Century OPTION VPE 331 VPE 341 VPE 351 E E Preview not available not available not available 8...

Страница 62: ...oftware 6 Troubleshooting after uploading keyboard software 7 Settings of the internal keyboard DIP switches 1 K3 Keyboard New Features The following is a list of special features that have been added...

Страница 63: ...r a Wipe The LED on the RECORD key flashes for 2 seconds each time the RECORD key is pressed All selected V and As flash when in the Assemble Mode SHIFT SHIFT SHIFT and SHIFT are usable for editing Ma...

Страница 64: ...ALT C VTR D B VTR or ALT D VTR E PREVIEW VVV or ALT E VTR F C VTR or ALT F VTR G D VTR or ALT AUX H E VTR or ALT BLK I SHIFT V J F VTR K AUX L BLK M MARK IN N SHIFT CUE O SHIFT SPLIT P CUT Q AUTO ASMB...

Страница 65: ...e where you can disassemble it 2 Position the keyboard on a stable padded surface and remove the six screws that hold the bottom cover onto the plastic housing 3 Lift the bottom cover by rotating the...

Страница 66: ...our EDL or adversely affect the Super Edit program currently running 6 Troubleshooting After Downloading If the Super Edit Main Menu does not appear after any of the download procedures given above pe...

Страница 67: ...ded that these settings not be changed For SW2 SW2 1 SW2 7 and SW2 8 are not used Functions of the remaining SW2 switches are described as follows SW2 2 Off selects a normal Split when the SPLIT key i...

Страница 68: ...atic Mode To manually override the automatic mode of Jog Knob operation simultaneously press the right hand SHIFT and VAR keys The keyboard beeps once Repeatedly pressing VAR now switches your from Sh...

Страница 69: ...nob and use a 1 16 hex wrench to loosen the 2 set screws inside the rim of the knob Then lift the knob off the shaft The knob may be snug use a firm grip 3 Turn the keyboard upside down and remove the...

Страница 70: ...endix E Interconnecting Diagrams Introduction This appendix consists of interconnecting diagrams as examples of installations Your system may not be exactly as diagrammed Appendix E Interconnecting Di...

Страница 71: ...J18 J19 J20 J14 J15 J16 J9 J10 J11 J12 J13 J5 J1 J6 J2 J7 J3 J8 J4 1 2 3 4 5 6 7 8 9 10 11 12 13 14 15 16 1 2 3 4 1 2 3 4 AUDIO INPUTS R VTR INPUTS PROGRAM OUTPUTS P H O N E S L M O N I T O R R Compu...

Страница 72: ...rinter Color Monitor 054642 00 054609 16 054602 16 054621 16 054602 16 054591 16 JOG IN VPE PORT EXPANDER 1 2 3 4 5 9 8 7 6 1 2 3 4 5 9 8 7 6 1 2 3 4 5 9 8 7 6 1 2 3 4 5 9 8 7 6 1 2 3 4 5 9 8 7 6 KBD...

Страница 73: ...J18 J19 J20 J14 J15 J16 J9 J10 J11 J12 J13 J5 J1 J6 J2 J7 J3 J8 J4 1 2 3 4 5 6 7 8 9 10 11 12 13 14 15 16 1 2 3 4 1 2 3 4 AUDIO INPUTS R VTR INPUTS PROGRAM OUTPUTS P H O N E S L M O N I T O R R Edito...

Страница 74: ...z SWITCHER I O ON OFF PARALLEL OUT BLK BURST SWI IN REC IN MON OUT B Y V R Y U R Y U COMP Y COMP Y S W I R E C I N M O N O U T I N 4 4 4 3 3 3 2 2 2 1 1 1 054642 00 COMP Y R Y U B Y V B Y V 8466 Previ...

Страница 75: ...ling System Software Note that Super Edit is on two 2 Floppy Disks The procedure to initially install Super Edit software is as follows 1 Insure that the WRITE ENABLE DISABLE tabs on the disks are in...

Страница 76: ...to RAM Disk is not intended for normal operation In this option the system software is put into battery backed RAM rather than on the Hard Drive If the Hard Drive should fail chose this option The ins...

Страница 77: ...tic transition made by pressing a button AUTO TRANS instead of moving a lever arm B Background Video 1 Video that forms a background scene into which a key may be inserted 2 Avideo output generated by...

Страница 78: ...from the chrominance information hue and saturation of the key source Chrominance The colorimetric difference between any color and a reference color of equal luminance The level of chrominance corres...

Страница 79: ...he length of time in hours minutes seconds and frames that a particular effect or event lasts DVE A registered trademark of Nippon Electric Corporation which stands for Digital Video Effects E Editor...

Страница 80: ...nt Porch The portion of the video signal that occurs during blanking and extends from the end of active video to the beginning of sync G Generation The number of times a dupe is removed from the origi...

Страница 81: ...s of a video key Master Slave Editing process in which one or more VTRs slaves are controlled by another VTR master Matte An internally generated flat color signal which is adjusted for luminance hue...

Страница 82: ...ask or related tasks Also see Operating Program and Routine PROM Programmable Read Only Memory An information storage device on which the information once entered cannot readily be changed It is nonvo...

Страница 83: ...ync Synchronization pulses that coordinate the operation of several interconnected video components Sync Roll Synchronizing and rolling the VTRs for editing purposes Synchronous A mode of computer ope...

Страница 84: ...Glossary Glossary 8 Word A unit of data which occupies one location in memory and is acted upon as a unit Also see Bit and Byte Workprint Edited master recording created during off line editing...

Отзывы: