background image

23

Parental Control

You can set a password for anyone who wishes to operate in the “Installation” menu. And you can also set 

the password for the lock channels. (How to set the lock channel please refer to LOCK) Here will show you 

how to setting and how to revising the password.

In “Parental Lock” function, press [OK] key, there will pop a dialogue for you to input the password. 


When you input the correct password, you will see a screen like below:


Menu Lock determining that when user wishes to enter “Installation” menu, whether have to input 


Password or not. If the setting of “Menu Lock” is “On” which means user have to key in password, 


set “Off” means unlock.

Channel Lock determining that when user wishes to play the lock channels, whether have to input 


the password or not. If the setting is “On”, play the channels with lock mark will show up a dialogue 


on the screen and ask for the password. If the setting of “Channel Lock ”is “Off”, the Lock function 


will invalid.

New Password is used for revising password; you can input the new password in this item by using 


number keys directly. After you filled in 4 digital numbers, the highlight will auto skip to Confirm 


Password and ask you to input the new password again. If the password is correct, the screen will 


show up a message of “Saving Data, Please Wait…” After finish saving and drawback to “System


 Setup” menu, the revising is complete.

Press [Menu] key to draw back from the “Parental Lock” menu. 
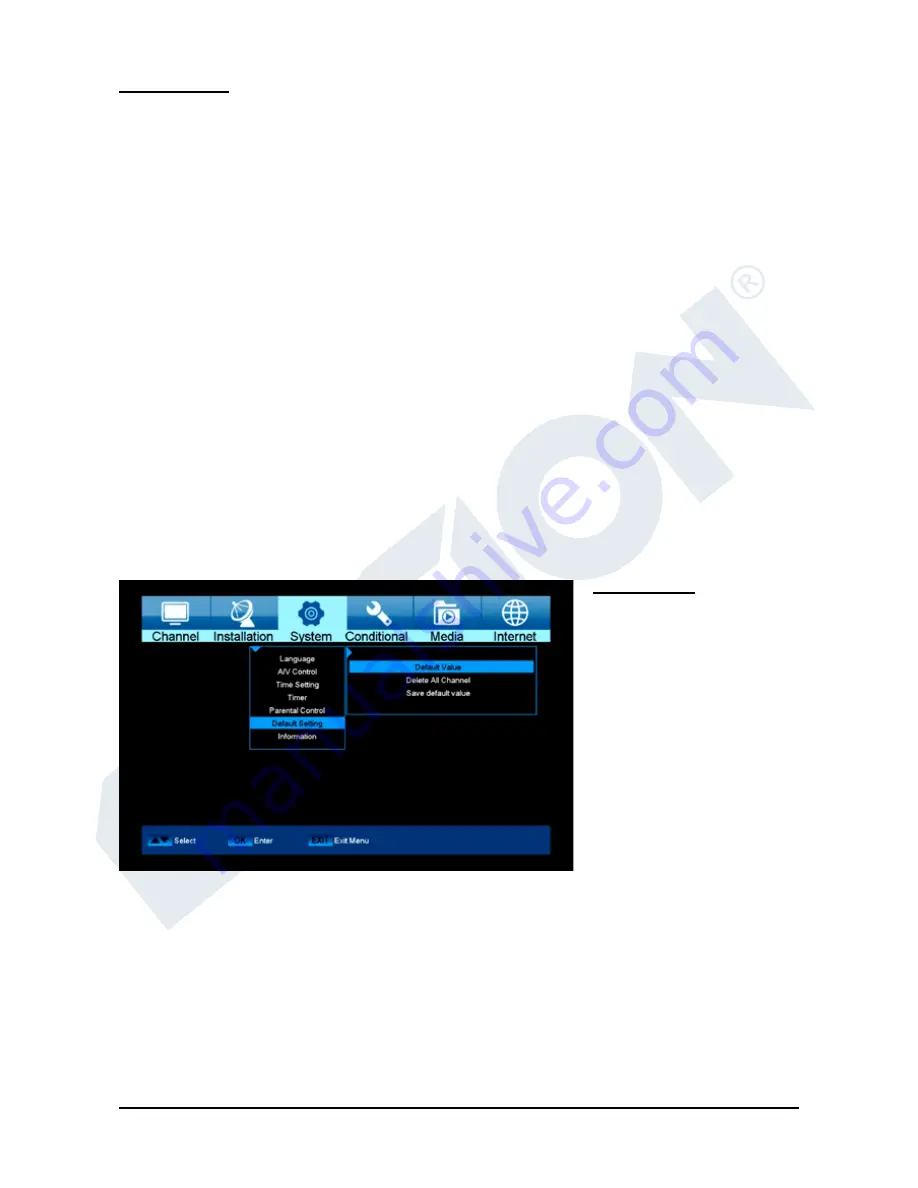
Factory setting

Use the up/down arrow buttons 

to select one of the following 

menu items and press the 

OK 

button

.

Functions and settings in the menu:

Factory setting:


Use of this function deletes ALL user programmed values and reinstalls factory 


settings. After selecting with the OK button, enter the PIN code (as a rule 0000). 


A warning window appears afterwards.

Delete all channels:

  The channel lists are deleted here.

Save as factory setting: 

The current configuration can be specified here as factory setting.

Exit the ‘Factory Setting’ menu by pressing the

 EXIT button.


Note: 

The ‘USB’ menu is only accessible if a suitable USB memory device is plugged in and recognised by 

the receiver.

Содержание progressiv hybrid

Страница 1: ...progressiv hybrid F u l l H D D V B C T 2 R e c e i v e r Operating instructions www edision gr...

Страница 2: ...2...

Страница 3: ...3 Operating instructions progressiv hybrid F u l l H D D V B C T 2 R e c e i v e r...

Страница 4: ...tes 16 Installation 18 Terrestrial Installation 18 Cable Installation 20 Netw ID Scan 20 Menu system settings 20 Language 20 A V Control 21 Time setting 21 Timer 22 Parental Control 22 Factory setting...

Страница 5: ...5 Internet 28 Ethernet Settings 28 YouTube 29 Web TV 29 Pss Reader 30 Weather Forecast 30...

Страница 6: ...mains cable from damage 10 Only use auxiliary devices accessories specified by the manufacturer 11 Disconnect the device during thunderstorms or extended periods of non use 12 All maintenance work sho...

Страница 7: ...voltage and user accessible parts Only use parts provided by the manufacturer during repair This symbol on the product or in the operating instructions indicates that the electrical or electronic devi...

Страница 8: ...annel List and confirms a selection Exits a Menu Dialogue window Selection of the electronic program guide EDIVISION To search for programs in lists Displays a file list Scrolls up or down in lists of...

Страница 9: ...ellite TV reception a specialist technician must calibrate your satellite TV system with a digital TV level meter Connect the receiver using HDMI cable from the HDMI output to your TV HDMI input Now c...

Страница 10: ...ch Multilingual OnScreenDisplay EDIVISION electronic program guide Picture In Grafik PIG support Channel edit and Fanourite lists Auto and Manual channel search Auto timer n Off Wifi Connection PVR vi...

Страница 11: ...far as information is available including start time the name of the favourite list the time indicates the availability of Teletext for the current program indicates if the transmitted program is encr...

Страница 12: ...uttons and another channel can be chosen with the OK button If the channel provides program related information it will be displayed in the list e g duration of the program in form of bars program tit...

Страница 13: ...tons in the following window to navigate between the menu items and the left right arrow buttons and OK button to set the values The following settings can be made in the menu Timer Timer number Calli...

Страница 14: ...for Move Lock Delete Rename and Skip Functions and settings in the menu Use the left right arrow buttons to switch back and forth between the columns in the menu window the up down arrow buttons to m...

Страница 15: ...ible to lock multiple channels simultaneously by selecting the respective channels first in the channel list left menu page with the OK button and then carrying out steps 2 3 as explained above How to...

Страница 16: ...ed moved and or locked upon confirmation with Yes NO changes are saved when selecting No Edit favourites Your favourite lists for TV or Radio programs can be customized in this menu in order to suit y...

Страница 17: ...llow bar in the favourite list in the right menu window to the channel you want to be removed 2 Change now to the central part of the menu and navigate the cursor to the Remove symbol The symbol is hi...

Страница 18: ...s are changed NO changes are saved when selecting No Menu installation Terrestrial Installation Cable Installation Netw ID Scan Terrestrial Installation Press OK key to enter the selected item 1 You c...

Страница 19: ...the Scan Mode to Blind Scan 4 You can input the Symbol Rate by use the numeric button of the RCU 5 You can select the QAM value among 16QAM 32QAM 64QAM 128QAM and 256QAM 6 You can turn ON or OFF the N...

Страница 20: ...nic program guide EDIVISION EDV should be displayed The program provider must support the language Subtitle language Specify the language here in which the subtitle information will be displayed Langu...

Страница 21: ...ur mode for image reproduction Digital Audio Out Specify here the mode in which the digital audio output should work Time setting Functions and settings in the menu GMT user Select On here and the rec...

Страница 22: ...ere Select the Message input if wanting to display a message on the screen at a certain time Wake up message This item only appears when coming across the Message setting in the previous item This all...

Страница 23: ...4 New Password is used for revising password you can input the new password in this item by using number keys directly After you filled in 4 digital numbers the highlight will auto skip to Confirm Pas...

Страница 24: ...e receiver tries to connect with the factory set server by EDISION A correct cable configuration and providing the proper values in Network Settings menu item according to your network the receiver co...

Страница 25: ...upload speed via USB depends on the data in the USB memory It is recommended to prepare the USB memory device first via the HDD formatting ALL data will be deleted item in the USB Memory Information...

Страница 26: ...e Auto You can press Left Right key to select On or Off If the current channel has subtitle information it will be showed up automatically while this function is ON if this function is OFF you need tu...

Страница 27: ...de Your videos can be played from the USB medium in the video mode Your music can be played from the USB medium in the music mode Memory Information Information can be found in this menu about the con...

Страница 28: ...Remove Safely remove the USB device Internet Ethernet Settings YouTube Web TV Rss Reader Weather Forecast Ethernet Settings Note The IP Address Subnet Mask Gateway DNS Preferred and DNS Alternate item...

Страница 29: ...r an alternative name server DNS Server can be indicated here Mac Address This item is defined hardware sided and shows the identifier of the network interface This item is not changeable WIFI Auto St...

Страница 30: ...e remote control 4 Enter this address URL of the channel 5 Press the red button to confirm the information Notes Use the numeric key 1 to input the following special characters Enter the characters _...

Страница 31: ...31...

Страница 32: ...32...

Страница 33: ...33 www edision gr...

Отзывы: