background image

Version of 14 June 2016

9

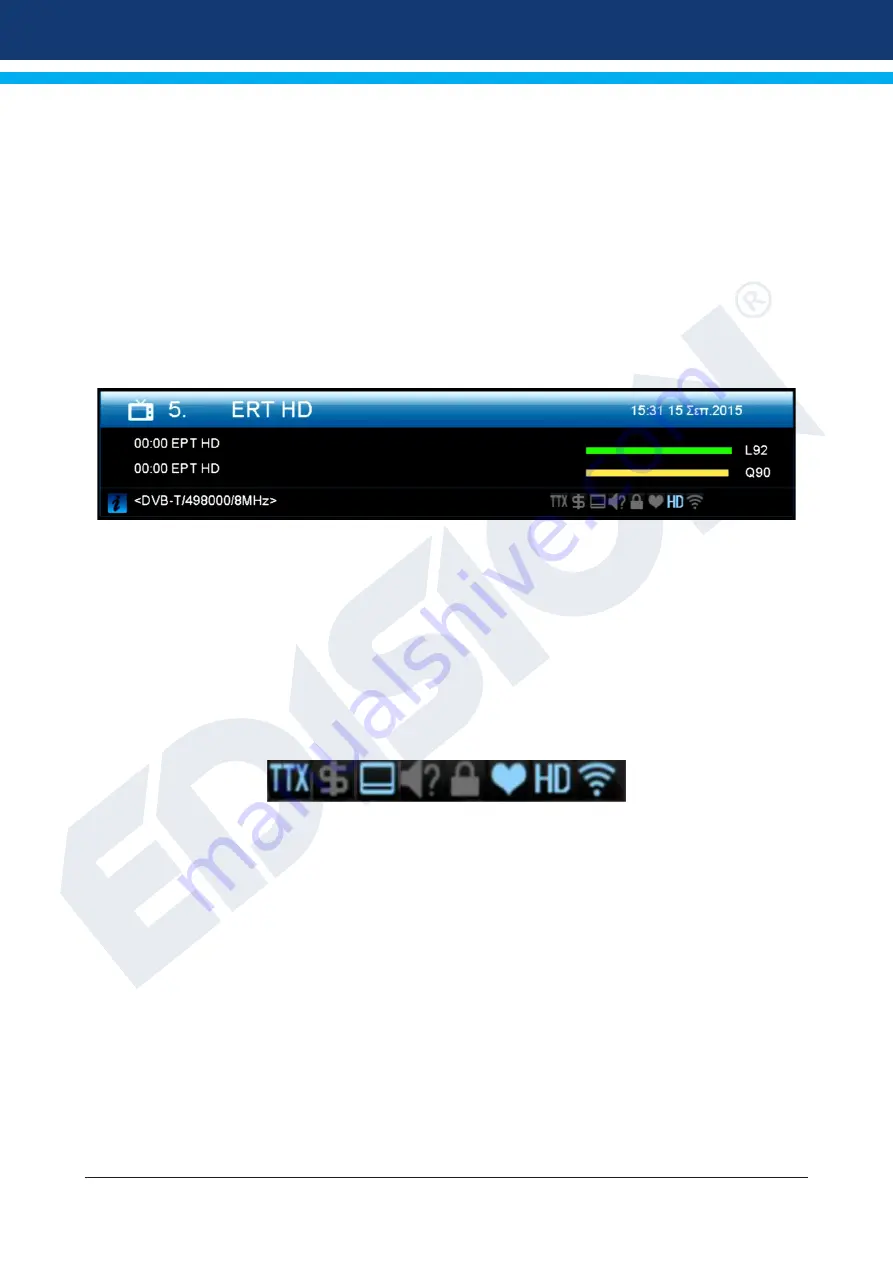
►Information bar (InfoBar) 

When in the TV/Radio mode, the 

‘INFO’ button

 displays an information bar (InfoBar) at the lower edge of the 

screen. This bar is faded-in up to 10 seconds.

How to change the duration of fading of the information bar:

1. 

Press the 

‘MENU’ button

 to open the main menu.

2. 

Use the 

left/right

 arrow buttons to navigate to the ‘System’ item.

3. 

Use the 

up/down

 arrow buttons to navigate to the ‘Other settings’ menu item and press 

 the 

OK button

.

4. 

Use the

 left/right

 arrow buttons to select the value in seconds you want to set (max. 10s) 


in the ‘OSD time exceeded’ item.

5. 

Press the 

EXIT button

 to exit the menu.


The InfoBar in TV or Radio mode shows the following information about the current program and selected 

station:

- the place in the program list

- the name of the station

- the current program (as far as information is available) including start time

- the following program (as far as information is available) including start time

- the name of the favourite list

- the time


- indicates the availability of Teletext for the current program

- indicates if the transmitted program is encrypted

- indicates if subtitles are available

- indicates if the sound broadcasted is in stereo or mono format, left or right balance

- indicates if the program is blocked (child protection)

- indicates that the station is present in a favourite list

- indicates if the program is transmitted in HD

- indicates if Wi-Fi network connection exists

Functions and settings:

If the InfoBar is displayed, detailed information about the current program can be displayed (if available) by 

(repeated) pressing the 

‘INFO’ button

. If multiple information pages are available, scroll through these pages 

by using the 

‘PAGE+’/’PAGE-’ buttons

. Use the

 left/right

 arrow buttons to switch between the information 

of the current and next program. Use the 

red button

 to display further (technical) information. Use the EXIT 

button to exit the menu with the detailed information.

Use the 

EXIT button

 again to switch off the InfoBar.

Содержание Progressiv Hybrid lite

Страница 1: ...progressiv hybrid lite LED FullHD DVB C T2 Receiver User s Guide hybrid lite hybrid lite...

Страница 2: ...guide 10 11 Channel 12 Edit channel 12 Edit favourites 14 Installation 16 Terrestrial Installation 16 Cable Installation 18 Network ID Scan 18 Menu system settings 18 Language 18 A V Control 19 Time s...

Страница 3: ...n of 14 June 2016 3 Media 25 File List 25 Memory Information 25 Check Speed USB 26 USB Safely Remove 26 Internet 27 Ethernet Settings 27 YouTube 28 Web TV 28 Pss Reader 28 Weather Forecast 29 Google M...

Страница 4: ...Protect the mains cable from damage 10 Only use auxiliary devices accessories specified by the manufacturer 11 Disconnect the device during thunderstorms or extended periods of non use 12 All maintena...

Страница 5: ...ion between voltage and user accessible parts Only use parts provided by the manufacturer during repair This symbol on the product or in the operating instructions indicates that the electrical or ele...

Страница 6: ...a Menu Dialogue window Selection of the electronic program guide EDIVISION Program List Search Displays a file list Channel List Scroll Forwards or Backwards Displays the favourite lists Displays the...

Страница 7: ...with a digital TV level measuring instrument Connect the receiver s HDMI output to the HDMI input of your television set TV for HDTV quality Then connect the coaxial cable from the terrestrial antenna...

Страница 8: ...VISION electronic program guide Supports Picture In Grafik PIG Channel Edit and Favourite lists Auto and Manual channel search n Off 3G Connection USB 3G Modem Wifi Connection WiFi USB Dongle PVR USB...

Страница 9: ...program as far as information is available including start time the name of the favourite list the time indicates the availability of Teletext for the current program indicates if the transmitted prog...

Страница 10: ...down arrow buttons and another channel can be chosen with the OK button If the channel provides program related information it will be displayed in the list e g duration of the program in form of bars...

Страница 11: ...p down arrow buttons in the following window to navigate between the menu items and the left right arrow buttons and OK button to set the values The following settings can be made in the menu Timer Ti...

Страница 12: ...the symbols for Move Lock Delete Rename and Skip Functions and settings in the menu Use the left right arrow buttons to switch back and forth between the columns in the menu window the up down arrow...

Страница 13: ...p It is possible to lock multiple channels simultaneously by selecting the respective channels first in the channel list left menu page with the OK button and then carrying out steps 2 3 as explained...

Страница 14: ...s only deleted moved and or locked upon confirmation with Yes NO changes are saved when selecting No Edit favourites Your favourite lists for TV or Radio programs can be customized in this menu in ord...

Страница 15: ...he cursor yellow bar in the favourite list in the right menu window to the channel you want to be removed 2 Change now to the central part of the menu and navigate the cursor to the Remove symbol The...

Страница 16: ...favourite lists are changed NO changes are saved when selecting No Menu installation Terrestrial Installation Cable Installation Network ID Scan Terrestrial Installation Press OK key to enter the sel...

Страница 17: ...if you set the Scan Mode to Blind Scan 4 You can input the Symbol Rate by use the numeric button of the RCU 5 You can select the QAM value among 16QAM 32QAM 64QAM 128QAM and 256QAM 6 You can turn ON...

Страница 18: ...the electronic program guide EDIVISION EDV should be displayed The program provider must support the language Subtitle language Specify the language here in which the subtitle information will be dis...

Страница 19: ...ect the colour mode for image reproduction Digital Audio Out Specify here the mode in which the digital audio output should work Time setting Functions and settings in the menu GMT user Select On here...

Страница 20: ...io Channel here Select the Message input if wanting to display a message on the screen at a certain time Wake up message This item only appears when coming across the Message setting in the previous i...

Страница 21: ...lid 4 New Password is used for revising password you can input the new password in this item by using number keys directly After you filled in 4 digital numbers the highlight will auto skip to Confirm...

Страница 22: ...menu item the receiver tries to connect with the factory set server by EDISION A correct cable configuration and providing the proper values in Network Settings menu item according to your network the...

Страница 23: ...n these circumstances the upload speed via USB depends on the data in the USB memory It is recommended to prepare the USB memory device first via the HDD formatting ALL data will be deleted item in th...

Страница 24: ...screen with the following options 1 Subtitle Auto You can press Left Right key to select On or Off If the current channel has subtitle information it will be showed up automatically while this functio...

Страница 25: ...the USB medium in the image mode Your videos can be played from the USB medium in the video mode Your music can be played from the USB medium in the music mode Memory Information Information can be fo...

Страница 26: ...ry device The window displays the estimated transfer write speed and if this speed is suitable for storing high definition channel content Furthermore you see how many channels can be recorded simulta...

Страница 27: ...owing items IP Address Enter an unassigned IP address from your network here Subnet Mask Enter the subnetmask corresponding to the network here Gateway Enter the IP address of the Gateway to the Inter...

Страница 28: ...right arrow buttons to switch the column Use the OK button to display more information about the messages in the right column The selected list is updated by pressing the red button the green button a...

Страница 29: ...s about a specific location Press the green button and use the arrow buttons to select and navigate in the letter field and the OK button to specify a new location To confirm navigate to the OK field...

Страница 30: ...www edision gr HDMI SCART DC 5V 1 0 A S PDIF ANT IN HDMI SCART DC 5V 1 0 A S PDIF ANT IN...

Отзывы: