background image

18

Version of 20 August 2019


in this item, accessing the menu is only possible via PIN code. Channel bar, 


EDIVISION and favourite lists are exempt.

Channel lock:   

Specify here whether or not channels can be locked in general.

New password: 

Specify a new password here.

Confirm password:


Repeat the new password.

Exit the ‘Youth Protection’ menu by pressing the EXIT button.

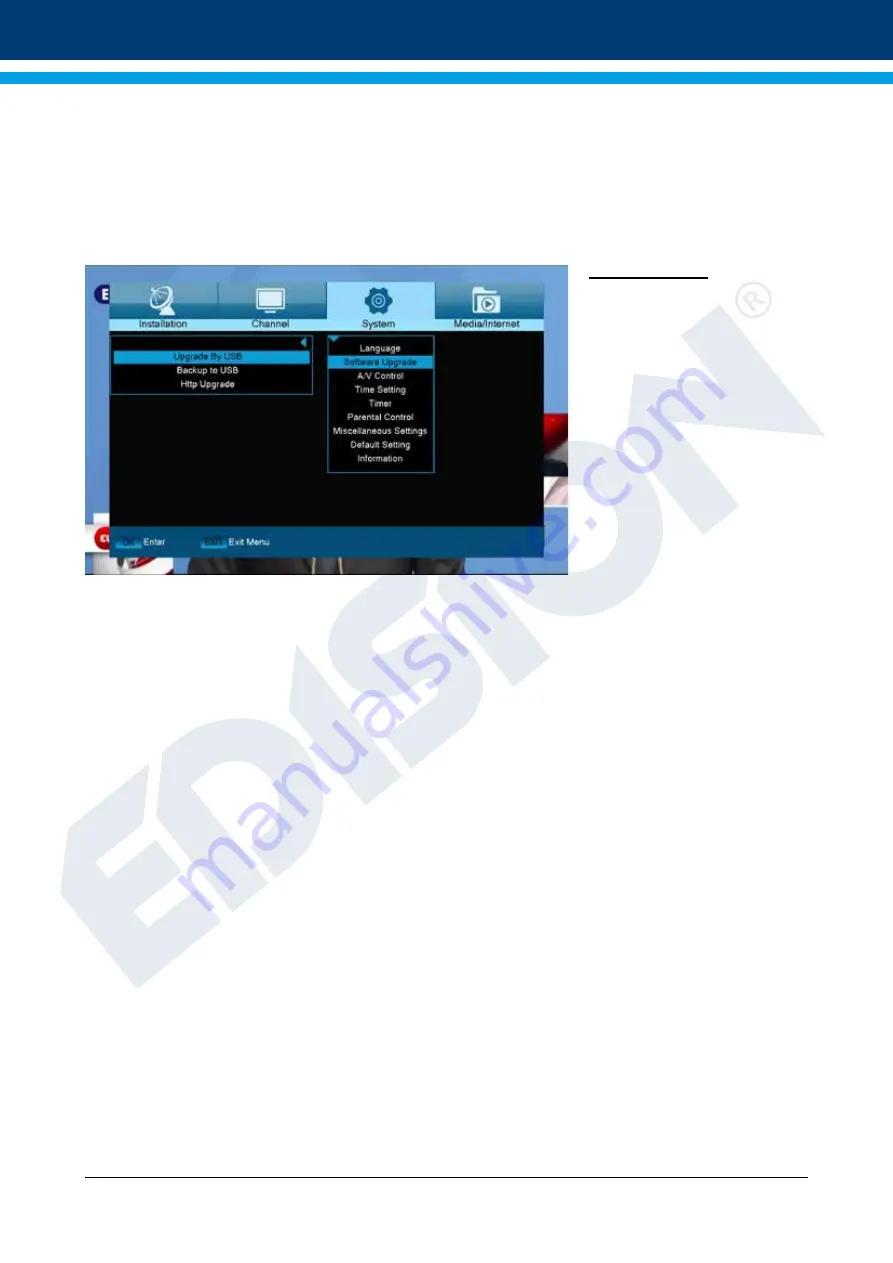
Software Update

Standard: 

This menu is only 

accessible if a suitable USB 
data storage is connected and 
recognized by the receiver. 
Otherwise, this menu is not 
accessible.
Another prerequisite for an 
‘Update of USB/HDD’ is that 
the appropriate software file 
is located on the USB data 
storage. This file, with the 
‘.abs’ file extension, can be 
downloaded from the Edision 
website via a PC with Internet 

connection:

http://www.edision.gr

Save the file downloaded from your PC onto the USB data storage and plug this data storage into the USB 
port of ‘picco T265’.

Note: 

In these circumstances, the upload speed via USB depends on the Organisation of the data on the 

USB memory. It is recommended to prepare the USB memory first via the ‘HDD formatting’ item in the 
‘USB’/’Memory Information’ menu (to format, start with the yellow button) and then save the software file 
(.abs) thereon.

Functions and settings in the menu:

Open file:


 If the receiver has found files on the USB memory device to be updated, it will 
display them. It is possible to specify the file to be updated with the arrow buttons or 
OK button. If no files were found, it will be indicated graphics.

Update Mode:


 Use the arrow buttons or OK button to set the parts of the software to be updated.

Start:


 Once the software file and update mode have been specified, navigate with the up/
down arrow buttons to the ‘Start’ item. Press the OK button and the update process 
starts.

Attention:

 The software update starts immediately after pressing the OK button and must not be interrupted.

Exit the ‘Update of USB/HDD’ menu by pressing the EXIT button. 

Содержание picco T265

Страница 1: ...picco T265 DigitalTerrestrialReceiverDVB T2H 265 HEVC User s Guide Support ...

Страница 2: ...2 Version of 20 August 2019 The CE certificate of the product is available on our webpage by visiting this link https www edision gr en support ...

Страница 3: ...Channel 13 Organizing Services 13 Organizing Favourites 15 System 17 Language 17 Software Update 18 A V Control 19 Time Setting 19 Timer 20 Parental Control 21 Miscellaneous Settings 21 Default setting 22 Information 22 Media Internet 23 File List 23 Storage Information 23 PVR setting 24 USB Speed Test 24 Remove USB Device Safely 25 Ethernet Settings 25 YouTube 27 Weather Forecast 27 Rss Reader 27...

Страница 4: ...9 Protect the mains cable from damage 10 Only use auxiliary devices accessories specified by the manufacturer 11 Disconnect the device during thunderstorms or extended periods of non use 12 All maintenance work should be carried out by qualified service personnel Maintenance is required when the device is damaged in any way including damage to the mains cable or mains plug Also in case the device ...

Страница 5: ...ation between voltage and user accessible parts Only use parts provided by the manufacturer during repair This symbol on the product or in the operating instructions indicates that the electrical or electronic device must be disposed of separately from household waste at the end of the service life Separate collection systems exist for recycling For further information please contact your local au...

Страница 6: ...ndyouhavecompletedthe learning procedure of ON OFF TV POWER key Then release the POWER key of your original TV remote control If the copying procedure fails the red LED will blink and stay OFF In this case please repeat the procedure For the next programmable function please repeat steps 1 to 2 Switching between TV AV mode TV AV Increasing decreasing volume VOL VOL Now you can operate your TV with...

Страница 7: ...reception your antenna and cable installation should be calibrated and inspected by a qualified professional with a digital TV level measuring instrument Connect the receiver using HDMI cable via the HD OUT output port to your TV s HDMI input port Then connect the coaxial cable from the terrestrial antenna to the ANT IN input of the receiver Insert the batteries into the remote control Notes on th...

Страница 8: ...annel Edit and Favourite Lists Auto and Manual channel search Auto timer Οn Off PVR via USB Τime Shift function Subtitle support Teletext support Last channel auto save Software upgrade backup channel list via USB Supports FAT 16 32 NTFS Parental control 100 240V Voltage 50Hz 60Hz Media player MP3 JPEG BMP AVI DivX VOB MKV Front Panel Display LED Display Buttons Power Channel 1 x USB 2 0 slot Side...

Страница 9: ...g program as far as information is available including start time the name of the favourite list the time indicates the availability of Teletext for the current program indicates if the transmitted program is encrypted indicates if subtitles are available indicates if the sound broadcasted is in stereo or mono format left or right balance indicates if the program is blocked child protection indica...

Страница 10: ...p down arrow buttons and another channel can be chosen with the OK button If the channel provides program related information it will be displayed in the list e g duration of the program in form of bars program title Press the OK button to display detailed information about the program if available Use the left right arrow buttons to switch between Now and Next EDIVISION modes The More mode displa...

Страница 11: ... up down arrow buttons in the following window to navigate between the menu items and the left right arrow buttons and OK button to set the values The following settings can be made in the menu Timer Timer number Calling up the timer menu automatically switches to the next available programmable timer Use the left right arrow buttons the OK button and the up down arrow buttons to switch between ti...

Страница 12: ...tly into blind scan mode to scan the current programs 4 Press Green key to enter the following menu Scan Mode 1 There are two modes You can scan channel by channel or by frequency 2 When scan band is UHF and region is France the range of Ch No is from 21 to 69 3 When scan Band is VHF and region is France the range of Ch No is from 1 to 9 it s according to region 4 Press Red key to enter blind scan...

Страница 13: ...The green button displays other possible options The following options are available Select all All channels are selected Deselect all All channels are deselected Select other All channels are selected that were previously not selected Select TP All channels of a transponder can be selected here The FIND button allows quick search for channel names A search window appears after pressing this butto...

Страница 14: ...in the right part of the menu and navigate the cursor to the Delete symbol The symbol is highlighted in colour 3 Press the OK button The channel is removed from the list Tip It is possible to delete multiple channels simultaneously by selecting the respective channels first in the channel list left menu page with the OK button and then carrying out steps 2 3 as explained above How to name a channe...

Страница 15: ...ws the list currently displayed The green button displays other possible options for channel lists The following options are available Select all All channels are selected Deselect all All channels are deselected Select other All channels are selected that were previously not selected Select TP All channels of a transponder can be selected here When in the left column the FIND button enables quick...

Страница 16: ...hted in colour 3 Press the OK button 4 Use now the up down arrow buttons to move the selected channel The channel now moves up and down in the list 5 By pressing the OK button the channel remains at the new position and exits the Move mode Tip It is possible to move multiple channels simultaneously by selecting the respective channels first in the channel list left menu page with the OK button and...

Страница 17: ...here in which the electronic program guide EDIVISION EDV should be displayed The program provider must support the language Subtitle language Specify the language here in which the subtitle information will be displayed Language must be supported by the service provider Teletext Specify the language here in which the teletext video text information will be displayed Language must be supported by t...

Страница 18: ... data storage into the USB port of picco T265 Note In these circumstances the upload speed via USB depends on the Organisation of the data on the USB memory It is recommended to prepare the USB memory first via the HDD formatting item in the USB Memory Information menu to format start with the yellow button and then save the software file abs thereon Functions and settings in the menu Open file If...

Страница 19: ...ollowing items Adjust GMT This item can only be reached when the On option was set for the GMT user item It will be possible to specify here the difference between your local time and GMT Greenwich Mean Time For Germany Austria Switzerland Luxembourg applies UTC 01 00 For Athens Bucharest Istanbul applies UTC 02 00 Scroll with the left right arrow buttons to the value you want to set Summer Specif...

Страница 20: ... This allows to choose between Birthday Anniversary or General Station This item does NOT appear when coming across the Message setting in the Timer Service item Otherwise set the channel here to be recorded or to which to be woken up Date Set the start date of the recording here Start time Set the start time here Duration This item is only changeable if the Recording TV Channel value or Recording...

Страница 21: ...alogue on the screen and ask for the password If the setting of Channel Lock is Off the Lock function is invalid 4 New Password is used for revising password you can input the new password in this item by using number keys directly After you filled in 4 digital numbers the highlight will auto skip to Confirm Password and ask you to input the new password again If the password is correct the screen...

Страница 22: ...rs afterwards Delete all channels The channel lists are deleted here Save as factory setting The current configuration can be specified here as factory setting Exit the Factory Setting menu by pressing the EXIT button Note The USB menu is only accessible if a suitable USB memory device is plugged in and recognised by the receiver Information Information about the device is displayed here This info...

Страница 23: ...ewed from the USB medium in the image mode Your videos can be played from the USB medium in the video mode Your music can be played from the USB medium in the music mode Storage Information Information can be found in this menu about the connected USB memory device Volume Displays the name Total memory Displays the total memory capacity Available memory Displays the available memory capacity File ...

Страница 24: ...e Shift Here you can enable disable the Time Shift function Time Shift for recording This item is variable only if the Time Shift item is set to On Here you can set whether the Time Shift function will be maintained during the recording Encrypted reception Here you can specify whether to allow reception of encrypted programs Exit the PVR Settings menu pressing the EXIT button USB Speed Test In thi...

Страница 25: ...rk Subnet Mask Enter the subnet mask corresponding to your network Gateway Enter here the IP address of the Internet gateway DNS Preferred Here you can enter the IP address of a DNS server DNS Alternate Enter here the IP address of an alternate DNS server Tip Use the numbered buttons on the remote control to enter the numbers Exit the Network Local Settings menu pressing the EXIT button http Updat...

Страница 26: ...tering Restarting Auto update If you select this menu item the receiver will try to connect with the factory configured server of EDISION Provided that the cables are properly setup and the values that correspond to your network in the Network Settings menu item are correct the receiver connects and acquires the list of files from the server In this case the File Name Date Time and File Size infor...

Страница 27: ...20 December 2018 27 ΥουΤube Access your favorite YouTube videos Weather forecast Weather information through your favorite EDISION receiver Rss Reader Keep up to date from your favorite websites through Rss Reader ...

Страница 28: ...www edision gr EDISION HELLAS LTD FARMAKEIKA 57001 N RISIO THESSALONIKI GREECE ...

Отзывы: