background image

80

Installation et configuration du pilote (Windows)

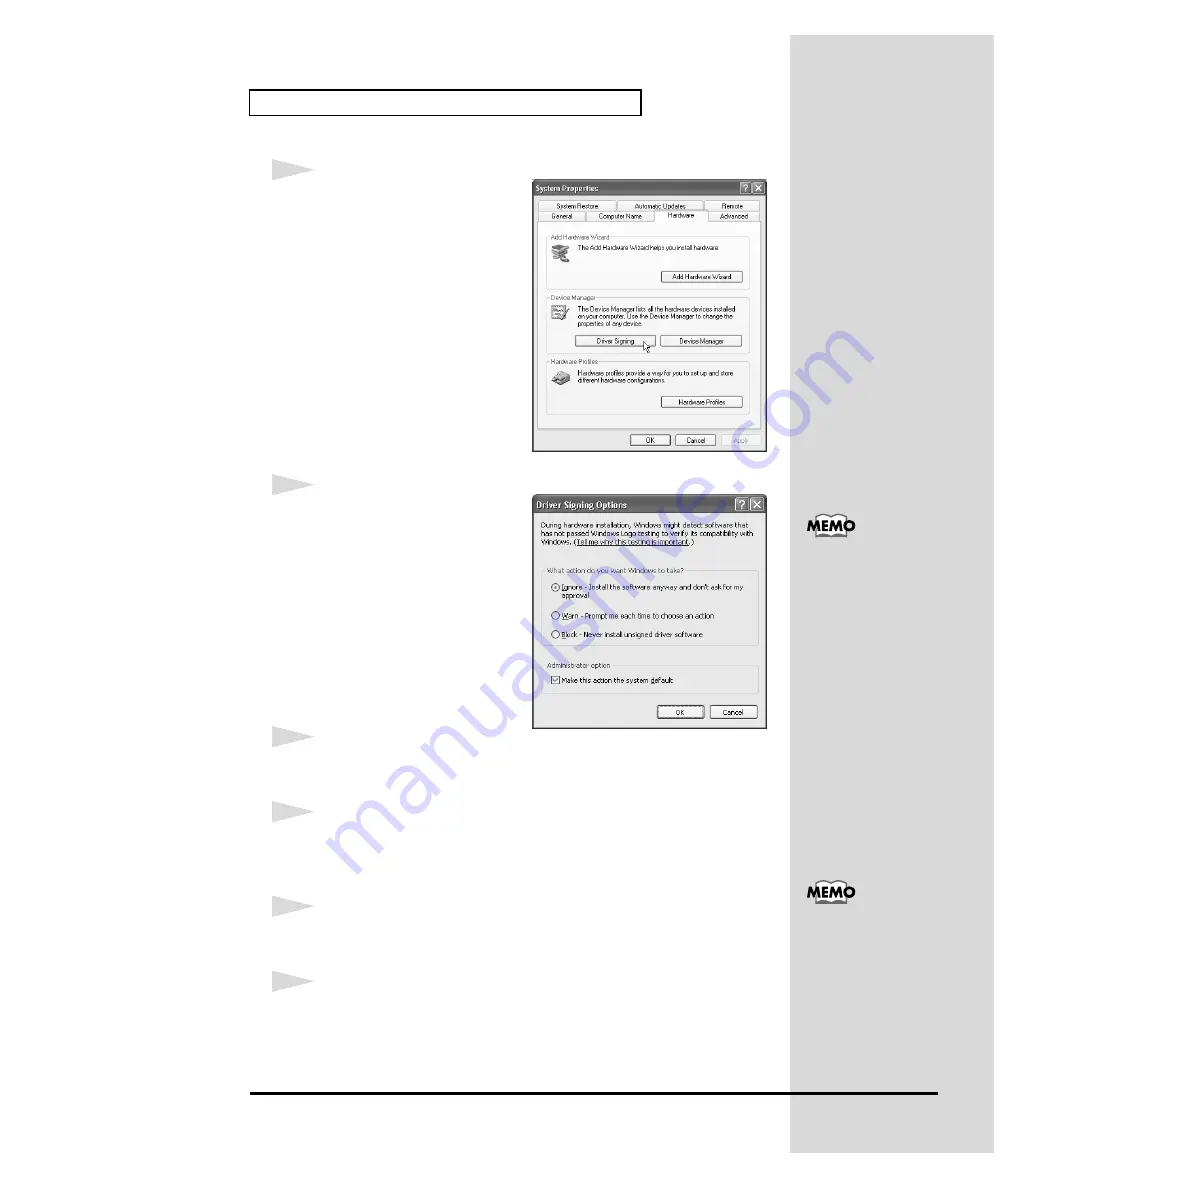
fig.2-1

3

Ouvrez la boîte de dialogue 

Options de signature des 

pilotes

.

Cliquez sur l’onglet 

Matériel

, puis 

cliquez sur 

[Signature du pilote]

.

fig.2-2

4

Assurez-vous que l’option 

“Que 

voulez-vous faire ?”

 est définie 

sur 

“Ignorer”

.

Si c'est le cas (

“Ignorer”

), cliquez 

sur 

[OK].

Si elle n’est pas définie sur 

“Ignorer”

, notez le paramètre 

indiqué (“Avertir” ou “Bloquer”). 
Choisissez ensuite 

“Ignorer”

 et 

cliquez sur 

[OK]

.

5

Fermez la boîte de dialogue 

Propriétés Système

.

Cliquez sur 

[OK]

.

6

Quittez tous les logiciels (applications) actifs.

Fermez également toutes les fenêtres éventuellement ouvertes. Si vous 
utilisez un anti-virus, quittez-le également.

7

Munissez-vous du CD-ROM.

Introduisez-le dans le lecteur de CD de votre ordinateur.

8

Ouvrez la boîte de dialogue 

Exécuter...

Cliquez sur le bouton 

Démarrer

 de Windows. Dans le menu qui s’affiche, 

sélectionnez 

Exécuter...

.

Si vous avez modifié 

“Que 

voulez-vous faire ?”

 à 

l’

étape 4

, vous devez 

rétablir le paramètre 
d’origine après installation 
du pilote. (->

Si vous avez 

modifié “Que voulez-

vous faire ?”

 (p. 84))

Si 

“Windows peut 

effectuer la même action 

à chaque fois que vous 

insérez un disque ou 

connectez un 

périphérique avec ce 

type de fichier”

 s’affiche, 

cliquez sur 

[Annuler]

.

Содержание Studio Canvas SD-80

Страница 1: ...IMPORTANT NOTES Owner s manual p 5 These sections provide important information concerning the proper operation of the unit Additionally in order to feel assured that you have gained a good grasp of every feature provided by your new unit Getting started and Owner s manual should be read in its entirety The manual should be saved and kept on hand as a convenient reference 03011123 02 6 xx 11N Gett...

Страница 2: ...aus Pour 230 V Français Cette boite contient des alimentations anglaises ou continentales Merci de choisir l alimentation appropriée de votre pays Per 230 V Italiano La confezione contiene alimentatori con spina europea e Inglese Scegliete quella adatta alla Vostra nazione Para 230 V Español Esta caja contiene cables de corriente continentales y británicos Por favor seleccione el tipo correcto par...

Страница 3: ...lems related to the USB driver 32 Problems when using the SD 80 36 Deleting the driver 39 Deutsch Inhalt der Verpackung 41 Anschluss von Audiogeräten 43 Installieren und Einrichten des Treibers Windows 44 Treiberinstallation 44 Einstellungen 56 Prüfung ob Sound zu hören ist 59 Installieren und Einrichten des Treibers Macintosh 60 Anschluss an Ihren Macintosh 60 Installation des SD 80 Treibers OMS ...

Страница 4: ... au pilote USB 102 Problems when using the SD 80 106 Deleting the driver 109 Italiano Contenuto della scatola 111 Collegamento degli apparecchi audio 113 Installazione e configurazione del driver Windows 114 Installazione del driver 114 Impostazioni 126 Verificare se l audio viene riprodotto 129 Installazione e configurazione del driver Macintosh 130 Collegamento del Macintosh 130 Installazione de...

Страница 5: ...ments are reprinted with permission from Microsoft Corporation ADD Windows XP is known officially as Microsoft Windows XP operating system 206f Windows 2000 is known officially as Microsoft Windows 2000 operating system 206g Windows Me is known officially as Microsoft Windows Millennium Edition operating system 206c Windows 98 is known officially as Microsoft Windows 98 operating system 207 Apple ...

Страница 6: ...ce of the disc Damaged or dirty CD ROM discs may not be read properly Keep your discs clean using a commercially available CD cleaner DO NOT play a CD ROM disc on a conventional audio CD player The resulting sound may be of a level that could cause permanent hearing loss Damage to speakers or other system components may result Getting Started This is the manual you are holding Please read this fir...

Страница 7: ...ou must use the screws that you removed Do not use any other screws Attaching the desk stand mount fig cushion 1 Remove three screws from the right panel of the SD 80 2 Affix the cushion set stickers to the locations shown in the diagram at right 3 Using the screws you removed in step 1 attach the desk stand mount to the SD 80 You must use the screws that you removed Do not use any other screws Wh...

Страница 8: ...ks to the input jacks of your audio playback equipment If you are using headphones connect them to the Headphone jack located on the front panel of the SD 80 fig 8 1e Before making connections to other equipment you must turn down the volume of all equipment to avoid malfunctions or speaker damage To avoid short circuits or broken connections grasp the plug when disconnecting a cable Some connecti...

Страница 9: ...nstallation procedure will differ depending on your system Please proceed to one of the following sections depending on the system you use Windows XP users p 9 Windows 2000 users p 15 Windows Me 98 users p 19 Macintosh users p 25 What is a driver A driver is software that transfers data between the SD 80 and application software running on your computer when your computer and the SD 80 are connect...

Страница 10: ...all currently running software applications Also close any open windows If you are using virus checking or similar software be sure to exit it as well 7 Prepare the CD ROM Insert the CD ROM into the CD ROM drive of your computer 8 Open the Run dialog box Click the Windows start button From the menu that appears select Run If you changed What action do you want Windows to take in step 4 you must re...

Страница 11: ...ease wait fig 2 6 13The Found New Hardware Wizard will appear Make sure that the screen indicates EDIROL SD 80 select Install from a list or specific location Advanced and click Next In this manual the location of folders and files is given in terms of the file path using as the delimiter For example USB_XP2K SETUPINF EXE indicates the SETUPINF EXE file found in the USB_XP2K folder If Do you want ...

Страница 12: ...ion will begin If the What action do you want Windows to take setting was not set to Ignore a Hardware Installation dialog box will appear If What action do you want Windows to take is set to Warn 1 Click Continue Anyway 2 Continue the installation If What action do you want Windows to take is set to Block 1 Click OK 2 When the Found New Hardware Wizard appears click Finish 3 Perform the installat...

Страница 13: ...K The drive name D may be different for your system Specify the drive name of your CD ROM drive fig 2 11_20 18The Found New Hardware Wizard will appear Make sure that the display indicates EDIROL SD 80 and click Finish Wait until Found New Hardware appears near the taskbar 19When driver installation has been completed the System Setting Change dialog box will appear Click Yes Windows will restart ...

Страница 14: ...g the user name of an administrative account e g Administrator 2 Click the Windows start menu and from the menu select Control Panel 3 In Pick a category click Performance and Maintenance 4 In or pick a Control Panel icon click the System icon The System Properties dialog box will appear 5 Click the Hardware tab and then click Driver Signing The Driver Signing Options dialog box will appear 6 Retu...

Страница 15: ... and then click Driver Signing fig 2 13_50 5 Make sure that File signature verification is set to Ignore If it is set to Ignore simply click OK If it is not set to Ignore make a note of the current setting Warn or Block Then change the setting to Ignore and click OK 6 Close the System Properties dialog box Click OK If you have already connected the SD 80 to your computer but the Add New Hardware W...

Страница 16: ...mputer 1 With the power switch turned OFF connect the AC cable to the SD 80 2 Connect the AC cable to an electrical outlet 3 Use the USB cable to connect the SD 80 to your computer Always make sure to have the volume level turned down before switching on power Even with the volume all the way down you may still hear some sound when the power is switched on but this is normal and does not indicate ...

Страница 17: ...ive name D may be different for your system Specify the drive name of your CD ROM drive If the File signature verification setting was not set to Ignore a Digital Signature Not Found dialog box will appear fig 2 16_30 If File signature verification is set to Warn 1 Click Yes 2 Continue the installation If File signature verification is set to Block 1 Click OK 2 When the Found New Hardware Wizard a...

Страница 18: ...estarts 1 After Windows restarts log in to Windows as a user with administrative privileges such as Administrator 2 In the Windows desktop right click the My Computer icon and from the menu that appears select Properties The System Properties dialog box will appear 3 Click the Hardware tab and then click Driver signature The Driver Signing Options dialog box will appear 4 Return the File signature...

Страница 19: ... click OK D Driver USB_ME98 SETUPINF EXE The drive name D may be different for your system Specify the drive name of your CD ROM drive fig 2 19_30 6 The SetupInf dialog box will appear You are now ready to install the driver Do not click OK at this time If you have already connected the SD 80 to your computer but the Add New Hardware Wizard appears refer to You attempted to install using the above...

Страница 20: ... By turning on devices in the wrong order you risk causing malfunction and or damage to speakers and other devices If you are using Windows 98 and the Insert Disk dialog box dose not appear please read The Insert Disk dialog box does not appear p 35 Always make sure to have the volume level turned down before switching on power Even with the volume all the way down you may still hear some sound wh...

Страница 21: ...ltimedia Properties dialog box 3 Click the Audio tab fig 2 28_30 4 For MIDI music playback click the located at the right of Default device or in Windows 2000 Me Preferred device and select the following from the list that appears 1 EDIROL SD 80 PARTA 5 Close the Sounds and Audio Devices Properties dialog box Click OK to complete the settings Depending on how your system is set up the Sounds and A...

Страница 22: ...DI output Select Single instrument and choose one of the following from the list that appears 1 EDIROL SD 80 PARTA 5 Close the Multimedia Properties dialog box Click OK to complete the settings Additional information about the ports SD 80 MIDI OUT1 Sends receives data from the SD 80 s MIDI OUT 1 connectors SD 80 MIDI OUT2 Sends receives data from the SD 80 s MIDI OUT 2 connectors SD 80 PART A Send...

Страница 23: ...mance and Maintenance 3 In or pick a Control Panel icon click the System icon 4 Click the Advanced tab 5 At the right of the Performance field click Settings The Performance Options dialog box will appear 6 Click the Advanced tab fig 2 30 7 In the Processor Scheduling field select Background services and click OK 8 In the System Properties dialog box click OK The System Properties dialog box will ...

Страница 24: ...Click the Preview tab and then click the button Use of the demo song supplied with this product for any purpose other than private personal enjoyment without the permission of the copyright holder is prohibited by law Additionally this data must not be copied nor used in a secondary copyrighted work without the permission of the copyright holder What you actually see on your computer screen may be...

Страница 25: ...e using FreeMIDI p 30 Either OMS or FreeMIDI must be installed in your Macintosh as appropriate for the sequencer software you are using What is a driver A driver is software that transfers data between the SD 80 and application software running on your computer when your computer and the SD 80 are connected by a USB cable The driver sends data from your application to the SD 80 and from the SD 80...

Страница 26: ...all fig 3 2_40 5 If a message like the following is displayed click Continue The other currently running applications will exit and installation will continue 6 A dialog box will indicate Installation completed Click Restart to restart your Macintosh 7 Use the USB cable to connect the SD 80 to your computer 8 Set the SD 80 s power switch to the ON position OMS can be found in the OMS 2 3 8 E folde...

Страница 27: ... If a dialog box like the one shown here appears click Turn It Off A confirmation dialog box will then appear so click OK fig 3 6_35 4 The Create a New Studio Setup dialog box will appear Click Cancel If you accidentally clicked OK click Cancel in the next screen fig 3 7 5 Choose Open from the File menu From the Setting folder that you copied in step 1 select the SD 80 USB file and click Open fig ...

Страница 28: ...performed correctly From the Studio menu choose Test Studio fig 3 22_50 9 When you move the mouse cursor near the sound generator icon the cursor will change to a shape Click on the sound generator icon of each port in the diagram at right If sound is heard from the SD 80 the settings are correct Additional information about the ports SD 80 Port A Sends receives data for SD 80 part group A SD 80 P...

Страница 29: ...teps needed to connect the SD 80 to the Macintosh install the MIDI driver and make the driver settings Does the SD 80 s PART level meter move If the PART level meter in the SD 80 s display is moving but you do not hear sound check whether the volume of the SD 80 or your speaker system has been lowered If the PART level meter does not move check the connections and OMS settings once again If the SD...

Страница 30: ... is displayed click Continue The other currently running applications will exit and installation will continue 6 A dialog box will indicate Installation completed Click Restart to restart your Macintosh 7 Use the USB cable to connect the SD 80 to your computer 8 Switch ON the SD 80 s Power switch FreeMIDI settings 1 From the CD ROM copy the Driver E FreeMIDI Setting folder onto the hard disk of yo...

Страница 31: ... to the SD 80 11Once again choose the MIDI menu command Check Connections to end the test 12From the File menu choose Quit to exit FreeMIDI Setup This completes the series of steps needed to connect the SD 80 to the Macintosh install the MIDI driver and make the driver settings Now MIDI data can be input and output recorded and played Additional information about the ports SD 80 Port A Sends recei...

Страница 32: ...free space After deleting the unneeded files empty the recycling bin Is the SD 80 connected correctly Make sure that the USB connector of your computer is connected to the SD 80 by a USB cable Check this and if you are using Windows close the Sound and Multimedia Properties dialog box Sounds and Audio Devices Properties in Windows XP and Multimedia Properties in Windows 98 re open the same dialog ...

Страница 33: ...FreeMIDI p 30 SD 80 is not detected when making OMS or FreeMIDI settings Is the SD 80 detected Turn the power of the SD 80 off then on again Reconnect the USB cable If other USB devices are connected connect only the SD 80 It is possible that the Macintosh did not correctly detect and initialize the SD 80 Leave the SD 80 s USB cable connected and restart your Macintosh If it is still not detected ...

Страница 34: ...hub Does Unknown device appear for Other device or Universal serial bus controller Use the following procedure to delete Other device Universal Serial Bus Controller Unknown device and then restart your computer 1 In the Windows Control Panel double click System The System Properties dialog box will appear 2 Click the Device Manager tab For Windows 2000 click the Hardware tab and then click the De...

Страница 35: ... USB cables disconnected except for keyboard and mouse 2 After Windows restarts use a USB cable to connect the SD 80 to your computer 3 Turn on the power of SD 80 4 Click the Windows Start button and from the menu that appears choose Settings Control Panel 5 Double click the System icon The System Properties dialog box will appear 6 Click the Device Manager tab In Windows XP select the System Prop...

Страница 36: ...tions If multiple applications are running simultaneously an error message may appear If this occurs click OK and exit the other applications Even if an application window is closed it is still running if it appears in the taskbar Be sure to exit unneeded applications displayed in the taskbar Was the driver installed correctly In order for you to play back audio data via the SD 80 the driver must ...

Страница 37: ...her the volume of the SD 80 or your speakers has been lowered If the PART level meter of the SD 80 is not moving recheck the connections and OMS settings p 27 FreeMIDI settings p 30 Is the OMS setup enabled If a diamond shaped symbol is not displayed at the left edge of the title area in the OMS setup window the setup is not enabled From the OMS File menu choose Enable setup OMS settings p 27 Has ...

Страница 38: ...playback device is assigned will not be heard If you want to play back a MIDI track you must make sure that the MIDI device you want to use is displayed in your software as the MIDI output port For details refer to the owner s manual for your software Can t record MIDI Has the MIDI input device you are using been selected correctly Select either SD 80 MIDI InOut 1 or SD 80 MIDI InOut 2 as the MIDI...

Страница 39: ...dows as a user with administrative privileges such as Administrator 3 After connecting the SD 80 to your computer via a USB cable turn on the power of the SD 80 4 Exit all applications before deleting the driver 5 Open the Control Panel and double click System 6 Click the Hardware tab and in the Device Manager area click Device Manager 7 Double click Sound Video and Game Controllers to view the li...

Страница 40: ... and then click the Display tab In Windows 98 click Start Settings Folder Options 1 12 In Detailed Settings of the Display tab remove the check mark for Don t display extensions of associated files click Show all files and folders and then click OK In Windows 98 this will be Show all files 13 Click Start Find Files or folders 14 In Search location select Local hard drive Then in Name of file or fo...

Страница 41: ...er verschmutzte CD ROMs können eventuell nicht fehlerfrei eingelesen werden Reinigen Sie Ihre CD ROMs mit einem handelsüblichen CD Reiniger CD ROMs dürfen niemals auf einem konventionellen Audio CD Spielgerät abgespielt werden Der ausgegebene Sound kann so laut sein dass dauerhafter Gehörverlust die Folge ist Ebenso können Schäden an den Lautsprechern oder an anderen Systemkomponenten auftreten Er...

Страница 42: ...ern für die Rack Befestigung am SD 80 zu montieren Sie müssen dabei die Schrauben verwenden die Sie zuvor entfernt haben Verwenden Sie keine anderen Schrauben Installation des Stand Montagesets fig cushion e 1 Entfernen Sie die drei Schrauben von der rechten Abdeckung des SD 80 2 Bringen Sie die Kissen Aufkleber an den Stellen an die im Diagramm rechts abgebildet sind 3 Verwenden Sie die Schrauben...

Страница 43: ...eräte Wenn Sie Kopfhörer verwenden verbinden Sie diese mit der Kopfhörerbuchse die sich an der Vorderseite des SD 80 befindet fig 8 1e Bevor Sie die Anschlüsse mit anderen Geräten herstellen müssen Sie die Lautstärke aller Geräte zurückdrehen um Fehlfunktionen oder Schäden an den Lautsprechern zu vermeiden Fassen Sie stets den Stecker an wenn Sie ein Kabel ausstecken um Kurzschlüsse oder Anschluss...

Страница 44: ...hensweise bei der Installation hängt von Ihrem System ab Bitte lesen Sie abhängig von dem von Ihnen verwendeten System in einem der folgenden Abschnitte weiter Windows XP Anwender S 44 Windows 2000 Anwender S 50 Windows Me 98 Anwender S 54 Macintosh Anwender S 60 Was ist ein Treiber Ein Treiber ist Software die Daten zwischen dem SD 80 und Anwendungssoftware auf Ihrem Computer überträgt wenn Ihr C...

Страница 45: ...tuell ausgeführten Programme Anwendungen Schließen Sie außerdem alle noch geöffneten Programmfenster Wenn Sie ein Virenschutzprogramm oder ähnliche Software verwenden müssen Sie diese ebenfalls beenden 7 Halten Sie die CD ROM bereit Legen Sie die CD ROM in das CD ROM Laufwerk Ihres Computers ein 8 Öffnen Sie das Dialogfeld Ausführen Klicken Sie auf die Windows Schaltfläche Start Wählen Sie im dara...

Страница 46: ...abel um das SD 80 mit Ihrem Computer zu verbinden 12Bringen Sie den Netzschalter des SD 80 in die Position ON Der Computer zeigt neben der Task Leiste folgende Meldung an Neue Hardware gefunden Bitte warten Sie In diesem Dokument wird die Position der Ordner und Dateien als Dateipfad mit als Trennzeichen angegeben Beispiel USB_XP2K SETUPINF EXE informiert Sie z B darüber dass sich die Datei SETUPI...

Страница 47: ...folgende Meldung angezeigt Wählen Sie die Such und Installationsoptionen Wählen Sie Nicht suchen sondern den zu installierenden Treiber selbst wählen und klicken Sie auf Weiter fig 2 8_20 15Prüfen Sie ob das Feld Modell EDIROL SD 80 anzeigt und klicken Sie auf Weiter Die Installation des Treibers beginnt Vergewissern Sie sich stets dass die Lautstärke reduziert wurde bevor Sie den Netzschalter bet...

Страница 48: ...lung Wie soll Windows vorgehen nicht auf Ignorieren gesetzt wurde wird ein Dialogfeld Hardware Installation angezeigt Wenn für Wie soll Windows vorgehen Warnen aktiviert wurde 1 klicken Sie auf Trotzdem fortsetzen 2 Setzen Sie die Installation fort Wenn für Wie soll Windows vorgehen Sperren aktiviert wurde 1 klicken Sie auf OK 2 Wenn der Assistent für das Suchen neuer Hardware erscheint klicken Si...

Страница 49: ...üssen Sie die ursprüngliche Einstellung nach dem Neustart von Windows wiederherstellen 1 Wenn Sie Windows XP Professional verwenden melden Sie sich in Windows mit dem Benutzernamen eines Administrationskontos an z B Administrator 2 Klicken Sie auf die Windows Schaltfläche Start und wählen Sie im daraufhin angezeigten Menü Systemsteuerung 3 Klicken Sie in Wählen Sie eine Kategorie auf Leistung und ...

Страница 50: ...rieren bereits aktiviert ist klicken Sie auf OK Wenn Ignorieren nichtaktiviert ist notieren Sie sich die aktuelle Einstellung Warnen oder Sperren Ändern Sie dann die Einstellung auf Ignorieren und klicken Sie auf OK 6 Schließen Sie das Dialogfeld Systemeigenschaften Klicken Sie auf OK Wenn Sie das SD 80 bereits an Ihren Computer angeschlossen haben und der Hardware Assistent angezeigt wird öffnen ...

Страница 51: ... Ihrem Computer zu verbinden 1 Verbinden Sie bei ausgeschaltetem Netzschalter das Wechselstromkabel mit dem SD 80 2 Verbinden Sie das Wechselstromkabel mit einer elektrischen Steckdose 3 Verwenden Sie das USB Kabel um das SD 80 mit Ihrem Computer zu verbinden Vergewissern Sie sich stets dass die Lautstärke reduziert wurde bevor Sie den Netzschalter betätigen Beim Einschalten wird eventuell auch da...

Страница 52: ...em anders lauten Geben Sie statt dessen den Laufwerknamen Ihres CD ROM Laufwerks an Wenn in für Dateisignaturverifizierung nicht Ignorieren aktiviert wurde erscheint die Meldung Digitalsignatur nicht gefunden fig 2 16_30 Wenn für Dateisignaturverifizierung Warnen aktiviert ist 1 klicken Sie auf Ja 2 Setzen Sie die Installation fort Wenn für Dateisignaturverifizierung Sperren aktiviert ist 1 klicke...

Страница 53: ...rherstellen 1 Nachdem Windows neu gestartet ist melden Sie sich als Benutzer mit Administratorrechten an z B als Administrator 2 Klicken Sie auf dem Windows Desktop mit der rechten Maustaste auf das Symbol Arbeitsplatz und wählen Sie aus dem angezeigten Menü den Punkt Eigenschaften Daraufhin wird das Dialogfeld Systemeigenschaften angezeigt 3 Klicken Sie auf die Registerkarte Hardware und klicken ...

Страница 54: ... Ihrem System anders lauten Geben Sie statt dessen den Laufwerknamen Ihres CD ROM Laufwerks an fig 2 19_30 6 Das Dialogfeld SetupInf wird angezeigt Jetzt kann der Treiber installiert werden Klicken Sie jetzt noch nicht auf OK Wenn Sie das SD 80 bereits an Ihren Computer angeschlossen haben und der Hardware Assistent angezeigt wird öffnen Sie als nächstes die Datei Readme_e htm im Ordner Driver USB...

Страница 55: ...n Reihenfolge ein Wenn Sie die Geräte in der falschen Reihenfolge einschalten besteht die Gefahr von Fehlfunktionen und oder Schäden an Lautsprechern und anderen Geräten Wenn Sie Windows 98 verwenden und das Dialogfeld Diskette einlegen nicht angezeigt wird lesen Sie bitte Das Dialogfeld Diskette einlegen wird nicht angezeigt S 70 Vergewissern Sie sich stets dass die Lautstärke reduziert wurde bev...

Страница 56: ...enschaften von Sounds und Multimedia zu öffnen 3 Klicken Sie auf die Registerkarte Audio fig 2 28_30 4 Klicken Sie bei MIDI Musikwiedergabe auf das das sich rechts von Standardgerät befindet bzw in Windows 2000 Me rechts von Bevorzugtes Gerät und wählen Sie folgende Option aus der angezeigten Liste aus 1 EDIROL SD 80 PARTA 5 Schließen Sie das Dialogfeld Eigenschaften von Sounds und Audiogeräte Kli...

Страница 57: ...e Wählen Sie Einzelnes Instrument und wählen Sie eine der folgenden Optionen aus der angezeigten Liste 1 EDIROL SD 80 PARTA 5 Schließen Sie das Dialogfeld Eigenschaften für Multimedia Klicken Sie auf OK um die Konfiguration abzuschließen Wechseln Sie zum folgenden Abschnitt Windows XP Anwender S 58 Windows 2000 Me Anwender S 59 Zusätzliche Informationen über die Anschlüsse SD 80 MIDI OUT1 Sendet e...

Страница 58: ...temsteuerungssymbol auf das Symbol System 4 Klicken Sie auf die Registerkarte Erweitert 5 Klicken Sie auf Einstellungen rechts vom Feld Leistung Daraufhin wird das Dialogfeld Systemleistungsoptionen angezeigt 6 Klicken Sie auf die Registerkarte Erweitert fig 2 30 7 Wählen Sie im Feld Prozessorzeitplanung die Option Hintergrunddienste und klicken Sie auf OK 8 Klicken Sie im Dialogfeld Systemeigensc...

Страница 59: ...eldaten ab Klicken Sie auf die Registerkarte Vorschau und klicken Sie anschließend auf die Schaltfläche Die Verwendung des Demosongs das mit diesem Produkt ausgeliefert wird für andere als private Zwecke oder persönlichen Gebrauch ist ohne Genehmigung des Urheberrechtsinhabers gesetzlich verboten Darüber hinaus dürfen diese Daten nicht kopiert oder in einem sekundären urheberrechtsgeschützten Werk...

Страница 60: ... S 61 Wenn Sie FreeMIDI verwenden S 64 Entsprechend der von Ihnen verwendeten Sequenzer Software muss auf Ihrem Macintosh entweder OMS oder FreeMIDI installiert sein Was ist ein Treiber Ein Treiber ist Software die Daten zwischen dem SD 80 und Anwendungssoftware auf Ihrem Computer überträgt wenn Ihr Computer und das SD 80 mit einem USB Kabel miteinander verbunden sind Der Treiber überträgt die Dat...

Страница 61: ...g 3 2_40 5 Falls eine Meldung wie abgebildet angezeigt wird klicken Sie auf Continue Alle anderen aktuell ausgeführten Anwendungen werden anschließend beendet und die Installation wird fortgesetzt 6 Ein Dialogfeld zeigt Folgendes an Installation completed Klicken Sie auf Restart um den Macintosh neu zu starten 7 Verwenden Sie das USB Kabel um das SD 80 mit Ihrem Computer zu verbinden 8 Bringen Sie...

Страница 62: ...d klicken Sie auf Turn It Off Anschließend wird ein Dialogfeld für die Bestätigung angezeigt Klicken Sie hier auf OK fig 3 6_35 4 Das Dialogfeld Create a New Studio Setup wird angezeigt Klicken Sie auf Cancel Wenn Sie versehentlich auf OK geklickt haben klicken Sie im nächsten Bildschirm auf Cancel fig 3 7 5 Wählen Sie Open im Menü File Wählen Sie im Ordner Setting den Sie in Schritt 1 kopiert hab...

Страница 63: ...MIDI Übertragung und der MIDI Empfang fehlerfrei funktionieren Wählen Sie im Menü Studio die Option Test Studio fig 3 22_50 9 Wenn Sie den Mauszeiger über das Soundgenerator Symbol bewegen ändert sich der Mauszeiger zu einem Klicken Sie auf die Soundgenerator Symbole für jeden Anschluss im Diagramm rechts Wenn das SD 80 Sound ausgibt wurden die Einstellungen korrekt vorgenommen Zusätzliche Informa...

Страница 64: ...Macintosh bevor Sie die Installation ausführen 1 Beenden Sie alle aktuell ausgeführten Programme Anwendungen Wenn Sie ein Virenschutzprogramm oder ähnliche Software verwenden müssen Sie diese ebenfalls beenden 2 Halten Sie die CD ROM bereit Legen Sie die CD ROM in das CD ROM Laufwerk ein 3 Doppelklicken Sie auf das Symbol SD 80 FM Driver E Installer das sich im Ordner Driver E FreeMIDI auf der CD ...

Страница 65: ... Wenn OMS is installed on this computer angezeigt wird klicken Sie auf FreeMIDI 4 Wenn die Software zum ersten Mal ausgeführt wird wird das Dialogfeld Welcome to FreeMIDI angezeigt Klicken Sie auf Continue 5 Wenn das Dialogfeld FreeMIDI Preferences angezeigt wird klicken Sie auf Cancel 6 Wenn das Dialogfeld About Quick Setup angezeigt wird klicken Sie auf Cancel 7 Wählen Sie im Menü File die Optio...

Страница 66: ...stallieren und die Treiber zu konfigurieren Nun können MIDI Daten eingegeben und ausgegeben aufgezeichnet und abgespielt werden Zusätzliche Informationen über die Anschlüsse SD 80 Port A Sendet empfängt Daten für SD 80 Part Group A SD 80 Port B Sendet empfängt Daten für SD 80 Part Group B SD 80 MIDI InOut1 Sendet empfängt Daten aus den MIDI IN 1 OUT 1 Anschlüssen des SD 80 SD 80 MIDI InOut2 Sendet...

Страница 67: ...ieren Sie die Software von einem Netzwerk CD ROM Laufwerk aus Die Software kann von einem Netzwerk CD ROM Laufwerk aus nicht installiert werden Ist genügend Platz auf der Festplatte frei Löschen Sie nicht benötigte Dateien um den verfügbaren freien Platz zu erhöhen Nachdem Sie die nicht erforderlichen Dateien gelöscht haben leeren Sie den Windows Papierkorb Wurde das SD 80 richtig angeschlossen Pr...

Страница 68: ...chen Sie es Wurde OMS oder FreeMIDI installiert Der SD 80 Treiber kann nur installiert werden wenn OMS oder FreeMIDI installiert ist Bitte installieren Sie OMS oder FreeMIDI OMS S 62 FreeMIDI S 65 Das SD 80 wird nicht erkannt wenn die OMS oder FreeMIDI Einstellungen vorgenommen werden Wird das SD 80 erkannt Schalten Sie das SD 80 aus und anschließend wieder ein Schließen Sie das USB Kabel an Schli...

Страница 69: ...n Computer verwenden der die elektrischen Anforderungen der USB Spezifikationen nicht erfüllt kann es während des Betriebs zu Instabilität kommen In solchen Fällen können Sie das Problem möglicherweise lösen indem Sie einen USB Hub anschließen Wird Unbekanntes Gerät für Anderes Gerät oder Universeller Serieller Bus Controller angezeigt Gehen Sie wie folgt vor um Anderes Gerät Universeller Serielle...

Страница 70: ...hres Computers Haben Sie die Treibersignatureinstellungen vorgenommen Damit Sie den Treiber installieren bzw neu installieren können müssen Sie die Optionen für die Treibersignaturverifizierung konfigurieren Windows XP S 45 Windows 2000 S 50 Windows XP 2000 zeigt das Dialogfeld Hardware Installation oder Digitalsignatur nicht gefunden an Haben Sie die Treibersignatureinstellungen vorgenommen Damit...

Страница 71: ...llieren und Einrichten des Treibers Windows S 44 Wenn das Problem immer noch auftritt nachdem Sie die oben genannten Maßnahmen ergriffen haben lesen Sie bitte auch die Readme Datei für den USB Treiber Die Readme Datei befindet sich auf der CD ROM Problems when using the SD 80 Operating system becomes unstable Operation becomes unstable when the computer is started up with the SD 80 already connect...

Страница 72: ...e normal operation then exit all applications that are using the SD 80 Next turn the SD 80 s power off then switch it on again Did you reconnect the USB cable or turn the power of the SD 80 off and on Exit all applications that are using the SD 80 and turn the power of the SD 80 off and then on once again Is OMS FreeMIDI set correctly As described in OMS Einstellungen S 62 or Einstellungen für Fre...

Страница 73: ... SD 80 Port A or SD 80 Port B as the MIDI output device Are the track outputs set correctly MIDI tracks to which no MIDI playback device is assigned will not be heard If you want to play back a MIDI track you must make sure that the MIDI device you want to use is displayed in your software as the MIDI output port For details refer to the owner s manual for your software Can t record MIDI Has the M...

Страница 74: ...privileges such as Administrator 3 After connecting the SD 80 to your computer via a USB cable turn on the power of the SD 80 4 Exit all applications before deleting the driver 5 Open the Control Panel and double click System 6 Click the Hardware tab and in the Device Manager area click Device Manager 7 Double click Sound Video and Game Controllers to view the list of devices 8 From the list click...

Страница 75: ... click Folder Options and then click the Display tab In Windows 98 click Start Settings Folder Options 1 12 In Detailed Settings of the Display tab remove the check mark for Don t display extensions of associated files click Show all files and folders and then click OK In Windows 98 this will be Show all files 13 Click Start Find Files or folders 14 In Search location select Local hard drive Then ...

Страница 76: ...us correctement Gardez vos disques propres à l aide d un nettoyant de CD disponible dans le commerce NE LISEZ PAS un disque CD ROM sur un lecteur de CD audio de salon Le niveau sonore généré pourrait être tel qu il serait susceptible d entraîner une perte irréversible d audition En outre vous risqueriez d endommager les haut parleurs ainsi que d autres composants du système Mise en route Le manuel...

Страница 77: ... SD 80 2 A l aide des vis retirées à l étape 1 fixez les attaches rack sur le SD 80 Vous devez utiliser les vis que vous avez retirées N utilisez pas d autres vis Fixation du support vertical fig cushion 1 Retirez les trois vis du panneau droit du SD 80 2 Fixez les amortisseurs auto collants sur les emplacements indiqués dans l illustration ci contre 3 A l aide des vis retirées à l étape 1 fixez l...

Страница 78: ...s utilisez un casque branchez le sur la prise casque située sur la face avant du SD 80 fig 8 1e Avant de connecter d autres appareils nous vous conseillons de baisser le volume sur ces appareils afin d éviter des anomalies de fonctionnement et d endommager les haut parleurs Lorsque vous débranchez un câble tirez le par sa fiche et non par le câble lui même vous éviterez ainsi les courts circuits e...

Страница 79: ...ir utiliser le SD 80 vous devez d abord installer le pilote USB MIDI La procédure d installation dépend de votre système d exploitation Veuillez lire la section qui vous concerne Windows XP p 79 Windows 2000 p 85 Windows Me 98 p 89 Macintosh p 95 Qu est ce qu un pilote Un pilote est un logiciel qui sert à transférer les données entre le SD 80 et le logiciel tournant sur votre ordinateur lorsque vo...

Страница 80: ...ttez tous les logiciels applications actifs Fermez également toutes les fenêtres éventuellement ouvertes Si vous utilisez un anti virus quittez le également 7 Munissez vous du CD ROM Introduisez le dans le lecteur de CD de votre ordinateur 8 Ouvrez la boîte de dialogue Exécuter Cliquez sur le bouton Démarrer de Windows Dans le menu qui s affiche sélectionnez Exécuter Si vous avez modifié Que voule...

Страница 81: ...es tâches votre ordinateur indique Nouveau matériel détecté Veuillez patienter fig 2 6 13La boîte de dialogue Assistant ajout de nouveau matériel s affiche Vérifiez que l écran indique EDIROL SD 80 Installer à partir d une liste ou d un emplacement spécifique Avancé puis cliquez sur Suivant Dans ce document l emplacement des dossiers et des fichiers est donné en termes de chemin avec comme délimit...

Страница 82: ... du pilote commence Si l option Que voulez vous faire n était pas définie sur Ignorer la boîte de dialogue Installation du matériel s affiche Si Que voulez vous faire est définie sur Avertir 1 Cliquez sur Continuer 2 Poursuivez l installation Si Que voulez vous faire est définie sur Bloc 1 Cliquez sur OK 2 Lorsque l Assistant ajout de nouveau matériel s affiche cliquez sur Terminer 3 Procédez à l ...

Страница 83: ...lle de votre ordinateur Tapez la lettre affectée au lecteur de CD de votre ordinateur par exemple E ou F fig 2 11_20 18La boîte de dialogue Assistant ajout de nouveau matériel s affiche Vérifiez que l écran indique EDIROL SD 80 puis cliquez sur Terminer Attendez que Nouveau matériel détecté s affiche près de la barre des tâches 19Une fois l installation du pilote terminée la boîte de dialogue Modi...

Страница 84: ...trateur 2 Cliquez sur le menu Démarrer de Windows puis dans le menu qui s affiche choisissez Panneau de configuration 3 Dans Choisissez une catégorie cliquez sur Performances et maintenance 4 Dans ou choisissez une icône du Panneau de configuration cliquez sur l icône Système La boîte de dialogue Propriétés système s affiche 5 Cliquez sur l onglet Matériel puis cliquez sur Signature du pilote La b...

Страница 85: ...nglet Matériel puis cliquez sur Signature du pilote fig 2 13_50 5 Assurez vous que l option Vérification des signatures de fichiers est définie sur Ignorer Si c est le cas Ignorer cliquez sur OK Si elle n est pas définie sur Ignorer notez le paramètre indiqué Avertir ou Bloquer Choisissez ensuite Ignorer et cliquez sur OK Si vous avez déjà connecté le SD 80 à votre ordinateur mais que la boîte Ass...

Страница 86: ...rêt à installer le pilote 12Utilisez le câble USB pour relier le SD 80 à votre ordinateur 1 L interrupteur d alimentation sur OFF reliez le cordon secteur sur le SD 80 2 Branchez le cordon secteur sur une prise électrique secteur 3 Utilisez le câble USB pour relier le SD 80 à votre ordinateur Baissez toujours le volume avant la mise sous tension Même avec le volume à zéro il se peut que vous enten...

Страница 87: ... la lettre affectée au lecteur de CD de votre ordinateur par exemple E ou F Si l option Vérification de la signature des pilotes n a pas été définie sur Ignorer une boîte de dialogue Signature numérique introuvable s affiche fig 2 16_30 Si Vérification des signatures des fichiers est défini sur Avertir 1 Cliquez sur Oui 2 Poursuivez l installation Si Vérification des signatures des fichiers est dé...

Страница 88: ...ows redémarré ouvrez une session Windows avec des privilèges d administration par exemple en ouvrant une session Administrateur 2 Sur le bureau Windows cliquez avec le bouton droit de la souris sur l icône Poste de travail puis dans le menu qui s affiche sélectionnez Propriétés La boîte de dialogue Propriétés Système s affiche 3 Cliquez sur l onglet Profils matériels puis cliquez sur Signature des...

Страница 89: ...ettre du lecteur D n est pas forcément celle de votre ordinateur Tapez la lettre affectée au lecteur de CD de votre ordinateur par exemple E ou F fig 2 19_30 6 La boîte de dialogue SetupInf s affiche Vous êtes maintenant prêt à installer le pilote Ne cliquez pas sur OK maintenant Si vous avez déjà connecté le SD 80 à votre ordinateur mais que la boîte Assistant ajout de nouveau matériel s affiche ...

Страница 90: ...dans l ordre spécifié Le non respect de cet ordre peut entraîner des dysfonctionnements et ou endommager les haut parleurs ou tout autre appareil Si vous utilisez Windows 98 et que la boîte de dialogue Insérez le disque ne s affiche pas veuillez lire la section La boîte de dialogue Insérez le disque ne s affiche pas p 105 Baissez toujours le volume avant la mise sous tension Même avec le volume à ...

Страница 91: ...Sons et Multimédia pour ouvrir la boîte de dialogue Propriétés Sons et multimédia 3 Cliquez sur l onglet Audio fig 2 28_30 4 Pour Lecture MIDI cliquez sur le situé à droite de Périphérique par défaut avec Windows 2000 Me Périphérique par défaut puis sélectionnez ce qui suit dans la liste qui s affiche 1 EDIROL SD 80 PART A 5 Fermez la boîte de dialogue Propriétés Son et périphériques multimédia Cl...

Страница 92: ...nglet MIDI fig 2 29_30 4 Spécifiez la Sortie MIDI Sélectionnez Instrument unique puis choisissez en dans la liste qui s affiche 1 EDIROL SD 80 PARTA 5 Fermez la boîte de dialogue Propriétés de Multimédia Cliquez sur OK pour terminer les réglages Informations complémentaires sur les ports SD 80 MIDI OUT1 Envoie reçoit les données des prises MIDI IN 1 OUT 1 du SD 80 SD 80 MIDI OUT2 Envoie reçoit les...

Страница 93: ...ce 3 Dans ou choisissez une icône du Panneau de configuration cliquez sur l icône Système 4 Cliquez sur l onglet Avancé 5 A droite du champ Performances cliquez sur Paramètres La boîte de dialogue Options des performances s affiche 6 Cliquez sur l onglet Avancé fig 2 30 7 Dans le champ Planification du processeur sélectionnez Ressources système puis cliquez sur OK 8 Dans la boîte de dialogue Propr...

Страница 94: ...e de l exemple de données Cliquez sur l onglet Aperçu puis cliquez sur le bouton L utilisation des données musicales fournies avec ce produit à des fins autres que personnelles et privées sans l autorisation du propriétaire des droits d auteur est interdite De plus ces données ne doivent ni être copiées ni être utilisées pour un produit dérivé protégé par copyright sans l autorisation du propriéta...

Страница 95: ... Si vous utilisez FreeMIDI p 100 OMS ou FreeMIDI doit être installé sur votre Macintosh selon le logiciel séquenceur utilisé Qu est ce qu un pilote Un pilote est un logiciel qui sert à transférer les données entre le SD 80 et le logiciel tournant sur votre ordinateur lorsque votre ordinateur et le SD 80 sont reliés par un câble USB Le pilote transmet les données de l application au SD 80 et vice v...

Страница 96: ...tall fig 3 2_40 5 Si un message du type suivant s affiche cliquez sur Continuer Les autres applications actives se ferment et l installation continue 6 Une boîte de dialogue s affiche Installation completed Cliquez sur Redémarrer pour redémarrer le Macintosh 7 Utilisez le câble USB pour relier le SD 80 à votre ordinateur 8 Placez l interrupteur d alimentation du SD 80 sur la position ON OMS se tro...

Страница 97: ...imilaire à celle présentée ici s affiche cliquez sur Turn It Off Une boîte de confirmation s affiche cliquez sur OK fig 3 6_35 4 La boîte de dialogue Create a New Studio setup s affiche Cliquez sur Annuler Si vous avez cliqué sur OK par erreur cliquez sur Annuler dans la boîte suivante fig 3 7 5 Choisissez Open dans le menu File Dans le dossier Settings que vous avez copié à l étape 1 sélectionnez...

Страница 98: ...eption MIDI fonctionnent correctement Dans le menu Studio sélectionnez Make Current Rendre actif fig 3 22_50 9 Lorsque vous déplacez le pointeur de la souris sur l icône du générateur de sons il se transforme en Cliquez sur les icônes des ports du générateur de sons illustrés sur le schéma ci contre Si du son est audible depuis le SD 80 les paramètres sont corrects Informations complémentaires sur...

Страница 99: ...exion du SD 80 au Macintosh l installation du pilote MIDI ainsi que sa configuration sont terminées Le vumètre PART du SD 80 est il actif Si le vumètre PART du SD 80 est actif mais que vous n entendez rien vérifiez que le volume est bien réglé sur le SD 80 ou votre système audio Si le vumètre PART n est pas actif vérifiez à nouveau les connexions et les paramètres OMS Si le SD 80 ne produit aucun ...

Страница 100: ...ffiche cliquez sur Continuer Les autres applications actives se ferment et l installation continue 6 Une boîte de dialogue s affiche Installation completed Cliquez sur Redémarrer pour redémarrer le Macintosh 7 Utilisez le câble USB pour relier le SD 80 à votre ordinateur 8 Placez l interrupteur d alimentation de l UA 80 sur ON Paramètres FreeMIDI 1 Depuis le CD ROM copiez le dossier Driver E FreeM...

Страница 101: ... cela signifie que les messages MIDI sont envoyés du Macintosh au SD 80 11Choisissez à nouveau la commande MIDI Check Connections pour terminer le test 12Dans le menu File choisissez Quit pour quitter FreeMIDI Setup La connexion du SD 80 au Macintosh l installation du pilote MIDI ainsi que sa configuration sont terminées A présent les données MIDI peuvent être envoyées et reçues enregistrées et jo...

Страница 102: ...Une fois les fichiers inutiles supprimés videz la corbeille Le SD 80 est il correctement connecté Vérifiez que le SD 80 est connecté à votre ordinateur avec un câble USB Ensuite si vous utilisez Windows fermez la boîte de dialogue Propriétés Son et multimédia Propriétés Son et périphériques audio avec Windows XP Propriétés de Multimédia avec Windows 98 ouvrez à nouveau la boîte de dialogue et spéc...

Страница 103: ... OMS ou FreeMIDI OMS p 97 FreeMIDI p 100 Le SD 80 n est pas détecté lors de la configuration d OMS ou de FreeMIDI Le SD 80 est il détecté Mettez le SD 80 hors tension puis sous tension Rebranchez le câble USB Si d autres périphériques USB sont connectés ne connectez que le SD 80 Il est possible que le Macintosh n ai pas correctement détecté et initialisé le SD 80 Laissez branché le câble du SD 80 ...

Страница 104: ...ur USB Appliquez la procédure suivante pour supprimer Autres périphériques Contrôleur USB Périphérique inconnu puis redémarrez votre ordinateur 1 Dans le Panneau de configuration de Windows cliquez deux fois sur Système La boîte de dialogue Propriétés Système s affiche 2 Cliquez sur l onglet Gestionnaire de périphériques Si vous utilisez Windows 2000 cliquez sur l onglet Profils matériels puis cli...

Страница 105: ...posite La boîte de dialogue Insérez le disque ne s affiche pas Appliquez la procédure suivante pour réinstaller le pilote 1 Eteignez l ordinateur débranchez tous les câbles USB sauf ceux du clavier et de la souris et rallumez le 2 Une fois Windows démarré branchez le SD 80 à l ordinateur à l aide d un câble USB 3 Mettez le SD 80 sous tension 4 Cliquez sur le bouton Démarrer de Windows puis dans le...

Страница 106: ... Paramètres d entrée et de sortie MIDI p 91 Macintosh Paramètres OMS p 97 Paramètres FreeMIDI p 100 Are you running multiple applications If multiple applications are running simultaneously an error message may appear If this occurs click OK and exit the other applications Even if an application window is closed it is still running if it appears in the taskbar Be sure to exit unneeded applications...

Страница 107: ... the volume of the SD 80 or your speakers has been lowered If the PART level meter of the SD 80 is not moving recheck the connections and Paramètres OMS p 97 Paramètres FreeMIDI p 100 Is the OMS setup enabled If a diamond shaped symbol is not displayed at the left edge of the title area in the OMS setup window the setup is not enabled From the OMS File menu choose Enable setup Paramètres OMS p 97 ...

Страница 108: ...I playback device is assigned will not be heard If you want to play back a MIDI track you must make sure that the MIDI device you want to use is displayed in your software as the MIDI output port For details refer to the owner s manual for your software Can t record MIDI Has the MIDI input device you are using been selected correctly Select either SD 80 MIDI InOut 1 or SD 80 MIDI InOut 2 as the MI...

Страница 109: ... user with administrative privileges such as Administrator 3 After connecting the SD 80 to your computer via a USB cable turn on the power of the SD 80 4 Exit all applications before deleting the driver 5 Open the Control Panel and double click System 6 Click the Hardware tab and in the Device Manager area click Device Manager 7 Double click Sound Video and Game Controllers to view the list of dev...

Страница 110: ...ns and then click the Display tab In Windows 98 click Start Settings Folder Options 1 12 In Detailed Settings of the Display tab remove the check mark for Don t display extensions of associated files click Show all files and folders and then click OK In Windows 98 this will be Show all files 13 Click Start Find Files or folders 14 In Search location select Local hard drive Then in Name of file or ...

Страница 111: ...rficie codificata del disco Se un CD ROM è sporco o danneggiato non verrà letto correttamente Pulire i dischi utilizzando un detergente apposito disponibile in commercio NON riprodurre un CD ROM su un normale lettore audio CD Il suono risultante potrebbe essere di livello tale da provocare una perdita di udito permanente Ne potrebbero derivare dei danni ai diffusori o ad altre componenti del siste...

Страница 112: ...istro dell SD 80 2 Utilizzando le viti svitate al passo 1 applicare le staffe di montaggio sull SD 80 È necessario utilizzare le viti tolte e non altri tipi Montaggio del supporto verticale fig cushion 1 Svitare le tre viti dal pannello destro dell SD 80 2 Applicare i cuscinetti nei punti indicati nello schema riportato a destra 3 Utilizzando le viti svitate al passo 1 applicare il supporto vertic...

Страница 113: ...o 2 Collegare le prese OUTPUT1 dell SD 80 alle prese d ingresso dell apparecchio di riproduzione audio Se si utilizzano delle cuffie collegarle alla presa per le cuffie che si trova sul pannello frontale dell SD 80 fig 8 1e Prima di effettuare i collegamenti ridurre al minimo il volume su tutti gli apparecchi per evitare malfunzionamenti o danni ai diffusori Per evitare cortocircuiti o rotture dei...

Страница 114: ...ario installare prima il driver USB MIDI La procedura d installazione dipenderà dal sistema utilizzato Passare ad una delle sezioni seguenti a seconda del sistema utilizzato Utenti Windows XP pag 114 Utenti Windows 2000 pag 120 Utenti Windows Me 98 pag 124 Utenti Macintosh pag 130 Definizione di un driver Un driver è un programma che trasferisce i dati tra l SD 80 e il programma utilizzato sul com...

Страница 115: ...Chiudere tutti i programmi in corso di esecuzione Chiudere anche le altre finestre aperte Se si utilizza un programma antivirus o simile accertarsi che sia anch esso chiuso 7 Preparare il CD ROM Inserire il CD nell unità CD ROM del computer 8 Aprire la finestra di dialogo Esegui Fare clic sul pulsante Start di Windows Nel menu visualizzato selezionare Esegui Se al passo 4 il parametro Scegliere un...

Страница 116: ...ttendere qualche minuto fig 2 6 13Verrà visualizzata la finestra di dialogo Installazione guidata nuovo hardware Accertarsi che sia visualizzato EDIROL SD 80 selezionare Installa da un elenco o percorso specifico per utenti esperti e fare clic su Avanti In questo manuale la posizione delle cartelle e dei file è indicata nel percorso del file utilizzando il carattere come delimitatore Ad esempio US...

Страница 117: ...installazione del driver verrà avviata Se l impostazione Scegliere una delle seguenti opzioni non è stata impostata su Ignora comparirà il messaggio Installazione guidata hardware Se Scegliere una delle seguenti opzioni è impostato su Avvisa 1 Fare clic su Continuare 2 Continuare l installazione Se Scegliere una delle seguenti opzioni è impostato su Blocca 1 Fare clic su OK 2 Quando appare la fine...

Страница 118: ...esto caso specificare il nome dell unità CD ROM utilizzata fig 2 11_20 18Verrà visualizzata la finestra di dialogo Installazione guidata nuovo hardware Accertarsi che sullo schermo sia visualizzato EDIROL SD 80 e fare clic su Fine Attendere fino a quando nella barra delle applicazioni non appare il messaggio Trovato nuovo hardware 19Alla fine dell installazione del driver comparirà la finestra di ...

Страница 119: ...o di privilegi di tipo amministrativo ad esempio Administrator 2 In Windows fare clic sul menu Start e nel menu selezionare Pannello di controllo 3 In Scegliere una categoria fare clic su Prestazioni e manutenzione 4 In o un icona del Pannello di controllo fare clic sull icona Sistema Viene visualizzata la finestra di dialogo Proprietà del sistema 5 Fare clic sulla scheda Hardware e poi sul pulsan...

Страница 120: ...er fig 2 13_50 5 Accertarsi che Verifica firma file sia impostato su Ignora Se è attivata l opzione Ignora fare clic su OK Se non è impostata su Ignora prendere nota dell impostazione corrente di avviso o di blocco Modificare quindi l impostazione su Ignora e fare clic su OK 6 Chiudere la finestra di dialogo Proprietà del sistema Fare clic su OK Se il computer è già stato collegato all SD 80 ma ap...

Страница 121: ...river 12Utilizzare il cavo USB per collegare l SD 80 al computer 1 Dopo aver spostato l interruttore di alimentazione su OFF collegare il cavo AC all SD 80 2 Collegare il cavo AC a una presa elettrica 3 Utilizzare il cavo USB per collegare l SD 80 al computer Prima di accendere gli apparecchi accertarsi che il livello del volume sia al minimo Si potrebbero sentire comunque dei suoni all accensione...

Страница 122: ...istema utilizzato In questo caso specificare il nome dell unità CD ROM utilizzata Se l impostazione Verifica firma file non è stata impostata su Ignora verrà visualizzato il messaggio Firma digitale non trovata fig 2 16_30 Se Verifica firma file è impostato su Avvisa 1 Fare clic su Sì 2 Continuare l installazione Se Verifica firma file è impostato su Blocca 1 Fare clic su OK 2 Quando appare la fin...

Страница 123: ...e dopo aver riavviato Windows 1 Dopo aver riavviato Windows collegarsi a Windows come un utente dotato di privilegi di amministrazione ad esempio come Administrator 2 Sul desktop di Windows fare clic con il pulsante destro del mouse su Risorse del computer e nel menu visualizzato selezionare Proprietà Viene visualizzata la finestra di dialogo Proprietà del sistema 3 Fare clic sulla scheda Hardware...

Страница 124: ...UPINF EXE L identificativo dell unità D potrebbe essere diverso da quello del sistema utilizzato In questo caso specificare il nome dell unità CD ROM utilizzata fig 2 19_30 6 Appare la finestra di dialogo SetupInf È ora possibile installare il driver Non fare clic su OK adesso Se il computer è già stato collegato all SD 80 ma appare la finestra Installazione guidata hardware consultare il punto Yo...

Страница 125: ... i vari dispositivi nell ordine indicato Se i dispositivi vengono accesi nell ordine sbagliato si rischia di provocare malfunzionamenti e o danni ai diffusori e agli altri dispositivi Se si utilizza Windows 98 e il messaggio Inserire il disco non appare leggere il punto La finestra di dialogo Inserire il disco non appare pag 140 Prima di accendere gli apparecchi accertarsi che il livello del volum...

Страница 126: ... multimedia 3 Fare clic sulla scheda Audio fig 2 28_30 4 Per Riproduzione musica MIDI fare clic su a destra di Periferica predefinita oppure in Windows 2000 Me Periferica preferenziale e selezionare quanto segue nell elenco visualizzato 1 EDIROL SD 80 PARTA 5 Chiudere la finestra di dialogo Proprietà Suoni e periferiche audio Fare clic su OK per completare le impostazioni A seconda di come il sist...

Страница 127: ...a MIDI fig 2 29_30 4 Impostare l Uscita MIDI Selezionare Strumento singolo e scegliere una delle seguenti opzioni nell elenco visualizzato 1 EDIROL SD 80 PARTA 5 Chiudere la finestra di dialogo Proprietà multimediali Fare clic su OK per completare le impostazioni Informazioni aggiuntive sulle porte SD 80 MIDI OUT1 Invia riceve i dati dai connettori MIDI OUT 1 dell SD 80 SD 80 MIDI OUT2 Invia ricev...

Страница 128: ... controllo fare clic sull icona Sistema 4 Fare clic sulla scheda Avanzate 5 A destra del campo Prestazioni fare clic su Impostazioni Verrà visualizzata la finestra di dialogo Opzioni prestazione 6 Fare clic sulla scheda Avanzate fig 2 30 7 Nel campo Pianificazione processore selezionare Servizi in background e fare clic su OK 8 Nella finestra di dialogo Proprietà del sistema fare clic su OK La fin...

Страница 129: ... sul pulsante L uso dei dati musicali forniti con questo prodotto per scopi diversi dalla riproduzione privata e personale senza autorizzazione del titolare dei diritti di copyright è proibito dalla legge Inoltre questi dati non possono essere copiati né utilizzati in un lavoro secondario protetto da diritti di copyright senza l autorizzazione del titolare dei diritti di copyright Le finestre effe...

Страница 130: ...ag 131 Se si utilizza FreeMIDI pag 135 Sul Macintosh deve essere stato installato OMS o FreeMIDI a seconda del software sequencer utilizzato Definizione di un driver Un driver è un programma che trasferisce i dati tra l SD 80 e il programma utilizzato sul computer attraverso un cavo USB Il driver trasmette i dati dall applicazione all SD 80 e viceversa Se l SD 80 è acceso comparirà un messaggio co...

Страница 131: ...one e fare clic su Install fig 3 2_40 5 Se appare un messaggio come quello sotto indicato fare clic su Continue Le applicazioni in corso di esecuzione verranno chiuse e l installazione proseguirà 6 Verrà visualizzata una finestra di dialogo indicante Installation completed Fare clic su Restart per riavviare il Macintosh 7 Utilizzare il cavo USB per collegare l SD 80 al computer 8 Spostare l interr...

Страница 132: ...a fare clic su Turn It Off Verrà visualizzata una finestra di dialogo di conferma fare clic su OK fig 3 6_35 4 Verrà visualizzata la finestra di dialogo Create a New Studio Setup Fare clic su Cancel Se è stato selezionato accidentalmente il pulsante OK fare clic su Cancel nella finestra successiva fig 3 7 5 Selezionare Open nel menu File Nella cartella Settings copiata al passo 1 selezionare il fi...

Страница 133: ... la trasmissione e la ricezione MIDI siano corrette Nel menu Studio selezionare Test Studio fig 3 22_50 9 Quando il cursore del mouse passa vicino all icona del generatore di suoni il cursore assumerà la forma di una nota Fare clic sull icona del generatore di suoni di ogni porta nello schema a destra Se l SD 80 emette dei suoni le impostazioni sono corrette Informazioni aggiuntive sulle porte SD ...

Страница 134: ...llazione del driver MIDI e di configurazione del driver è giunta al termine L indicatore di livello PART dell SD 80 si sposta Se l indicatore di livello PART nel display dell SD 80 si sposta ma non viene emesso alcun suono controllare se il volume dell SD 80 o degli altoparlanti è al minimo Se l indicatore di livello PART non si sposta ricontrollare i collegamenti e le impostazioni OMS Se l SD 80 ...

Страница 135: ... un messaggio come quello sotto indicato fare clic su Continue Le applicazioni in corso di esecuzione verranno chiuse e l installazione proseguirà 6 Verrà visualizzata una finestra di dialogo indicante Installation completed Fare clic su Restart per riavviare il Macintosh 7 Utilizzare il cavo USB per collegare l SD 80 al computer 8 Portare l interruttore di alimentazione dell SD 80 in posizione ON...

Страница 136: ...e di nuovo il comando Check Connections nel menu MIDI per concludere il test 12Nel menu File scegliere Quit per uscire da FreeMIDI Setup La procedura di collegamento dell SD 80 al Macintosh di installazione del driver MIDI e di configurazione del driver è giunta al termine I dati MIDI potranno quindi essere registrati e riprodotti Informazioni aggiuntive sulle porte SD 80 Port A Invia riceve i dat...

Страница 137: ...nare i file non necessari per aumentare lo spazio disponibile sul disco Dopo aver cancellato i file non necessari svuotare il Cestino L SD 80 è collegato correttamente Accertarsi che il connettore USB del computer sia collegato all SD 80 tramite un cavo USB Dopo aver effettuato questo controllo e se si utilizza Windows chiudere la finestra di dialogo Proprietà Suoni e multimedia Proprietà Suoni e ...

Страница 138: ... OMS o FreeMIDI è già presente sul disco Installare OMS o FreeMIDI OMS pag 132 FreeMIDI pag 135 SD 80 non viene rilevato durante la configurazione di OMS o FreeMIDI L SD 80 è rilevato Spegnere e riaccendere l SD 80 Ricollegare il cavo USB Se sono collegati altri dispositivi USB collegare solo l SD 80 Forse il Macintosh non ha rilevato e inizializzato correttamente l SD 80 Dopo aver scollegato il c...

Страница 139: ...Periferica sconosciuta sotto Altre periferiche o Controller USB Universal Serial Bus Seguire la procedura sotto illustrata per cancellare Altre periferiche Universal Serial Bus Controller Periferica sconosciuta e riavviare il computer 1 Nel Pannello di controllo di Windows fare doppio clic su Sistema Viene visualizzata la finestra di dialogo Proprietà del sistema 2 Fare clic sulla scheda Gestione ...

Страница 140: ...e Seguire la procedura sotto indicata per reinstallare il driver 1 Spegnere il computer e avviare Windows con tutti i cavi USB scollegati ad eccezione della tastiera e del mouse 2 Dopo aver riavviato Windows utilizzare un cavo USB per collegare l SD 80 al computer 3 Accendere l SD 80 4 In Windows fare clic sul pulsante Start e nel menu selezionare Impostazioni Pannello di controllo 5 Fare doppio c...

Страница 141: ...ust specify the SD 80 as the audio data output destination for your computer For details on how to make this setting refer to Settings and checking Windows Destinazioni input e output MIDI pag 126 Macintosh Impostazioni OMS pag 132 Impostazioni FreeMIDI pag 135 Are you running multiple applications If multiple applications are running simultaneously an error message may appear If this occurs click...

Страница 142: ...the SD 80 display If the PART level meter is moving but you do not hear sound check whether the volume of the SD 80 or your speakers has been lowered If the PART level meter of the SD 80 is not moving recheck the connections and Impostazioni OMS pag 132 Impostazioni FreeMIDI pag 135 Is the OMS setup enabled If a diamond shaped symbol is not displayed at the left edge of the title area in the OMS s...

Страница 143: ... MIDI tracks to which no MIDI playback device is assigned will not be heard If you want to play back a MIDI track you must make sure that the MIDI device you want to use is displayed in your software as the MIDI output port For details refer to the owner s manual for your software Can t record MIDI Has the MIDI input device you are using been selected correctly Select either SD 80 MIDI InOut 1 or ...

Страница 144: ... administrative privileges such as Administrator 3 After connecting the SD 80 to your computer via a USB cable turn on the power of the SD 80 4 Exit all applications before deleting the driver 5 Open the Control Panel and double click System 6 Click the Hardware tab and in the Device Manager area click Device Manager 7 Double click Sound Video and Game Controllers to view the list of devices 8 Fro...

Страница 145: ...rol Panel click Folder Options and then click the Display tab In Windows 98 click Start Settings Folder Options 1 12 In Detailed Settings of the Display tab remove the check mark for Don t display extensions of associated files click Show all files and folders and then click OK In Windows 98 this will be Show all files 13 Click Start Find Files or folders 14 In Search location select Local hard dr...

Страница 146: ...s CD ROM dañados o sucios no se puedan leer correctamente Mantenga sus discos limpios con un limpiador de CD del mercado NO inserte un CD ROM en un reproductor de CD de audio convencional El sonido resultante puede ser de un nivel tan alto que puede causar la pérdida permanente del sentido de audición También podría ocasionar desperfectos en los altavoces u otros componentes del sistema Guía de in...

Страница 147: ...a extraído en el paso 1 fije las orejas de montaje en bastidor al SD 80 Debe utilizar los tornillos que ha extraído No utilice otros tornillos Fijación del montaje vertical sobre escritorio fig soporte 1 Extraiga tres tornillos del panel derecho del SD 80 2 Fije los soportes pegatinas en las posiciones que se muestran en el diagrama de la derecha 3 Con los tornillos que ha extraído en el paso 1 fi...

Страница 148: ...ntrada de su equipo de reproducción de audio Si utiliza auriculares conéctelos al jack de auriculares del panel frontal del SD 80 fig 8 1e Antes de establecer las conexiones con otro equipo debe bajar el volumen de todos los equipos para evitar anomalías en el funcionamiento o daños en los altavoces Cuando desconecte el cable cójalo por el extremo para evitar cortocircuitos o conexiones interrumpi...

Страница 149: ...instalación variará en función del sistema Prosiga con alguno de los siguientes apartados según del sistema que utilice Usuarios de Windows XP pág 149 Usuarios de Windows 2000 pág 155 Usuarios de Windows Me 98 pág 159 Usuarios de Macintosh pág 165 Qué es un controlador Un controlador es software que transfiere datos entre el SD 80 y el software de aplicación que esté ejecutando en su PC siempre qu...

Страница 150: ...lic en Aceptar 6 Salga de todo el software que se esté ejecutando aplicaciones Cierre cualquier ventana que esté abierta Si utiliza un programa antivirus o software similar también debe cerrarlo 7 Prepare el CD ROM Inserte el CD ROM en la unidad de CD ROM del sistema 8 Abra el cuadro de diálogo Ejecutar Haga clic en el botón Inicio de Windows En el menú que aparece seleccione Ejecutar Si ha modifi...

Страница 151: ...ig 2 6 13Aparecerá el Asistente para hardware nuevo encontrado Compruebe que la pantalla indique EDIROL SD 80 seleccione Instalar desde una lista o una ubicación específica Avanzada y haga clic en Siguiente En este manual la ubicación de las carpetas y archivos se da en términos de la ruta del archivo y se utiliza como delimitador Por ejemplo USB_XP2K SETUPINF EXE se refiere al archivo SETUPINF EX...

Страница 152: ...ón desea que realice Windows no se ha establecido en Ignorar aparecerá el cuadro de diálogo Instalación de hardware Si Qué acción desea que realice Windows está establecido en Advertir 1 Haga clic en Continuar de todos modos 2 Prosiga con la instalación Si Qué acción desea que realice Windows está establecido en Bloquear 1 Haga clic en Aceptar 2 Cuando aparezca Asistente para hardware nuevo encont...

Страница 153: ...uede ser diferente para su sistema Especifique el nombre de su unidad de CD ROM fig 2 11_20 18Aparecerá el Asistente para hardware nuevo encontrado Asegúrese de que la pantalla indique EDIROL SD 80 y haga clic en Finalizar Espere hasta que aparezca Hardware nuevo encontrado cerca de la barra de tareas 19Una vez finalizada la instalación del controlador aparecerá el cuadro de diálogo Cambio de conf...

Страница 154: ...enta administrativa Administrador por ejemplo 2 Haga clic en el menú Inicio de Windows y seleccione Panel de control 3 En Elegir una categoría haga clic en Rendimiento y mantenimiento 4 En o elegir un icono del Panel de control haga clic en el icono Sistema Aparecerá el cuadro de diálogo Propiedades del sistema 5 Haga clic en la ficha Hardware y a continuación en Firma del controlador Aparecerá el...

Страница 155: ...50 5 Asegúrese de que Verificación de la firma del archivo esté establecido en Ignorar Si está establecido en Ignorar sólo tiene que hacer clic en Aceptar Si no está establecido en Ignorar anótese la configuraciónactual Advertir o Bloquear A continuación cambie la configuración a Ignorar y haga clic en Aceptar 6 Cierre el cuadro de diálogo Propiedades del sistema Haga clic en Aceptar Si ya ha cone...

Страница 156: ...tar el SD 80 al PC 1 Con el interruptor de alimentación en OFF conecte el cable de CA al SD 80 2 Conecte el cable de CA a una toma de corriente eléctrica 3 Utilice el cable USB para conectar el SD 80 al PC Asegúrese siempre de tener bajado el volumen antes de encender la unidad Aunque tenga el volumen completamente bajado puede que oiga algún sonido al encender la unidad pero esto es algo normal y...

Страница 157: ...a Especifique el nombre de su unidad de CD ROM Si la configuración de Verificación de la firma del archivo no se ha establecido en Ignorar aparecerá el cuadro de diálogo No se ha encontrado la firma digital fig 2 16_30 Si Verificación de la firma del archivo está establecido en Advertir 1 Haga clic en Sí 2 Prosiga con la instalación Si Verificación de la firma del archivo está establecido en Bloqu...

Страница 158: ... vez se haya reiniciado Windows inicie la sesión de Windows como usuario con privilegios administrativos como Administrador 2 En el escritorio de Windows haga clic con el botón secundario del ratón en el icono Mi PC y en el menú que aparece seleccione Propiedades Aparecerá el cuadro de diálogo Propiedades del sistema 3 Haga clic en la ficha Hardware y a continuación haga clic en Firma del controla...

Страница 159: ... y haga clic en Aceptar D Driver USB_ME98 SETUPINF EXE El nombre de la unidad D puede ser diferente para su sistema Especifique el nombre de su unidad de CD ROM fig 2 19_30 6 Aparecerá el cuadro de diálogo SetupInf Ahora ya puede instalar el controlador No haga clic en Aceptar todavía Si ya ha conectado el SD 80 a su PC pero aparece el Asistente para agregar nuevo hardware consulte el apartado Ha ...

Страница 160: ...den incorrecto puede causar anomalías en el funcionamiento o daños en los altavoces y otros aparatos Si utiliza Windows 98 y no aparece el cuadro de diálogo Insertar disco consulte el apartado No aparece el cuadro de diálogo Insertar disco pág 175 Asegúrese siempre de tener bajado el volumen antes de encender la unidad Aunque tenga el volumen completamente bajado puede que oiga algún sonido al enc...

Страница 161: ...onidos y multimedia 3 Haga clic en la ficha Audio fig 2 28_30 4 Para la reproducción de música MIDI haga clic en que aparece a la derecha de Dispositivo predeterminado o Dispositivo preferido en Windows 2000 o Me y seleccione lo siguiente en la lista que aparece 1 EDIROL SD 80 PARTA 5 Cierre el cuadro de diálogo Propiedades de sonidos y dispositivos de audio Haga clic en Aceptar para finalizar la ...

Страница 162: ...que la Salida de MIDI Seleccione Instrumento único y elija una de las opciones siguientes en la lista que aparece 1 EDIROL SD 80 PARTA 5 Cierre el cuadro de diálogo Propiedades de Multimedia Haga clic en Aceptar para finalizar la configuración Información adicional sobre los puertos SD 80 MIDI OUT1 Envía o recibe datos de los conectores MIDI OUT 1 del SD 80 SD 80 MIDI OUT2 Envía o recibe datos de ...

Страница 163: ...o elegir un icono del Panel de control haga clic en el icono Sistema 4 Haga clic en la ficha Avanzadas 5 A la derecha del campo Rendimiento haga clic en Configuración Aparecerá el cuadro de diálogo Opciones de rendimiento 6 Haga clic en la ficha Avanzadas fig 2 30 7 En el campo Planificación del procesador seleccione Servicios de segundo plano y haga clic en Aceptar 8 En el cuadro de diálogo Propi...

Страница 164: ... en la ficha Vista previa y a continuación haga clic en el botón El uso de la canción de demostración proporcionada con este producto para cualquier fin que no sea el disfrute personal o privado sin el permiso del propietario del copyright está prohibido por la ley Además estos datos no pueden copiarse ni utilizarse en otro trabajo con copyright propio sin el permiso del propietario del copyright ...

Страница 165: ...FreeMIDI pág 170 Debe instalar OMS o FreeMIDI en su Macintosh según el software secuenciador que vaya a utilizar Qué es un controlador Un controlador es software que transfiere datos entre el SD 80 y el software de aplicación que esté ejecutando en su sistema siempre que su sistema y el SD 80 estén conectados mediante un cable USB El controlador pasa los datos de la aplicación al SD 80 y del SD 80...

Страница 166: ... haga clic en Install fig 3 2_40 5 Si aparece un mensaje como el siguiente haga clic en Continue Saldrá de todas las aplicaciones que se estén ejecutando y proseguirá con la instalación 6 Aparecerá un cuadro de diálogo que indicará Installation completed Haga clic en Restart para reiniciar el Macintosh 7 Utilice el cable USB para conectar el SD 80 al sistema 8 Disponga el interruptor de alimentaci...

Страница 167: ...3 Si aparece un cuadro de diálogo como éste haga clic en Turn It Off Aparecerá un cuadro de diálogo de confirmación haga clic en OK fig 3 6_35 4 Aparecerá el cuadro de diálogo Create a New Studio Setup Haga clic en Cancel Si por error hace clic en OK haga clic en Cancel en la siguiente pantalla fig 3 7 5 Elija Open en el menú File En la carpeta Setting que ha copiado en el paso 1 seleccione el arc...

Страница 168: ...ne Test Studio fig 2 22_50 9 Cuando mueva el cursor del ratón cerca del icono del generador de sonido el cursor se convertirá en una Haga clic en el icono del generador de sonido de cada uno de los puertos que aparecen en el diagrama de la derecha Si el SD 80 emite sonido la configuración es correcta Información adicional sobre los puertos Puerto A del SD 80 Envía o recibe datos para la parte SD 8...

Страница 169: ...ios para conectar el SD 80 al Macintosh instalar el controlador MIDI y efectuar la configuración del controlador Se mueve el medidor de nivel PART del SD 80 Si el medidor de nivel PART de la pantalla del SD 80 se mueve pero no oye ningún sonido compruebe si se ha bajado el volumen del SD 80 o de los altavoces Si el medidor de nivel PART no se mueve vuelva a comprobar las conexiones y la configurac...

Страница 170: ...aje como el siguiente haga clic en Continue Saldrá de todas las aplicaciones que se estén ejecutando y proseguirá con la instalación 6 Aparecerá un cuadro de diálogo que le indicará Installation completed Haga clic en Restart para reiniciar el Macintosh 7 Utilice el cable USB para conectar el SD 80 al sistema 8 Disponga en la posición ON el interruptor de alimentación del SD 80 Configuración de Fr...

Страница 171: ...uelva a elegir el comando Check Connections del menú MIDI para finalizar la prueba 12En el menú File seleccione Quit para salir de FreeMIDI Setup Con esto habrá completado todos los pasos necesarios para conectar el SD 80 al Macintosh instalar el controlador MIDI y efectuar la configuración del controlador Ya está listo para recibir y enviar grabar y reproducir datos MIDI Información adicional sob...

Страница 172: ...dad de CD ROM en red El software no puede instalarse desde una unidad de CD ROM en red Hay suficiente espacio en el disco duro Elimine los archivos que no necesite para ganar espacio en el disco duro Una vez eliminados los archivos innecesarios vacíe la papelera de reciclaje Está el SD 80 conectado correctamente Asegúrese de que el conector USB de su sistema esté conectado al SD 80 mediante un cab...

Страница 173: ...sitivo desconocido en Administrador de dispositivos u Otros dispositivos en Controladores de bus serie universal Si encuentra alguno elimínelo Están OMS o FreeMIDI instalados El controlador SD 80 no se puede instalar a menos que OMS o FreeMIDI estén instalados Instale OMS o FreeMIDI OMS pág 167 FreeMIDI pág 170 No se detecta el SD 80 al efectuar la configuración de OMS o FreeMIDI El sistema ha det...

Страница 174: ...lador de bus serie universal Siga el procedimiento que se describe a continuación para eliminar Otro dispositivo Controlador de bus serie universal y Dispositivo desconocido y reinicie su PC 1 En Panel de control de Windows haga doble clic en Sistema Aparecerá el cuadro de diálogo Propiedades del sistema 2 Haga clic en la ficha Administrador de dispositivos Si utiliza Windows 2000 haga clic en la ...

Страница 175: ... el procedimiento que se describe a continuación para volver a instalar el controlador 1 Apague el PC e inicie Windows con todos los cables USB desconectados excepto el del teclado y el ratón 2 Después de reiniciar Windows utilice un cable USB para conectar el SD 80 al PC 3 Encienda el SD 80 4 Haga clic en el botón Inicio de Windows y en el menú que aparece seleccione Configuración Panel de contro...

Страница 176: ...must specify the SD 80 as the audio data output destination for your computer For details on how to make this setting refer to Settings and checking Windows Destinos de entrada y salida MIDI pág 161 Macintosh Configuración de OMS pág 167 Configuración de FreeMIDI pág 170 Are you running multiple applications If multiple applications are running simultaneously an error message may appear If this oc...

Страница 177: ...meter move in the SD 80 display If the PART level meter is moving but you do not hear sound check whether the volume of the SD 80 or your speakers has been lowered If the PART level meter of the SD 80 is not moving recheck the connections and Configuración de OMS pág 167 Configuración de FreeMIDI pág 170 Is the OMS setup enabled If a diamond shaped symbol is not displayed at the left edge of the t...

Страница 178: ...IDI playback device is assigned will not be heard If you want to play back a MIDI track you must make sure that the MIDI device you want to use is displayed in your software as the MIDI output port For details refer to the owner s manual for your software Can t record MIDI Has the MIDI input device you are using been selected correctly Select either SD 80 MIDI InOut 1 or SD 80 MIDI InOut 2 as the ...

Страница 179: ...as a user with administrative privileges such as Administrator 3 After connecting the SD 80 to your computer via a USB cable turn on the power of the SD 80 4 Exit all applications before deleting the driver 5 Open the Control Panel and double click System 6 Click the Hardware tab and in the Device Manager area click Device Manager 7 Double click Sound Video and Game Controllers to view the list of...

Страница 180: ...tions and then click the Display tab In Windows 98 click Start Settings Folder Options 1 12 In Detailed Settings of the Display tab remove the check mark for Don t display extensions of associated files click Show all files and folders and then click OK In Windows 98 this will be Show all files 13 Click Start Find Files or folders 14 In Search location select Local hard drive Then in Name of file ...

Страница 181: ......

Страница 182: ......

Страница 183: ...aus Pour 230 V Français Cette boite contient des alimentations anglaises ou continentales Merci de choisir l alimentation appropriée de votre pays Per 230 V Italiano La confezione contiene alimentatori con spina europea e Inglese Scegliete quella adatta alla Vostra nazione Para 230 V Español Esta caja contiene cables de corriente continentales y británicos Por favor seleccione el tipo correcto par...

Страница 184: ...IMPORTANT NOTES Owner s manual p 5 These sections provide important information concerning the proper operation of the unit Additionally in order to feel assured that you have gained a good grasp of every feature provided by your new unit Getting started and Owner s manual should be read in its entirety The manual should be saved and kept on hand as a convenient reference 03011123 02 6 xx 11N Gett...

Отзывы: