Edirol P-10 Скачать руководство пользователя страница 56


56


Menu


You can save all of the bank parameters and image files on the 
SD card in up to 99 files. You can also restore the P-10 using 
bank parameter data that you have saved on the SD card.
For details, see  “Restoring All Bank Data (Project Restore)” (p. 
56).

Backup data is saved on the SD card in a folder 
(folder names 001EDROL–099EDROL).


1. Rotate the [VALUE] knob to select “INFORMATION” 

from the MENU screen, and then press the [ENTER] 
button.


The INFORMATION screen appears.


2. Rotate the [VALUE] knob to select “Project Backup.”

3. Press the [ENTER] button.


A confirmation screen appears.


4. Rotate the [VALUE] knob to select “Execute.”


D06_08.eps


5. Press the [ENTER] button.


The bank data is backed up. 
When backup is complete, “Completed!” appears.

If there is not enough free space on the SD card, 
you cannot save the data.

Restore all of the bank data using backup data saved on the 
SD card.


1. Rotate the [VALUE] knob to select “INFORMATION” 

from the MENU screen, and then press the [ENTER] 
button.


The INFORMATION screen appears.


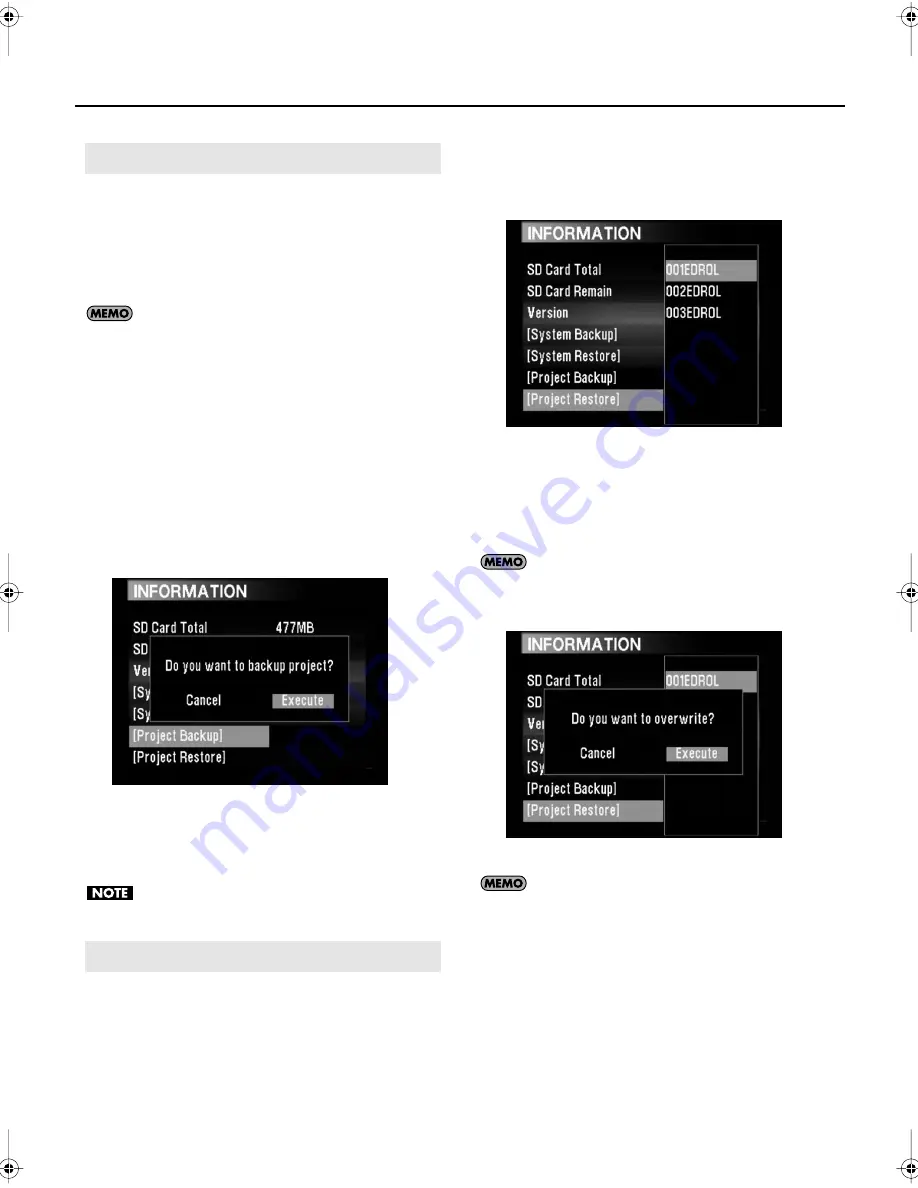
2. Rotate the [VALUE] knob to select “Project Restore.”

3. Press the [ENTER] button.


A list of folders that contain backup data appears.


D06_09.eps


4. Rotate the [VALUE] knob to select the folder that has 

the bank data that you want to restore, and then 
press the [ENTER] button.


A confirmation screen appears.

When there is no backup data, the list of folders is 
not displayed and you cannot restore bank data. 


5. Rotate the [VALUE] knob to select “Execute.”


D06_10.eps


When you restore bank data on the P-10, the 
current settings are overwritten. We recommend 
backing up your current settings to the SD card first, 
and then restoring the P-10.


6. Press the [ENTER] button.


The bank data is restored. 
When restoration is complete, “Completed!” appears.


Backing Up All Bank Data (Project Backup)

Restoring All Bank Data (Project Restore)

P-10_e.book 56 ページ 2008年7月16日 水曜日 午後8時23分

Содержание P-10

Страница 1: ......

Страница 2: ......

Страница 3: ... concerning the proper operation of the unit Additionally in order to feel assured that you have gained a good grasp of all of your new unit s features you should read the Owner s manual in its entirety The manual should be saved and kept on hand as a convenient reference Copyright 2008 ROLAND CORPORATION All rights reserved No part of this publication may be reproduced in any form without the wri...

Страница 4: ...nd short circuits Damaged cords are fire and shock hazards 010 This unit either alone or in combination with an amplifier and headphones or speakers may be capable of producing sound levels that could cause permanent hearing loss Do not operate for a long period of time at a high volume level or at a level that is uncomfortable If you experience any hearing loss or ringing in the ears you should i...

Страница 5: ...n page 023 DO NOT play a CD ROM disc on a conventional audio CD player The resulting sound may be of a level that could cause permanent hearing loss Damage to speakers or other system components may result 101b The unit and the AC adaptor should be located so their location or position does not interfere with their proper ventilation 102c Always grasp only the plug on the AC adaptor cord when plug...

Страница 6: ...re using the unit you must allow it to stand for several hours until the condensation has completely evaporated 360 Depending on the material and temperature of the surface on which you place the unit its rubber feet may discolor or mar the surface You can place a piece of felt or cloth under the rubber feet to prevent this from happening If you do so please make sure that the unit will not slip o...

Страница 7: ...f third party copyrights arising through your use of this unit 981b Use of the image supplied with this product for any purpose other than private personal enjoyment without the permission of the copyright holder is prohibited by law Additionally this data must not be copied nor used in a secondary copyrighted work without the permission of the copyright holder 985 The explanations in this manual ...

Страница 8: ... Turning the Power Off 19 Main Applications 19 Using the P 10 for Presentations 19 Using the P 10 at Events 19 Using the P 10 at Concerts V LINK 20 Mastering Basic Operation 21 What Does the P 10 Do 21 Basic Operation 21 What is a PAD 21 Using the MENU Button and VALUE Knob 22 Using the ENTER Button 22 Using the EXIT Button 22 Outputting Images 23 Supported Movie and Still Image File Formats 23 Ab...

Страница 9: ...r of Still Images 34 Capturing Movies 34 Capturing Still Images 35 Deleting Captured Images 36 Transferring Files from a Computer to the P 10 37 Using Windows XP or Windows Vista 37 5 Pad Settings 39 Assigning Images to Pads 40 Pad Parameters 41 What are the Pad Parameters 41 PAD PARAMETER Screen Operation 41 Exiting the PAD PARAMETER Screen 41 Returning to the Previous Setting Value UNDO 42 Movie...

Страница 10: ... 52 Items You Can Specify 52 MENU Screen Operation 54 Menu 55 INFORMATION 55 Backing Up System Settings on the SD Card System Backup 55 Restoring System Settings System Restore 55 Backing Up All Bank Data Project Backup 56 Restoring All Bank Data Project Restore 56 VIDEO 57 Adjusting the Display Contrast LCD Contrast 57 Specifying the Video Format Video Format 57 Specifying the Video Input Jack In...

Страница 11: ...estricting Buttons During Performance PROTECT 62 Restricting Buttons Related to Pads Pad Edit 62 Restricting the Capture Buttons Capture 62 Deleting Files on the SD Card DELETE FILE 63 Formatting the SD Card FORMAT SD CARD 63 Returning to the Factory Default Settings FACTORY RESET 64 7 Appendices 65 Using V LINK 66 What is V LINK 66 How to Use V LINK 66 Items You Can Specify with V LINK 66 SD Card...

Страница 12: ...12 Artist Introductions 78 Index 79 ...

Страница 13: ...13 1 Introduction ...

Страница 14: ...s the movie playback speed p 28 PAD PARAM Button Use to make parameter settings for each PAD p 41 BANK A F Buttons Press to select a bank p 26 PADs 1 12 PADs 1 12 perform the following functions Play back images p 26 You can tell what type of image is assigned to a pad by looking at the pad color While holding down a BANK A F button press a PAD 1 12 to change the BANK number p 26 Top Panel Pad Ass...

Страница 15: ... is playing VIDEO OUTPUT FADE Knob Use to fade images to black or white p 29 COLOR Knob Adjusts the color of the image p 28 PAD COPY Button Copy pad parameters of images and audio assigned to a pad and assign the copied data to another pad p 48 REPEAT A B Button Repeat a section of the movie file p 29 REVERSE SLIDE SHOW Button STROBE Button Apply strobe play back images with short intervals betwee...

Страница 16: ...ndue stress to the DC IN jack anchor the power cord using the cord hook p 17 MEMORY CARD SD Card Slot Insert an SD card here p 17 DC IN Jack Connect the supplied AC adaptor here p 17 POWER Switch Press this switch to turn the power on and off p 19 Ground Terminal Depending on the circumstances of a particular setup you may experience a discomforting sensation or perceive that the surface feels gri...

Страница 17: ...SD Card Theft Prevention Cover p 67 This section explains how to connect the AC adaptor and various external devices to the P 10 Here s how to connect the supplied AC adaptor to the P 10 1 Connect the power cord to the AC adaptor 2 Insert the AC adaptor cord into the DC IN jack on the rear panel 3 Anchor the AC adaptor cord on the cord hook 4 Connect the plug of the power cord to the AC outlet P 1...

Страница 18: ...y be low If this happens use connection cables that do not contain resistors 1 Turn off the power to all devices 2 Connect the P 10 to the external device The necessary cables for connecting the P 10 to various devices are not included with the unit You will need to supply these cables yourself Connecting External Devices Projector Display Video Camera DVD Player P 10 Rear Panel MIDI Device Comput...

Страница 19: ...o an appropriate level on the P 10 and any connected devices This unit is equipped with a protection circuit A brief interval a few seconds after power up is required before the unit will operate normally 1 Turn down the volume on the P 10 and any connected devices 2 Turn off the power to any connected devices 3 Press the POWER switch on the P 10 All of the buttons and indicators on the top panel ...

Страница 20: ...20 Before You Start As a musician use your MIDI device to control the P 10 and synchronize images to the sounds and beats P 10_Concert eps Using the P 10 at Concerts V LINK ...

Страница 21: ...864 possible assignment locations 6 BANK buttons x 12 BANK numbers x 12 PAD buttons 864 storage locations P01_PadImage_e eps What Does the P 10 Do P 10 Projector Screen Capture Apply Effect and Play Back Video Camera Basic Operation What is a PAD A Bank Number A1 A10 A7 A2 A8 A3 A9 A4 A5 A6 A11 A12 BANK A B Bank Number B1 B10 B7 B2 B8 B3 B9 B4 B5 B6 B11 B12 BANK B Bank Number C1 C10 C7 C2 C8 C3 C9...

Страница 22: ... knob to the left or right to select setting items Press the ENTER button to execute the setting that you have selected by rotating the VALUE knob Button_ENTER eps Press the EXIT button to return to the previous screen When an image is being played back pressing the EXIT button stops playback Button_EXIT eps Using the MENU Button and VALUE Knob Using the ENTER Button Using the EXIT Button ...

Страница 23: ...ollowing movie and still image file formats For details see P 10 Supported Formats p 68 There are two main TV broadcast formats used around the world NTSC and PAL The standard in use differs according to the country or region If the P 10 format doesn t match the format of the external display such as a TV images will not be displayed When you connect an external display first check which format is...

Страница 24: ...24 MEMO ...

Страница 25: ...25 2 Playing Back Images ...

Страница 26: ...ays back at the same time If you add an audio file to a movie that has its own audio the added audio plays back when you play the movie For details see Specifying an Audio Files Additional Audio File p 44 p 46 1 Press the EXIT button Button_EXIT eps Image playback is stopped Connect an external device such as a video camera or DVD player and you can display its images on the P 10 s display or on a...

Страница 27: ...27 3 Applying Effects to Images ...

Страница 28: ...ype p 58 Effect Description Movies Stills SPEED Knob Adjust the playback speed O COLOR Knob Adjust the image color O O VIDEO OUTPUT FADE Knob Fade the image O O REPEAT A B Button Repeat a specified section of a movie O REVERSE SLIDE SHOW Button when playing back movies Play the movie in reverse O REVERSE SLIDE SHOW Button when playing back still images Play a slide show of all the images assigned ...

Страница 29: ... For details about playing back movies see Playing Back Images p 26 2 Press the REPEAT A B button at the point where you want the movie to start repeating Button_RepeatAB eps The REPEAT A B button flashes 3 Press the REPEAT A B button at the point where you want the movie to stop repeating The REPEAT A B button lights up and the specified section plays back repeatedly 4 To cancel the repeat effect...

Страница 30: ...mages in a slide show you can also apply motion graphics just like the ones used in professional music video clips Slide show patterns that apply these effects are called a slide show set The P 10 has 79 motions for you to choose from to create a set that displays your own unique style 1 Play a still image For details see Playing Back Images p 26 2 Press the REVERSE SLIDE SHOW button Button_Rev_Sl...

Страница 31: ...trobe eps The STROBE button lights up and images are played back with strobe 3 To cancel the strobe effect press the STROBE button again The STROBE button turns off and strobe playback is cancelled When you select another pad strobe playback is cancelled You can set the strobe interval for each pad For details see below Movies Specifying the Strobe Interval Strobe Time p 45 Still Images Specifying...

Страница 32: ...32 MEMO ...

Страница 33: ...33 4 Capturing Images ...

Страница 34: ...uring the movie Empty pads flash red When there is no flashing pad press a bank button to select another bank 5 Press a pad that is flashing The captured movie is assigned to the selected pad If you have selected a pad that is lit red movie or blue still image the following screen appears D04_01 eps If you want to overwrite the image assigned to the pad rotate the VALUE knob to select Execute and ...

Страница 35: ... when the image you want to capture appears Button_Still eps Empty pads flash blue When there is no flashing pad press a bank button to select another bank 4 Press a pad that is flashing The captured still image is assigned to the selected pad If you have selected a pad that is lit red movie or blue still image the following screen appears D04_01 eps If you want to overwrite the image assigned to ...

Страница 36: ...b to select Execute 4 Press the ENTER button A screen appears to confirm whether you want to delete the file from the SD card 5 Rotate the VALUE knob to select Execute or Cancel When you want to delete the image from the SD card select Execute and when you don t want to not delete the image select Cancel 6 Press the ENTER button If the image is assigned to other pads when you delete the file the i...

Страница 37: ... can also insert the P 10 formatted SD card into your computer s card reader or connect a card reader to your computer to prepare images Starting Up P 10 Image Converter Format the SD card on the P 10 p 63 and prepare images on the computer before performing the following procedure 1 Insert the SD card into the P 10 2 Turn on the P 10 3 Press the EXIT button to make sure that nothing is being disp...

Страница 38: ...38 Transferring Files from a Computer to the P 10 MEMO ...

Страница 39: ...39 5 Pad Settings ...

Страница 40: ...u can assign to one pad are listed below P 10_Num_Files eps 1 Press the PAD PARAM button Button_PADPARAM eps 2 Press a pad that is unlit The selected pad flashes purple and the FILE SELECT screen appears D05_01 eps 3 Rotate the VALUE knob to select an image 4 Press the ENTER button The image is assigned to the pad For details about how to add still images to a pad see Adding Still Images to a Pad ...

Страница 41: ...en D05_02 eps 3 Rotate the VALUE knob to select a setting item Knob_VALUE eps 4 Press the ENTER button 5 Rotate the VALUE knob to change the value D05_03 eps 6 Press the ENTER button The selected parameter is changed While the PAD PARAMETER screen is displayed you can select another pad and change its pad parameter settings To return to the previous screen press the EXIT button Press the PAD PARAM...

Страница 42: ...6 Copying pad data p 48 Capturing images p 34 Movie Pad Parameters Parameter Name Description Page Movie File Change the movie assigned to a pad p 43 Play Mode Specify the play mode p 43 Start Frame Specify the first frame for playback p 44 End Frame Specify the last frame for playback p 44 Audio Sync Specify whether to sync movie and audio playback p 44 Additional Audio File Specify an audio file...

Страница 43: ... play back a movie Play back a movie using the following play modes Movies Changing a Movie Assigned to a Pad Changing the Play Mode Play Mode Play Mode Description Forward Loop 05PAD_ForwardLoop eps Repeats playback Alternate Loop 05PAD_AltermateLoop eps Repeats playback alternating between forward and reverse play back One Shot1 05PAD_Oneshot1 eps Plays the movie file once and then stops leaving...

Страница 44: ...fy whether to apply the same changes to the audio When you turn the SPEED knob all the way to the left the movie and audio playback both pause You can specify a separate audio file to play back with a movie When you play back the movie the specified audio file plays back To specify an audio file make sure you add audio files to the SD card beforehand 1 Rotate the VALUE knob to select Additional Au...

Страница 45: ...TER button The STILL IMAGE LIST screen appears D05_06 eps 4 Rotate the VALUE knob to select Add Still Image and then press the ENTER button The FILE SELECT screen appears D05_07 eps 5 Rotate the VALUE knob to select the still image that you want to add 6 Press the ENTER button The still image is added to the pad Specifying the Volume Audio Level Setting Description MAX This is the maximum volume 1...

Страница 46: ...ile to a pad which has still images assigned to it When you play back the still images the audio file also plays back To specify an audio file make sure you add audio files to the SD card beforehand 1 Rotate the VALUE knob to select Additional Audio File on the PAD PARAMETER screen and then press the ENTER button 2 Rotate the VALUE knob to select an audio file 3 Press the ENTER button If there are...

Страница 47: ...otions p 70 You can specify the time interval for the strobe effect For example if you specify 0 5sec each still image plays back in 0 5 second strobe bursts Specifying the Slide Show Set Slide Show Set Setting Description Preset 1 10 Select the slide show set to apply User Set Apply your customized slide show set Creating a Slide Show Set Slide Show User Set Setting Description Motion 1 5 Specify...

Страница 48: ...eters are copied to the selected pad If you have selected a pad that is lit red movie or blue still image the following screen appears D05_10 eps If you want to overwrite the image assigned to the pad rotate the VALUE knob to select Execute and then press the ENTER button If you don t want to overwrite the image assigned to the pad rotate the VALUE knob to select Cancel and then press the ENTER bu...

Страница 49: ...tart Frame End Frame p 44 2 Press the PAD PARAM button The PAD PARAM button lights up 3 Press the DELETE button Button_DELETE eps A confirmation screen appears 4 Rotate the VALUE knob to select Execute P05_11 eps If you want to cancel the operation rotate the VALUE knob to select Cancel and then press the ENTER button 5 Press the ENTER button The P 10 begins truncating the movie Truncating a file ...

Страница 50: ...50 MEMO ...

Страница 51: ...51 6 System Settings ...

Страница 52: ...st Adjust the display contrast p 57 Video Format Select the video format NTSC PAL p 57 Input Video Select the INPUT jack type p 57 Capture Still Mode Specify the capture mode for still images one shot continuous p 58 Color Ctrl Type Specify the color type applied to the Color knob p 58 Speed Ctrl Type Specify the speed type applied to the Speed knob p 58 Output Fade Color L Specify the color that ...

Страница 53: ...trolled from a MIDI device p 61 Output Fade Knob Specify how the VIDEO OUTPUT FADE knob is controlled from a MIDI device p 61 Repeat A B Sw Specify how the REPEAT A B button is controlled from a MIDI device p 61 Reverse Sw Specify how the REVERSE SLIDE SHOW button is controlled from a MIDI device p 61 Strobe Sw Specify how the STROBE button is controlled from a MIDI device p 61 Capture Still Image...

Страница 54: ...ettings screen appears Press the EXIT button to return to the previous screen 4 Rotate the VALUE knob to select a setting item D06_03 eps 5 Press the ENTER button 6 Rotate the VALUE knob to change the setting value D06_04 eps 7 Press the ENTER button The selected value is specified 8 When you have finished specifying settings press the MENU button The screen closes MENU Screen Operation ...

Страница 55: ...s backed up When the backup is complete Completed appears Restore P 10 settings using the backup file saved on the SD card 1 Rotate the VALUE knob to select INFORMATION from the MENU screen and then press the ENTER button The INFORMATION screen appears 2 Rotate the VALUE knob to select System Restore 3 Press the ENTER button A confirmation screen appears 4 Rotate the VALUE knob to select Execute D...

Страница 56: ...tore all of the bank data using backup data saved on the SD card 1 Rotate the VALUE knob to select INFORMATION from the MENU screen and then press the ENTER button The INFORMATION screen appears 2 Rotate the VALUE knob to select Project Restore 3 Press the ENTER button A list of folders that contain backup data appears D06_09 eps 4 Rotate the VALUE knob to select the folder that has the bank data ...

Страница 57: ...rst check which format is in use and then match the setting on the P 10 After changing the video format make sure you turn off the P 10 and then turn it back on again Specify the video input jack Match the setting to the input jack you are going to use VIDEO Adjusting the Display Contrast LCD Contrast Setting Description Rotate the VALUE knob to the left The display becomes darker Rotate the VALUE...

Страница 58: ...r Ctrl Type Setting Description B W Vivid Turn the knob to the left to change the color to black and white Turn the knob to the right to make the colors more vivid CR CB Turn the knob to the left to emphasize red tones and decrease blue tones Turn the knob to the right to emphasize blue tones and decrease red tones Color Filter Change the color balance Specifying the Type of Speed Effect Speed Ctr...

Страница 59: ... menu when you have connected the P 10 to a MIDI device D06_13 eps D06_14 eps D06_15 eps Specifying the Startup Logo Start LOGO Setting Description ON Display the Edirol logo when the P 10 starts up OFF Don t display the Edirol logo when the P 10 starts up AUDIO Adjusting the Volume Level Using the Level Meter Adjusting the Audio Input Gain Recording Gain Setting Description 0 6 12 The higher the ...

Страница 60: ...fying Soft Through Soft Through Setting Description ON Transmit MIDI data received from the MIDI IN jack as is from the MIDI OUT THRU jack OFF MIDI data received from the MIDI IN jack is not transmitted Operating the P 10 Using Note Messages Note Message Enable Setting Description Note Message Enable OFF Control from the MIDI keyboard is disabled 49keys Select this setting to use 49 keys of a MIDI...

Страница 61: ...led CC 1 95 Control the knob using Control Change Channel Press Control the knob using Channel Press Pitch Bend Control the knob using Pitch Bend Controlling the Output Fade Output Fade Knob Setting Description OFF Control from the MIDI device is disabled CC 1 95 Control the knob using Control Change Channel Press Control the knob using Channel Press Pitch Bend Control the knob using Pitch Bend Co...

Страница 62: ...ll Image Setting Description OFF Control from the MIDI device is disabled CC 1 95 Control the button using Control Change Channel Press Control the button using Channel Press Pitch Bend Control the button using Pitch Bend Controlling Movie Capture Capture Movie Setting Description OFF Control from the MIDI device is disabled CC 1 95 Control the button using Control Change Channel Press Control the...

Страница 63: ...eted Completed appears You can format the SD card All of the data that was previously on the SD card is deleted and the SD card is formatted to the P 10 You cannot restore files that have been deleted Make sure you back up all important data to a computer 1 Rotate the VALUE knob to select FORMAT SD CARD from the MENU screen and then press the ENTER button 2 Rotate the VALUE knob to select Execute ...

Страница 64: ... button 2 Rotate the VALUE knob to select Execute D06_20 eps While factory reset is being executed do not turn the power off 3 Press the ENTER button When factory reset is completed Please restart the device appears The P 10 is returned to its factory default settings 4 Turn the power off and then on again Returning to the Factory Default Settings FACTORY RESET ...

Страница 65: ...65 7 Appendices ...

Страница 66: ...always turn down the volume and turn off the power on all devices before making any connections V LINK Connection eps When you turn the MIDI device s V LINK feature on all of the system settings return to their default value When you turn the MIDI device s V LINK feature off P 10 settings return to the values they had before V LINK was turned on MENU VIDEO p 57 MENU MIDI p 59 For details about spe...

Страница 67: ...APTURE MOVIE button CAPTURE STILL IMAGE button PAD PARAM button DELETE button PAD COPY button SD CARD FORMAT function SDCard File_e eps At the time of purchase the P 10 has specialized screws on the back panel marked with a When you use these screws to attach the SD card cover the card can t easily be removed which is useful for preventing the SD card from being stolen SDCard Cover_e eps Make sure...

Страница 68: ...ce such as a computer on a TV screen the outer edges of the images may be cut off depending on the maker or the type of TV In other words if there are words or elements of an image placed close to the edge you may not be able to see them on the TV screen For this reason you should be aware of the safety area when creating your materials As an approximation you should specify about 90 of the inner ...

Страница 69: ...eset 5 Presentation with a travel log photo album feel 6 Preset 6 Presentation with a family photo album feel 7 Preset 7 Presentation with a quick flash and change effect 8 Preset 8 Presentation with little development and a calm feel 9 Preset 9 Presentation with rich expressions ideal for concert use 10 Preset 10 Presentation with a multi screen feel 11 User Set User Set You can create an origina...

Страница 70: ...Zoom in to the image from a white screen while sliding diagonally to the upper left and then fade to white 20 S Z W W 3 Zoom in to the image from a white screen while sliding diagonally to the lower left and then fade to white 21 CF Zoom B B Fade in from black while crossfading two images zooming out and then fade to black 22 CF Zoom W B Fade in from white while crossfading two images zooming out ...

Страница 71: ...Quickly zoom in to the image from a black screen and then fade out to black 58 Zoom B B 2 S Quickly zoom in to the image from a black screen and then shrink the last image 59 Zoom W W 1 S Quickly zoom in to the image from a white screen and then fade out to white 60 Zoom W W 2 S Quickly zoom out to the image from a white screen and then fade out to white 61 Zoom I O 1 S After quickly zooming in an...

Страница 72: ... not centered Please center the VIDEO OUTPUT FADE knob you will feel the knob stick in the center p 29 Is the SPEED knob not centered Please center the SPEED knob you will feel the knob stick in the center p 28 Is Scratch specified in the Speed Ctrl Type setting When Scratch is specified the movie will stop when the SPEED knob is centered p 58 Is the COLOR knob not centered Please center the COLOR...

Страница 73: ...t too low Rotate the INPUT LEVEL knob to adjust the setting to an appropriate level p 59 Could you be using a connection cable that contains a resistor Use a connection cable that does not contain resistor The audio contains noise or the sound is distorted Is the audio input level set appropriately when you capture images If the input level is set too high the sound is distorted Conversely if the ...

Страница 74: ...10 cannot capture images from media with technical security measures copy guard signal Effects don t work Is the EXT SOURCE button on When the EXT SOURCE button is on images from the device connected to the P 10 appear on the P 10 s display You can t apply effects to images from an external source p 26 Is a slide show being displayed While a slide show is being displayed the SPEED COLOR and VIDEO ...

Страница 75: ...D card memory is full Delete some files from the SD card or use a new SD card Desired file does not exist The image file does not exist on the SD card Capture images from a connected device or use P 10 Image Converter to save image files to the SD card p 37 Select still image file Select a still image Select movie file Select a movie This list is maximum You cannot add on the still image The still...

Страница 76: ...on Chart Basic Channel Default Changed Mode Default Messages Altered Note Number True Voice Velocity Note On Note Off After Touch Key s Channel s Pitch Bend 0 32 1 31 33 95 Control Change Program Change True Number System Exclusive System Common Song Position Song Select Tune Request System Real Time Clock Commands Aux Messages All Sound Off Reset All Controllers All Notes Off Active Sensing Syste...

Страница 77: ...are assigned 86 400 72 banks x 12 pads x 100 images Movie Playback Modes Forward Loop Play Back Alternate Loop Play Back One Shot Play Back 2 types Gate Play Back 2 types Image Effects Repeat Reverse Strobe Speed Color Output Fade Slide Show Pads 12 Pads Controllers SPEED knob COLOR knob VIDEO OUTPUT FADE knob Display Graphic LCD color 3 5 inch TFT With Backlight Connecting Jacks Composite Video I...

Страница 78: ... upbringing Masaru continues to be a major influence on the scene Aside from images Masaru has branched into other areas of design such as illustration space design object design graphics and apparel His publications include such releases as BlueFlower TDK Core and BEHIND TDK Core He has produced or created performance images for concerts for Hideaki Tokunaga Hound Dog Un Girls Tomoko Yazawa and T...

Страница 79: ...ge 36 Movie 36 SD Card File 63 Still Image 36 DELETE Button 15 36 49 62 DELETE FILE 63 Device ID 60 Display 14 Display Contrast 57 E Effect Sw 46 Effects 28 End Frame 44 49 End Frame Screen 44 ENTER Button 15 22 EXIT Button 15 22 EXT SOURCE Button 15 26 External Devices 18 F FACTORY RESET 64 Fade 29 Fade In 29 Fade Out 29 File Format 68 FILE SELECT Screen 40 43 46 FORMAT SD CARD 63 G Ground Termin...

Страница 80: ... Screws 16 Delete File 63 Folder Structure 67 Format 63 Inserting Removing 17 Protection Feature LOCK 67 Recommended 67 Theft Prevention Cover 16 67 Security Lock 16 SLIDE SHOW 30 Slide Show Set 47 Slide Show User Set 47 Soft Through 60 SPEED 28 Speed Ctrl Type 58 Speed Effect Type 58 SPEED Knob 14 28 58 61 Speed Knob 61 Start Frame 44 49 Start Frame Screen 44 Start LOGO 59 Still Image Add to Pad ...

Страница 81: ...a B Parque Industrial San Jose Cotia Sao Paulo SP BRAZIL TEL 011 4615 5666 Other CENTRAL LATIN AMERICA Roland Systems Group U S 425 Sequoia Drive Suite 114 Bellingham Washington 98226 USA TEL 360 594 4282 AUSTRIA GERMANY ITALY IRELAND UNITED KINGDOM EDIROL Europe Ltd Studio 3 4 114 Power Road London W4 5PY U K TEL 0 20 8747 5949 BELGIUM FRANCE LUXEMBOURG SWITZERLAND HOLLAND SPAIN PORTUGAL Roland I...

Страница 82: ...ON OF CONFORMITY Compliance Information Statement Model Name Type of Equipment Responsible Party Address Telephone P 10 Visual Sampler Roland Systems Group U S 425 Sequoia Drive Suite 114 Bellingham Washington 98226 USA 360 594 4282 ...

Страница 83: ......

Страница 84: ...5100002714 08 07 2N 5 1 0 0 0 0 2 7 1 4 0 2 ...

Отзывы: