background image

9


II

2.


Basic


Settings


The


instructions


below


will


help


you


to


configure


the


following


basic


settings


of


the


access


point:


LAN


IP


Address


2.4GHz


&


5GHz


SSID


&


Security


Administrator


Name


&


Password


Time


&


Date


It


is


recommended


you


configure


these


settings


before


using


the


access


point.


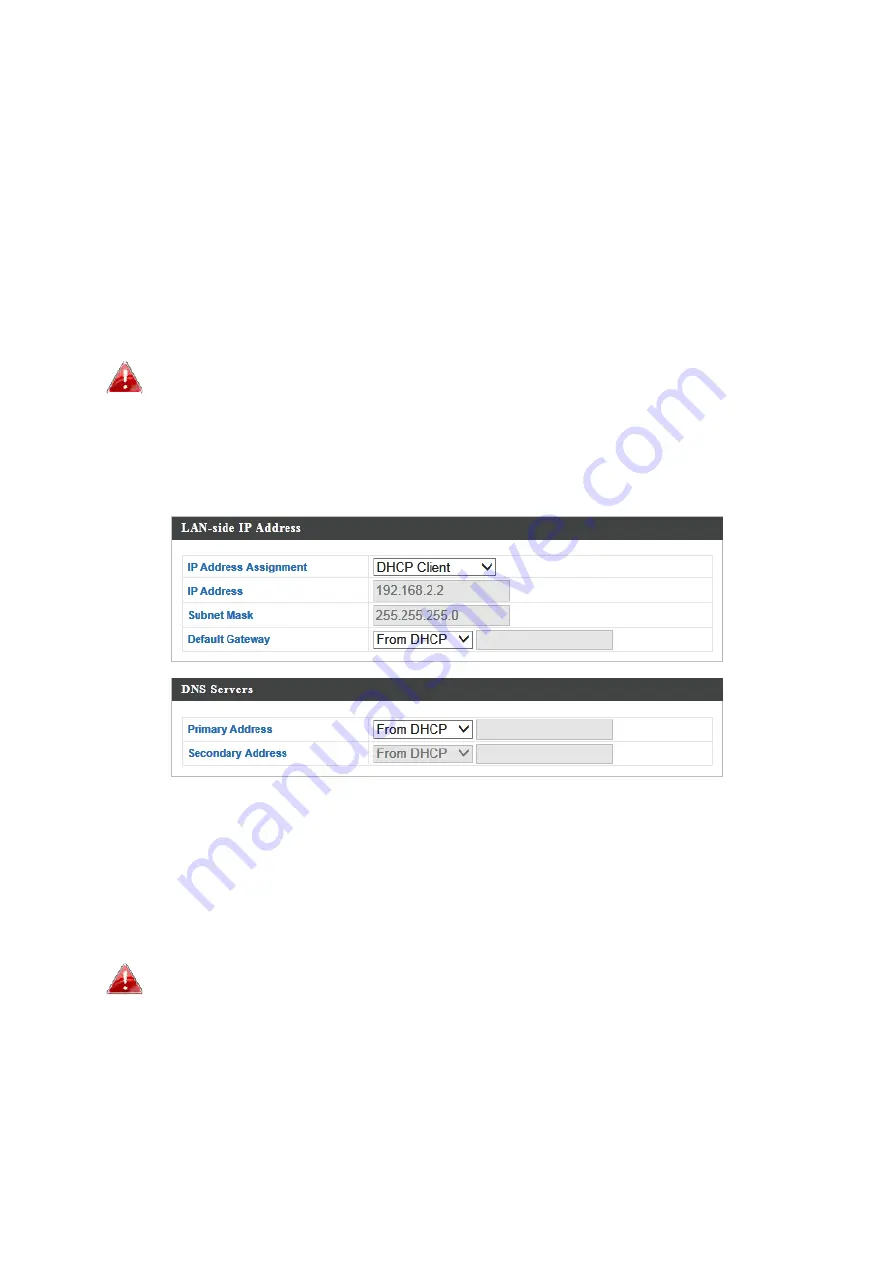
1.


To


change


the


access


point’s


LAN


IP


address,


go


to


“Network


Settings”


>


“LAN

side


IP


Address”


and


you


will


see


the


screen


below.


2.


Enter


the


IP


address


settings


you


wish


to


use


for


your


access


point.


You


can


use


a


dynamic


(DHCP)


or


static


IP


address,


depending


on


your


network


environment.


Click


“Apply”


to


save


the


changes


and


wait


a


few


moments


for


the


access


point


to


reload.


When


you


change


your


access


point’s


IP


address,


you


need


to


use


the


new


IP


address


to


access


the


browser


based


configuration


interface


instead


of


the


default


IP


192.168.2.2.


3.


To


change


the


SSID


of


your


access


point’s


2.4GHz


wireless


network(s),


go


to


“Wireless


Setting”


>


“2.4GHz


11bgn”


>


“Basic”

.


Enter


the


new


SSID


for


your


2.4GHz


wireless


network


in


the


“SSID1”


field


and


click


“Apply”.


Содержание EW-7679WAC

Страница 1: ...AC1750 Wireless LAN 11ac Dual Band Concurrent Wall Mount Access Point User s Manual EW 7679WAUser Manual 05 2014 v1 0 Version 1 0 August 2014...

Страница 2: ...er Based Configuration Interface 15 IV 1 Information 17 IV 1 1 System Information 17 IV 1 2 Wireless Clients 21 IV 1 3 Wireless Monitor 23 IV 1 4 Log 25 IV 2 Network Settings 27 IV 2 1 LAN Side IP Add...

Страница 3: ...Management 65 IV 4 1 Admin 65 IV 4 2 Date and Time 68 IV 4 3 Syslog Server 70 IV 4 4 I m Here 71 IV 5 Advanced 72 IV 5 1 LED Settings 72 IV 5 2 Update Firmware 73 IV 5 3 Save Restore Settings 75 IV 5...

Страница 4: ...1 I Product Information I 1 Package Contents 1 Access Point 2 Magnetic Wall Mount x 2 Screws 3 Quick Installation Guide 4 Power Cord 5 Power Adapter 1 2 3 4 5...

Страница 5: ...the power adapter B LAN port with Power over Ethernet PoE PD IN C LAN port with Power over Ethernet PoE PSE OUT D USB Port for system log E Eject an attached USB device F Reset the access point to fac...

Страница 6: ...access point you can reset the device back to its factory settings This resets all settings back to default 1 Press and hold the reset button on the access point for at least 10 seconds than release t...

Страница 7: ...netic wall mount strips to your wall using the included screws as shown below 2 Press the back of your access point firmly against the two wall mounted magnetic strips with the access point s in the c...

Страница 8: ...the Console port located on the access point s side panel using a terminal emulation program e g HyperTerminal Use the following configuration settings for terminal emulation programs Baud Rate 115200...

Страница 9: ...of children 6 Do not place the access point on paper cloth or other flammable materials The access point may become hot during use 7 There are no user serviceable parts inside the access point If you...

Страница 10: ...Green 4 Set your computer s IP address to 192 168 2 x where x is a number in the range 3 100 If you are unsure how to do this please refer to V 1 Configuring your IP address for more information Plea...

Страница 11: ...formation screen shown below 8 Next please follow the instructions below in II 2 Basic Settings to configure the access point s basic settings For more advanced configurations please refer to IV Brows...

Страница 12: ...r the IP address settings you wish to use for your access point You can use a dynamic DHCP or static IP address depending on your network environment Click Apply to save the changes and wait a few mom...

Страница 13: ...etwork s go to Wireless Setting 2 4GHz 11bgn Security Select an Authentication Method and enter a Pre shared Key or Encryption Key depending on your choice then click Apply If using multiple SSIDs spe...

Страница 14: ...et the correct time and time zone for your access point using the drop down menus The access point also supports NTP Network Time Protocol so alternatively you can enter the host name or IP address of...

Страница 15: ...12 10 The basic settings of your access point are now configured Please refer to III Hardware Installation for guidance on connecting your access point to a router or PoE switch...

Страница 16: ...ection between the access point and a WPS compatible wireless device client 1 Press and hold the WPS Reset button on the side of the access point for 2 seconds 2 Within two minutes activate WPS on you...

Страница 17: ...ccess point s 12V DC port and plug the power adapter into a power supply 3 If you are using a PoE Power over Ethernet switch then it is not necessary to use the included power adapter the access point...

Страница 18: ...computer to your access point using an Ethernet cable 2 Enter your access point s IP address in the URL bar of a web browser The access point s default IP address is 192 168 2 2 3 You will be prompted...

Страница 19: ...o save changes and reload the access point or Cancel to cancel changes Please wait a few seconds for the access point to reload after you Apply changes as shown below 7 Please refer to the following c...

Страница 20: ...reenshots displayed are examples The information shown on your screen will vary depending on your configuration IV 1 1 System Information The System Information page displays basic system information...

Страница 21: ...s point Product Name Displays the product name for reference which consists of AP plus the MAC address Uptime Displays the total time since the device was turned on Boot From Displays information for...

Страница 22: ...N mode tagged or untagged and VLAN ID for the specified LAN port See IV 2 3 VLAN Wireless 2 4GHz 5GHz Status Displays the status of the 2 4GHz or 5GHz wireless enabled or disabled MAC Address Displays...

Страница 23: ...r wireless client isolation is in use for the specified SSID See IV 2 3 VLAN Wireless 2 4GHZ 5GHz WDS Status MAC Address Displays the peer access point s MAC address Encryption Type Displays the encry...

Страница 24: ...table list to automatically refresh Manual Refresh Click refresh to manually refresh the client table 2 4GHz 5GHz WLAN Client Table SSID Displays the SSID which the client is connected to MAC Address...

Страница 25: ...total time the wireless client has been connected to the access point Idle Time Client idle time is the time for which the client has not transmitted any data packets i e is idle Vendor The vendor of...

Страница 26: ...itor Site Survey Select which frequency or both to scan and click Scan to begin Channel Survey Result After a scan is complete click Export to save the results to local storage Site Survey Results Ch...

Страница 27: ...isplays the current signal strength of the SSID Type Displays the 802 11 wireless networking standard s of the specified SSID Vendor Displays the vendor of the wireless router access point for the spe...

Страница 28: ...n such as up time and connection processes This information is useful for network administrators When the log is full old entries are overwritten Save Click to save the log as a file on your local com...

Страница 29: ...s Change Settings System Boot Displays current model name NTP Client Wired Link LAN Port link status and speed status Proxy ARP Proxy ARP module start stop Bridge Bridge start stop SNMP SNMP server st...

Страница 30: ...ddress from your router s DHCP server or you can specify a static IP address for your access point as well as configure DNS servers The access point s default IP address is 192 168 2 2 LAN side IP Add...

Страница 31: ...default value is blank DHCP users can select to get DNS servers IP address from DHCP or manually enter a value For static IP users the default value is blank DNS Servers Primary Address DHCP users can...

Страница 32: ...type for specified LAN port or use the Auto value LAN ports can operate up to 1000Mbps and full duplex enables simultaneous data packets transfer receive Flow Control Enable disable flow control Flow...

Страница 33: ...IDs 1 4094 are supported VLAN IDs in the range 1 4094 are supported VLAN Interface Wired LAN Port Wireless Identifies LAN port 1 or 2 and wireless SSIDs 2 4GHz or 5GHz VLAN Mode Select Tagged Port or...

Страница 34: ...information shown on your screen will vary depending on your configuration IV 3 1 2 4GHz 11bgn The 2 4GHz 11bgn menu allows you to view and configure information for your access point s 2 4GHz wireles...

Страница 35: ...32 IV 3 1 1 Basic The Basic screen displays basic settings for your access point s 2 4GHz Wi Fi network s...

Страница 36: ...atically set the wireless channel for the access point s 2 4GHz frequency based on availability and potential interference When disabled select a channel manually as shown in the next table Auto Chann...

Страница 37: ...ndwidth Set the channel bandwidth 20MHz lower performance but less interference 40MHz higher performance but potentially higher interference or Auto automatically select based on interference level BS...

Страница 38: ...Settings Contention Slot Select Short or Long this value is used for contention windows in WMM see IV 3 6 WMM Preamble Type Set the wireless radio preamble type The preamble type in 802 11 based wire...

Страница 39: ...reless radio The default value is 1 RTS Threshold Set the RTS threshold of the wireless radio The default value is 2347 Fragment Threshold Set the fragment threshold of the wireless radio The default...

Страница 40: ...mation transmitted wirelessly cannot be read by anyone who does not know the correct encryption key It s essential to configure wireless security in order to prevent unauthorised access to your networ...

Страница 41: ...s security Typically this function is useful for corporate environments or public hot spots and can prevent brute force attacks on clients usernames and passwords Load Balancing Load balancing limits...

Страница 42: ...1 4 Enter your encryption key password according to the format you selected above IV 3 1 3 3 IEEE802 1x EAP Key Length Select 64 bit or 128 bit 128 bit is more secure than 64 bit and is recommended I...

Страница 43: ...Additional Authentication Additional wireless authentication methods can also be used MAC Address Filter Restrict wireless clients access based on MAC address specified in the MAC filter table See IV...

Страница 44: ...Select whether to use MAC address or password authentication via RADIUS server If you select Use the following password enter the password in the field below The password should match the Shared Secre...

Страница 45: ...own below When using WDS configure the IP address of each access point to be in the same subnet and ensure there is only one active DHCP server among connected access points preferably on the WAN side...

Страница 46: ...ss encryption method Local MAC Address Displays the MAC address of your access point WDS Peer Settings WDS Enter the MAC address for up to four other WDS devices you wish to connect WDS VLAN VLAN Mode...

Страница 47: ...allows you to view and configure information for your access point s 5GHz wireless network across four categories Basic Advanced Security and WDS IV 3 2 1 Basic The Basic screen displays basic settin...

Страница 48: ...ion will automatically set the wireless channel for the access point s 5GHz frequency based on availability and potential interference When disabled select a channel manually as shown in the next tabl...

Страница 49: ...Channel Bandwidth Set the channel bandwidth 20MHz lower performance but less interference Auto 40 20MHz or Auto 80 40 20MHz automatically select based on interference level BSS BasicRate Set Set a Bas...

Страница 50: ...formance 802 11n Protection Enable disable 802 11n protection which increases reliability but reduces bandwidth clients will send Request to Send RTS to access point and access point will broadcast Cl...

Страница 51: ...ng a lower power output can enhance security since potentially malicious unknown users in distant areas will not be able to access your signal Beacon Interval Set the beacon interval of the wireless r...

Страница 52: ...passwords which include combinations of numbers letters and symbols and change your password regularly 5GHz Wireless Security Settings SSID Selection Select which SSID to configure security settings...

Страница 53: ...asswords Load Balancing Load balancing limits the number of wireless clients connected to an SSID Set a load balancing value maximum 50 Authentication Method Select an authentication method from the d...

Страница 54: ...own below When using WDS configure the IP address of each access point to be in the same subnet and ensure there is only one active DHCP server among connected access points preferably on the WAN side...

Страница 55: ...l and wireless encryption method Local MAC Address Displays the MAC address of your access point WDS Peer Settings WDS Enter the MAC address for up to four other WDA devices you wish to connect WDS VL...

Страница 56: ...e device s firmware configuration interface known as PBC or Push Button Configuration When WPS is activated in the correct manner and at the correct time for two compatible devices they will automatic...

Страница 57: ...WPS device for PIN code WPS Click Generate PIN to generate a new WPS PIN code Push Button WPS Click Start to activate WPS on the access point for approximately 2 minutes This has the same effect as p...

Страница 58: ...client control users can be authenticated before gaining access to a network The access point can utilize both a primary and secondary backup RADIUS server for each of its wireless frequencies 2 4GHz...

Страница 59: ...uilt in RADIUS server or external to use an external RADIUS server RADIUS Server Enter the RADIUS server host IP address Authentication Port Set the UDP port used in the authentication protocol of the...

Страница 60: ...s a built in RADIUS server which can be configured as shown below used when Internal is selected for RADIUS Type in the Wireless Settings RADIUS RADIUS Settings menu To use RADIUS servers go to Wirele...

Страница 61: ...d for use between the internal RADIUS server and RADIUS client The shared secret should be 1 99 characters in length This should match the MAC RADIUS password used in IV 3 1 3 6 or IV 3 2 3 Session Ti...

Страница 62: ...59 IV 3 4 3 RADIUS Accounts The internal RADIUS server can authenticate up to 256 user accounts The RADIUS Accounts page allows you to configure and manage users...

Страница 63: ...ser name has a password configured or not not configured Customize Click Edit to open a new field to set edit a password for the specified user name below Delete Selected Delete selected user from the...

Страница 64: ...connect to the access point Devices are each identified by their unique MAC address If a device which is not on the list of permitted MAC addresses attempts to connect to the access point it will be d...

Страница 65: ...ll fields MAC address entries will be listed in the MAC Address Filtering Table Select an entry using the Select checkbox Select Delete selected or all entries from the table MAC Address The MAC addre...

Страница 66: ...erent categories of wireless traffic Traffic is sent to the following queues Background Low Priority High throughput non time sensitive bulk data e g FTP Best Effort Medium Priority Traditional IP dat...

Страница 67: ...ine priority of frame transmission A shorter window has a higher probability priority of transmission CWMax Maximum Contention Window milliseconds This value is the upper limit to random backoff value...

Страница 68: ...the password used to login to the browser based configuration interface here It is advised to do so for security purposes If you change the administrator password please make a note of the new passwor...

Страница 69: ...ve Administrator Password Set the access point s administrator password This is used to log in to the browser based configuration interface and must be between 4 32 alphanumeric characters case sensit...

Страница 70: ...rk errors SNMP Trap Community Enter an SNMP Trap Community name for verification with the SNMP manager for SNMP TRAP requests SNMP Trap Manager Specify the IP address or sever name 2 128 alphanumeric...

Страница 71: ...manually or can be synchronized with a time server Date and Time Settings Local Time Set the access point s date and time manually using the drop down menus Acquire Current Time from your PC Click Acq...

Страница 72: ...me or IP address of the time server if you wish Update Interval Specify a frequency in hours for the access point to update synchronize with the NTP server Time Zone Time Zone Select the time zone of...

Страница 73: ...ver Transfer Logs Check uncheck the box to enable disable the use of a syslog server and enter a host name domain or IP address for the server consisting of up to 128 alphanumeric characters Copy Logs...

Страница 74: ...useful for network administrators and engineers working in complex network environments to locate the access point The buzzer is loud Duration of Sound Set the duration for which the buzzer will soun...

Страница 75: ...mples The information shown on your screen will vary depending on your configuration IV 5 1 LED Settings The access point s LEDs can be manually enabled or disabled according to your preference Power...

Страница 76: ...re to a more recent version Updated firmware versions often offer increased performance and security as well as bug fixes You can download the latest firmware from the website Do not switch off or dis...

Страница 77: ...from an attached USB device You must transfer a firmware file to the USB device first Firmware Update File Click Browse to open a new window to locate and select the firmware file in your computer Up...

Страница 78: ...cess point s Save Restore Settings page enables you to save backup the access point s current settings as a file to your local computer or a USB device attached to the access point and restore the acc...

Страница 79: ...n to save the settings file If saving settings to your computer or USB device you can also check the Encrypt the configuration file with a password box and enter a password to protect the file in the...

Страница 80: ...omatically be displayed Then click Restore to replace your current settings If your settings file is encrypted with a password check the Open file with password box and enter the password in the field...

Страница 81: ...ettings You can reset the access point back to its default settings using this feature if the location of the access point is not convenient to access the reset button Factory Default Click Factory De...

Страница 82: ...n it is recommended that you reboot the device or reset the access point back to its factory default settings see IV 5 4 You can reboot the access point remotely using this feature Reboot Click Reboot...

Страница 83: ...modify the IP address of your computer to be in the same IP address subnet e g 192 168 2 x x 3 254 The procedure for modifying your IP address varies across different operating systems please follow...

Страница 84: ...le click the Network and Internet Connections icon click Network Connections and then double click Local Area Connection The Local Area Connection Status window will then appear click Properties 2 Sel...

Страница 85: ...82...

Страница 86: ...ks then click Manage Network Connections Right click Local Area Network then select Properties The Local Area Connection Properties window will then appear select Internet Protocol Version 4 TCP IPv4...

Страница 87: ...84...

Страница 88: ...ows 7 1 Click the Start button it should be located in the lower left corner of your computer then click Control Panel 2 Under Network and Internet click View network status and tasks 3 Click Local Ar...

Страница 89: ...86 4 Click Properties...

Страница 90: ...ct Internet Protocol Version 4 TCP IPv4 and then click Properties 6 Select Use the following IP address then input the following values IP address 192 168 2 10 Subnet Mask 255 255 255 0 Click OK when...

Страница 91: ...From the Windows 8 Start screen you need to switch to desktop mode Move your curser to the bottom left of the screen and click 2 In desktop mode click the File Explorer icon in the bottom left of the...

Страница 92: ...89 3 Right click Network and then select Properties...

Страница 93: ...90 4 In the window that opens select Change adapter settings from the left side 5 Choose your connection and right click then select Properties...

Страница 94: ...ct Internet Protocol Version 4 TCP IPv4 and then click Properties 7 Select Use the following IP address then input the following values IP address 192 168 2 10 Subnet Mask 255 255 255 0 Click OK when...

Страница 95: ...your Macintosh computer operate as usual and click on System Preferences 2 In System Preferences click on Network 3 Click on Ethernet in the left panel 4 Open the drop down menu labeled Configure IPv4...

Страница 96: ...93 5 Enter the IP address 192 168 2 10 and subnet mask 255 255 255 0 Click on Apply to save the changes...

Страница 97: ...er is sent to the proper IP address The DNS server IP address used by the computers on your home network is the location of the DNS server your ISP has assigned to you DSL Modem DSL stands for Digital...

Страница 98: ...for the Internet access point located at the ISP s office ISP Internet Service Provider An ISP is a business that provides connectivity to the Internet for individuals and other businesses or organiza...

Страница 99: ...th TCP and UDP are transport layer protocol TCP performs proper error detection and error recovery and thus is reliable UDP on the other hand is not reliable They both run on top of the IP Internet Pr...

Страница 100: ...erial console interface RJ 45 Reset Button WPS Button Eject Button USB eject DC Power Jack Power Requirement Power over Ethernet IEEE 802 3at DC 12V 4A Antenna 2dBi Internal PIFA Dual Band Antenna x 3...

Страница 101: ...spect to the contents hereof and specifically disclaims any warranties merchantability or fitness for any particular purpose Any software described in this manual is sold or licensed as is Should the...

Страница 102: ...and operated with minimum distance 20cm between the radiator your body Federal Communications Commission FCC RF Exposure Requirements SAR compliance has been established in the laptop computer s confi...

Отзывы: