Edimax ES-5800D+ Скачать руководство пользователя страница 15

14 

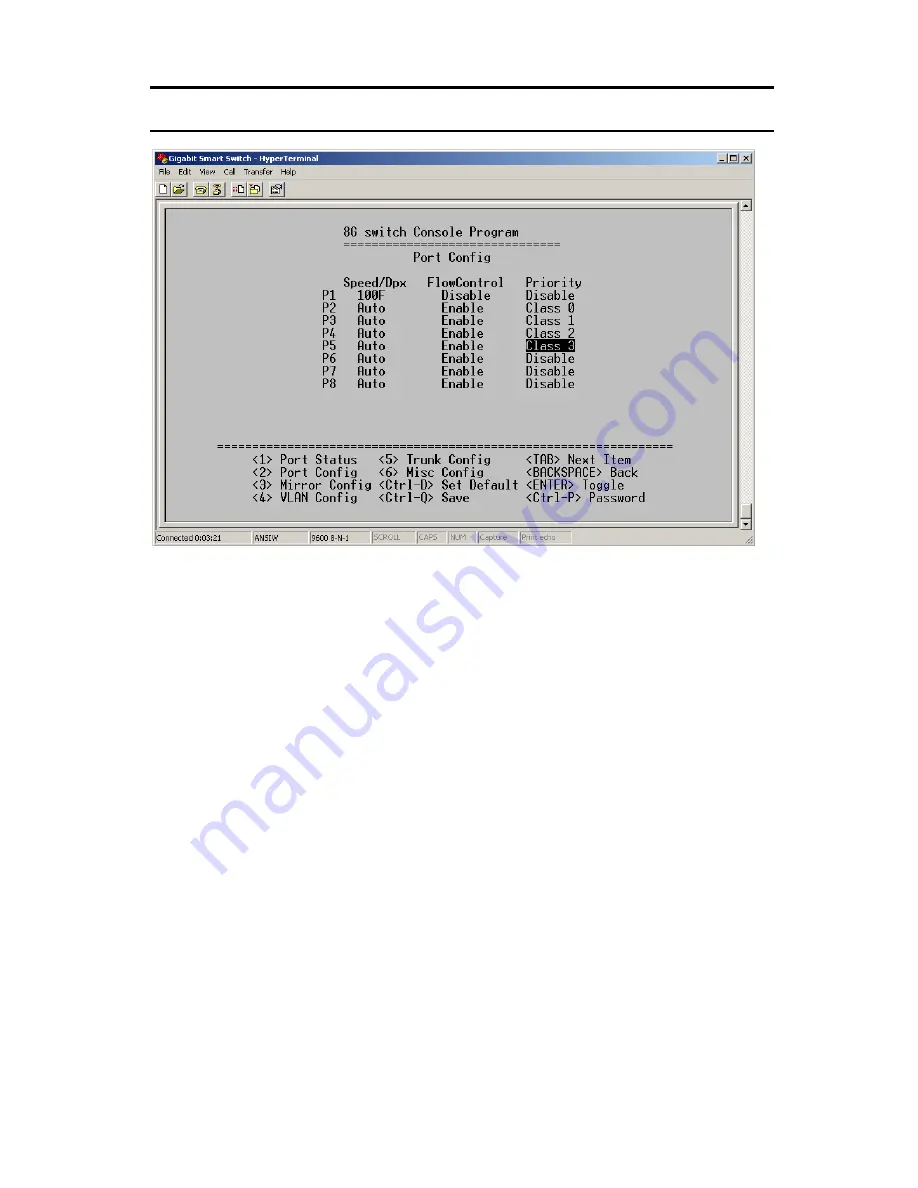
5.4 Port Configuration 


Press <2> to set up the Port configuration. In this screen, you 
can set up the port speed, enable or disable the flow control 
function and set up the priority queues.   

1.  In the Speed/Dpx column, it has six kinds of speed modes. 

By pressing <Enter>, you can choose AUTO, 1000F, 100F, 
100H, 10F or 10H (F and H represent Full duplex and Half 
duplex respectively.) to set the speed mode of the port. 

2.  In the second column (FlowControl), you can press <Enter> 

to enable or disable the flow control function. 

3.  At the last column, you can set up the Priority queues of 

each port. It provides four classes of service: class 0(low), 
class 1(normal), class 2(high) and class 3(very high). 


Содержание ES-5800D+

Страница 1: ...Gigabit Smart Switch 8 Ports 1000 100 10Mbps ES 5800D ES 5800R User s Manual...

Страница 2: ...urn your computer on and off while your radio or TV is showing interference If the interference disappears then when you turn the computer off and reappears then you turn the computer on something in...

Страница 3: ...e Description 7 5 Advance Smart Function Setting 9 5 1 Login Page 11 5 2 Top Screen 12 5 3 Port Status 13 5 4 Port Configuration 14 5 5 Mirror Port Configuration 15 5 6 VLAN Configuration 16 5 7 Trunk...

Страница 4: ...ont panel of this switch provides LEDs for easy recognition of the switch operation status and for troubleshooting All the Gigabit ports support both Full and Half duplex which are able to provide up...

Страница 5: ...rate Provides eight 10 100 1000Mbps Gigabit switching ports RJ 45 connector All ports provide Auto Negotiation and Auto MDI MDI X functions Supports flow control Back pressure for Half duplex and IEE...

Страница 6: ...plex and IEEE802 3x for full duplex Advance configuration functions VLAN setting Port based VLAN up to 8 groups Trunking Up to 2 trunking groups Priority Queuing CoS setting Port Mirroring Auto negoti...

Страница 7: ...One Gigabit Switch One User s manual One Power cord One RS 232 Cable If any of the items are missing or damaged please contact your local dealer Console 1 2 3 8 8 Port Gigabit Smart Switch 1000 100 10...

Страница 8: ...with its display indicators and ports All LEDs are located on the front panel of the switch They serve the purpose of monitoring the operation and performance of the switch at a glance LED indicators...

Страница 9: ...RJ 45 port will auto detect and auto switch to the correct MDI MDI X mode do not need to connect to a specific uplink port or cross over cable 2 Connect one end of the network cable to the RJ 45 port...

Страница 10: ...PC Attach a RS 232 serial cable 9 pin male connector to the female connector on the switch Plug the other side of this cable to your PC Using Hyper Terminal to connect to Switch In MS Windows launch...

Страница 11: ...10 4 Adjust the setting of the communication port 4 1 Select the using by connect interface such as COM1 COM2 4 2 Select the Bits per second at 9600 4 3 Set the flow control value as None...

Страница 12: ...nter the initial system screen as shown If this is your first time to log into the configuration program then the default user name is admin with password admin After you have entered the correct user...

Страница 13: ...or network conditions Note Use the number key to select the function screen you want to set Press Tab to move between the items and then press Enter to change the value 1 Port Status Indicates the por...

Страница 14: ...s The Speed Dpx parameter represents the speed 10 100 or 1000Mbps and half full duplex mode of the port For example 100 F represents the network is 100Mbps with full duplex mode If the network is conn...

Страница 15: ...ed modes By pressing Enter you can choose AUTO 1000F 100F 100H 10F or 10H F and H represent Full duplex and Half duplex respectively to set the speed mode of the port 2 In the second column FlowContro...

Страница 16: ...nitored port configuration function allows us to monitor the port traffic We can press Enter to enable or disable the function If you enable the port mirroring function you should set up the monitored...

Страница 17: ...members of the VLAN group and then press enter to configure as in the following steps 1 Choose the VLAN group you want to set up and press Enter to enable it 2 Press Tab to move to the next column and...

Страница 18: ...ports each Trunk channel A is comprised from ports 1 and 2 while trunk channel B is comprised from ports 7 and 8 You can press ENTER to enable or disable this function There are three parameters of Ba...

Страница 19: ...18 5 8 MISC Configuration In this screen you can set up the aging time You can select 300 600 900 1200 seconds or just disable it...

Страница 20: ...19 5 9 Set Password Press Ctrl P you can change the username and password In this function you should fill in the old username and password then enter the new username new password and confirm it...

Страница 21: ...the configurations were set up remember to store it with Ctrl Q The switch will save the configuration and exit the system You can restore all the configurations setting to the original values by pre...

Страница 22: ...operly connected to the switch and the network device 2 Make sure the UTP cables comply with EIA TIA 568 and Category 5 specification 3 Collision LED flashes constantly 1 Remove all the network cables...

Отзывы: