Edgestore DAS501t Скачать руководство пользователя страница 25

3.4  INSTALLING ON WINDOWS XP


3.4.1      INSTALLING SATA RAID HOST BUS ADAPTER


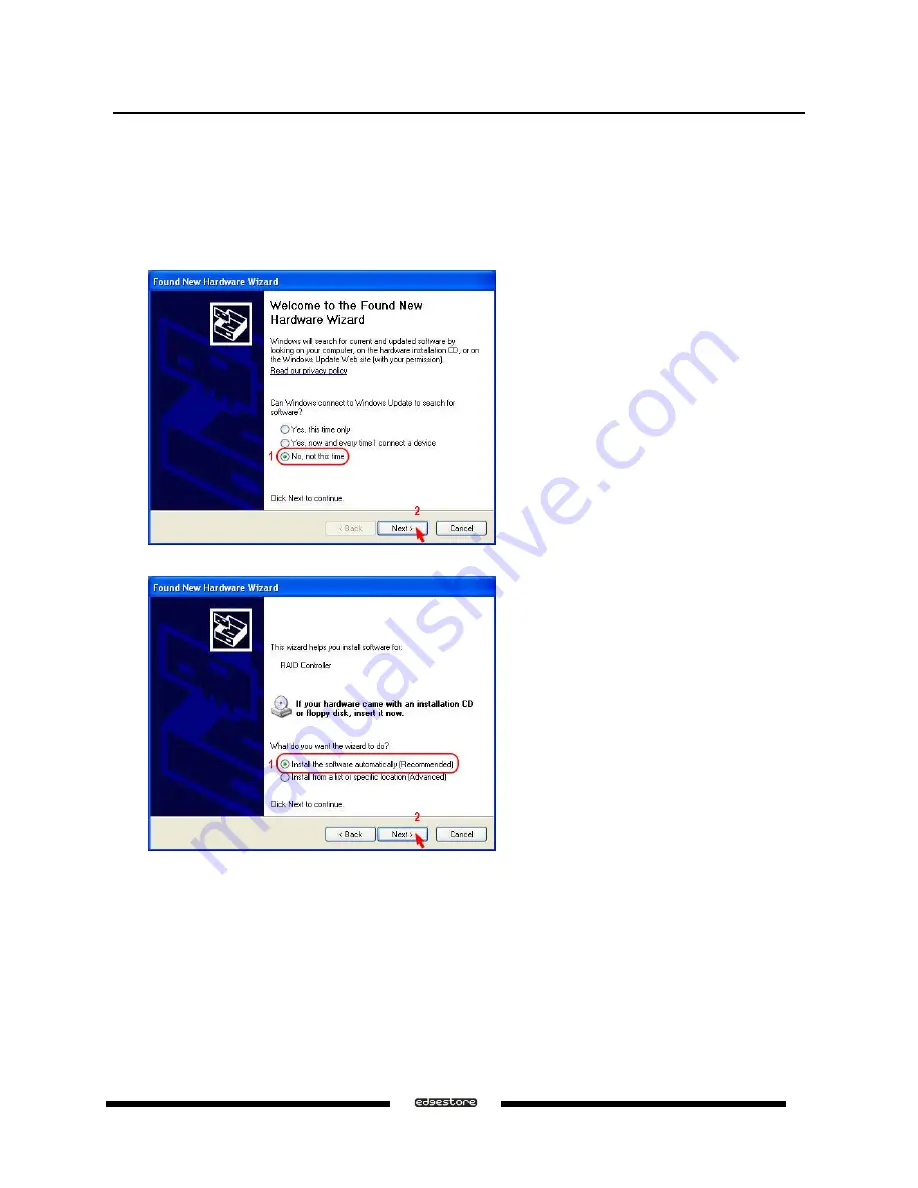
Follow the descriptions below, and step by step to complete the setup. 


a


Insert the Setup and Installation Driver Repository CD in the CD-ROM drive. 


a


When start the Windows O/S, new hardware will be found; select 

No, not this time

, than click 

Next


a


Select 

Install the software automatically (Recommended)

, than click 

Next


DAS501t User’s Manual 

Ver.071016 


25 

Содержание DAS501t

Страница 1: ...5 Bay Storage with RAID eSATA Trays DAS501t User s Manual ...

Страница 2: ...IVE SEGMENT 9 2 4 RAID VOLUME STATUS 10 3 INSTALLATION 11 3 1 COMPONENTS 11 3 2 INSTALLING HARDWARE 11 3 3 INSTALLING ON WINDOWS 2000 11 3 3 1 INSTALLING SATA RAID HOST BUS ADAPTER 11 3 3 2 INSTALLING SATARAID5 UTILITY 15 3 3 3 DISK DRIVE MODE SETUP 19 3 3 4 ALLOCATING PARTITION 19 3 4 INSTALLING ON WINDOWS XP 25 3 4 1 INSTALLING SATA RAID HOST BUS ADAPTER 25 3 4 2 INSTALLING SATARAID5 UTILITY 26 ...

Страница 3: ...D RAID GROUPS 74 4 2 3 STRIPED RAID GROUPS 75 4 2 4 MIRRORED RAID GROUPS 75 4 2 5 MIRRORED STRIPED RAID GROUPS 76 4 2 6 PARITY RAID GROUPS 76 4 2 7 RAID GROUPS OVERVIEW 77 4 3 ADDITIONAL MENU COMMANDS 78 4 3 1 CONFIGURATION 79 4 3 2 EXIT 81 4 3 3 CREATE SPARE 82 4 3 4 DELETE SPARE 82 4 3 5 DELETE MEMBER 83 4 3 6 DELETE ORPHAN 83 4 3 7 MAKE PASS THRU 83 4 3 8 DEVICE SUMMARY 84 4 3 9 CREATE RAID GRO...

Страница 4: ...ay result in fire or electrical shock Please consult your product distributor or the closest support center a Do not handle the product near a heat source or expose them to direct flame or heat a Never place the product in close to equipment generating storage electromagnetic fields Exposure to strong magnetic fields may cause malfunctions or corrupt data a Can t operate properly under Windows 3 x...

Страница 5: ...ch hard disks with HDD trays door cover a Power LED and devices status and activity LED on the HDD trays a Metal chassis SECC and plastic panel frame ABS with HDD trays SECC and ABS design a 135 W x 180 H x 255 D mm NW 2 7 Kgs GW 3 1Kgs a Design based on the Silicon Image SiI3726 Port Multiplier with SiI3132R5 PCI Express 1X HBA a Support Striped RAID 0 Mirrored RAID 1 Mirrored Striped RAID 10 Par...

Страница 6: ...Bus Adapter card controller number Sii3124 or Sii3132 and associated software drivers with Port Multiplier support 1 7 PRODUCT CONTENTS The following parts are content a DAS501t x 1 a SiI3132R5 PCI Express 1X HBA x 1 a eSATA Cable x 1 a Power Cable x 1 a HDD Screw x 20 a Setup and Installation Driver Repository CD x 1 Ver 071016 DAS501t User s Manual 6 ...

Страница 7: ...t data protection High cost 10 Mirrored Striped High performance excellent data protection High cost 5 Parity RAID Good data protection good value Some performance degradation for writes Combination Concatenated Good performance low cost large Volume size No data protection Single Drive Segment Contiguous Same as single disk Same as single disk 2 2 SEGMENTING DISKS For increased versatility the SA...

Страница 8: ...his redundancy provides instantaneous protection from a single disk failure If a read failure occurs on one drive the system reads the data from the other drive RAID 1 sets are comprised of two drives and a third drive can be allocated as a spare in case one of the drives in the set fails If the sizes of the disk segments are different the smallest disk segment will limit the overall size of the R...

Страница 9: ...al required capacity decreases as the number of disks in the group increases i e 33 for four drives or 25 for five drives In exchange for low overhead necessary to implement protection Parity RAID degrades performance for all write operations The parity calculations for Parity RAID may result in write performance that is somewhat slower than the write performance to a single disk 2 3 5 CONCATENATI...

Страница 10: ...k drive has been replaced and the data is being regenerated on the replacement disk When complete the RAID Group will return to Good status Resynchronizing An error has occurred and RAID algorithms be regenerated on this RAID Group When complete the RAID Group will return to Good status Failed One or more disks have failed and RAID algorithms can no longer regenerate the data The minimum number of...

Страница 11: ...end to the eSATA connecter on DAS501T a If hard disk drives are not installed in DAS501t insert the drives into the trays the round srew hole is the drive positioner than insert the trays most of the way to bay 1 to 5 in order from the bottom to top gently insert the tray until the drive is fully inserted and shut to seat the tray handle securely a Attach one end of the AC power cord to DAS501t an...

Страница 12: ...elect Search for a suitable driver for my device recommended than click Next a Select CD ROM drives than click Next a Click Next to search the driver of RAID Controller Ver 071016 DAS501t User s Manual 12 ...

Страница 13: ...ick Finish and begin to the Pseudo SCSI Processor Device installation a Windows will find the Pseudo SCSI Processor Device hardware click Next a Select Search for a suitable driver for my device recommended than click Next DAS501t User s Manual Ver 071016 13 ...

Страница 14: ... CD ROM drives than click Next a Click Next to install the Pseudo SCSI Processor Device driver a When the Pseudo SCSI Processor Device installation has completed click Finish Ver 071016 DAS501t User s Manual 14 ...

Страница 15: ... Open the Setup and Installation Driver Repository CD and select the SATARAID5 Array Manager software from the Utility folder a Double click the 3132 W I32 R msi file Located at E Utility SiI3132R5 Windows 2k 3132 W I32 R msi PS E CD ROM drive letter a Click Next to begin setup DAS501t User s Manual Ver 071016 15 ...

Страница 16: ...a Select I Agree than click Next a Select Place shortcut on Desktop than click Next a Click Next to use the default installation folder Ver 071016 DAS501t User s Manual 16 ...

Страница 17: ...n a When Digital Signature Not Found message pop out click Yes to continue the installation a When the SATARAID5 Utility installation has completed click Close and begin to the Java platform installation DAS501t User s Manual Ver 071016 17 ...

Страница 18: ...ment than click Next a Select Typical than click Next a When Java platform installation has completed click Finish to exit a Select Start Programs Silicon Image SATARaid5Manager to start the Array Manager software Ver 071016 DAS501t User s Manual 18 ...

Страница 19: ...tions RAID groups must first be created using the SATARaid5Manager utility Once the sets have been created allow the system to load Windows a Right click on My Computer icon and select Manage from the pop up menu a Select Disk Management under Storage to view the disk drives DAS501t User s Manual Ver 071016 19 ...

Страница 20: ...Signature and Upgrade Disk Wizard appears click Next a Select the new disk to write a signature than click Next a Do not click any disk to upgrade to dynamic disk than click Next Ver 071016 DAS501t User s Manual 20 ...

Страница 21: ...and Upgrade Disk Wizard has completed click Finish a Right click on the Unallocated partition and select Create Partition from the pop up menu a Click Next to create a partition on a basic disk DAS501t User s Manual Ver 071016 21 ...

Страница 22: ...rtition type you want to create than click Next a Specify the partition size you want to create than click Next a Assign the drive letter or path you want to create than click Next Ver 071016 DAS501t User s Manual 22 ...

Страница 23: ...with the following settings and Perform a Quick Format setup the File system to use Allocation unit size Volume label than click Next a When the Create Partition Wizard has completed click Finish DAS501t User s Manual Ver 071016 23 ...

Страница 24: ...and drive letter will be updated Once the disk reports Healthy it appears in the listing in System Listing section with all of its pertinent information as well Repeat the above procedure as needed for any other partitions Close the Data Management window by clicking on the small boxed X in the top right corner of the window Click on the My Computer icon on the Desktop The new drives will be visib...

Страница 25: ...p by step to complete the setup a Insert the Setup and Installation Driver Repository CD in the CD ROM drive a When start the Windows O S new hardware will be found select No not this time than click Next a Select Install the software automatically Recommended than click Next DAS501t User s Manual Ver 071016 25 ...

Страница 26: ...d step by step to complete the installation a Open the Setup and Installation Driver Repository CD and select the SATARAID5 Array Manager software from the Utility folder a Double click the 3132 W R msi file Located at E Utility SiI3132R5 Windows 3132 W R msi PS E CD ROM drive letter Ver 071016 DAS501t User s Manual 26 ...

Страница 27: ...a Click Next to begin setup a Select I Agree than click Next a Select Place shortcut on Desktop than click Next to create a shortcut on the desktop DAS501t User s Manual Ver 071016 27 ...

Страница 28: ...e the default installation folder a Click Next to begin the installation a When the SATARAID5 Utility installation has completed click Close and begin to the Java platform installation Ver 071016 DAS501t User s Manual 28 ...

Страница 29: ...nt than click Next a Select Typical than click Next a When Java platform installation has completed click Finish to exit a Select Start All Programs Silicon Image SATARaid5Manager to start the Array Manager software DAS501t User s Manual Ver 071016 29 ...

Страница 30: ...g any partitions RAID groups must first be created using the SATARaid5Manager utility Once the sets have been created allow the system to load Windows a Right click on My Computer icon and select Manage from the pop up menu a Select Disk Management under Storage to view the disk drives Ver 071016 DAS501t User s Manual 30 ...

Страница 31: ...a When Initialize and Convert Disk Wizard appears click Next a Select the new disk to initialize than click Next a Do not click any disk to convert than click Next DAS501t User s Manual Ver 071016 31 ...

Страница 32: ...nd Convert Disk Wizard has completed click Finish a Right click on the Unallocated partition and select New Partition from the pop up menu a Click Next to create a partition on a basic disk Ver 071016 DAS501t User s Manual 32 ...

Страница 33: ...rtition type you want to create than click Next a Specify the partition size you want to create than click Next a Assign the drive letter or path you want to create than click Next DAS501t User s Manual Ver 071016 33 ...

Страница 34: ...tion with the following settings and Perform a quick format setup the File system Allocation unit size Volume label than click Next a When the New Partition Wizard has completed click Finish Ver 071016 DAS501t User s Manual 34 ...

Страница 35: ...and drive letter will be updated Once the disk reports Healthy it appears in the listing in System Listing section with all of its pertinent information as well Repeat the above procedure as needed for any other partitions Close the Data Management window by clicking on the small boxed X in the top right corner of the window Click on the My Computer icon on the Desktop The new drives will be visib...

Страница 36: ...must first be created using the SATARaid5Manager utility Once the sets have been created allow the system to load Windows a Right click on My Computer icon and select Manage from the pop up menu a Select Disk Management under Storage to view the disk drives Ver 071016 DAS501t User s Manual 36 ...

Страница 37: ...a When Initialize and Convert Disk Wizard appears click Next a Select the new disk to initialize than click Next a Do not click any disk to convert than click Next DAS501t User s Manual Ver 071016 37 ...

Страница 38: ... Wizard has completed click Finish a Windows 64 bit system supports GPT disk which supports disk volume greater than 2TB a Right click on the Basic disk and select Convert to GPT disk from the pop up menu Ver 071016 DAS501t User s Manual 38 ...

Страница 39: ...ck on the Unallocated partition and select New Partition from the pop up menu a Click Next to create a partition on a basic disk a Select the partition to create than click Next DAS501t User s Manual Ver 071016 39 ...

Страница 40: ...t a Assign the drive letter or path you want to create than click Next a Click Format this partition with the following settings and Perform a quick format setup the File system Allocation unit size Volume label than click Next Ver 071016 DAS501t User s Manual 40 ...

Страница 41: ...tage complete will be displayed Depending upon the size of the partition the format process may take several minutes When complete the status will change to Healthy and the name and drive letter will be updated Once the disk reports Healthy it appears in the listing in System Listing section with all of its pertinent information as well DAS501t User s Manual Ver 071016 41 ...

Страница 42: ...ill be visible and properly named The new disks are available for use 3 5 INSTALLING ON WINDOWS SERVER 2003 3 5 1 INSTALLING SATA RAID HOST BUS ADAPTER Follow the descriptions below and step by step to complete the setup a Insert the Setup and Installation Driver Repository CD in the CD ROM drive a When start the Windows O S new hardware will be found Select No not this time than click Next Ver 07...

Страница 43: ...a Select Install the software automatically Recommended than click Next a When the installation has completed click Finish DAS501t User s Manual Ver 071016 43 ...

Страница 44: ...etup and Installation Driver Repository CD and select the SATARAID5 Array Manager software from the Utility folder a Double click the 3132 W R msi file Located at E Utility SiI3132R5 Windows 3132 W R msi PS E CD ROM drive letter a Click Next to begin setup a Select I Agree than click Next Ver 071016 DAS501t User s Manual 44 ...

Страница 45: ...ct Place shortcut on Desktop than click Next to create a shortcut on the desktop a Click Next to use the default installation folder a Click Next to begin the installation DAS501t User s Manual Ver 071016 45 ...

Страница 46: ...5 Utility installation has completed click Close and begin to the Java installation a Select I accept the terms in the license agreement than click Next a Select Typical than click Next Ver 071016 DAS501t User s Manual 46 ...

Страница 47: ...re 3 5 3 DISK DRIVE MODE SETUP Please refer to the chapter 4 3 5 4 ALLOCATING PARTITIONS Before creating any partitions RAID groups must first be created using the SATARaid5Manager utility Once the sets have been created allow the system to load Windows a Right click on My Computer icon and select Manage from the pop up menu DAS501t User s Manual Ver 071016 47 ...

Страница 48: ...ect Disk Management under Storage to view the disk drives a When Initialize and Convert Disk Wizard appears click Next a Select the new disk to initialize than click Next Ver 071016 DAS501t User s Manual 48 ...

Страница 49: ...ert than click Next a When the Initialize and Convert Disk Wizard has completed click Finish a Windows Server 2003 SP1 or later system supports GPT disk which supports disk volume greater than 2TB DAS501t User s Manual Ver 071016 49 ...

Страница 50: ...sk and select Convert to GPT disk from the pop up menu a Right click on the Unallocated partition and select New Partition from the pop up menu a Click Next to create a partition on a basic disk Ver 071016 DAS501t User s Manual 50 ...

Страница 51: ... the partition to create than click Next a Specify the partition size you want to create than click Next a Assign the drive letter or path you want to create than click Next DAS501t User s Manual Ver 071016 51 ...

Страница 52: ...tion with the following settings and Perform a quick format setup the File system Allocation unit size Volume label than click Next a When the New Partition Wizard has completed click Finish Ver 071016 DAS501t User s Manual 52 ...

Страница 53: ...and drive letter will be updated Once the disk reports Healthy it appears in the listing in System Listing section with all of its pertinent information as well Repeat the above procedure as needed for any other partitions Close the Data Management window by clicking on the small boxed X in the top right corner of the window Click on the My Computer icon on the Desktop The new drives will be visib...

Страница 54: ... step to complete the setup a Insert the Setup and Installation Driver Repository CD in the CD ROM drive a When start the Windows O S new hardware will be found Select Locat and install driver software recommended a Insert the disc that came with your RAID Controller than click Next Ver 071016 DAS501t User s Manual 54 ...

Страница 55: ... step by step to complete the installation a Open the Setup and Installation Driver Repository CD and select the SATARAID5 Array Manager software from the Utility folder a Double click the 3132 W R msi file Located at E Utility SiI3132R5 Windows 3132 W R msi PS E CD ROM drive letter DAS501t User s Manual Ver 071016 55 ...

Страница 56: ...a Click Next to begin setup a Select I Agree than click Next a Select Place shortcut on Desktop than click Next to create a shortcut on the desktop Ver 071016 DAS501t User s Manual 56 ...

Страница 57: ...o use the default installation folder a Click Next to begin the installation a When the SATARAID5 Utility installation has completed click Close and begin to the Java installation DAS501t User s Manual Ver 071016 57 ...

Страница 58: ...nt than click Next a Select Typical than click Next a When Java platform installation has completed click Finish to exit a Select Start All Programs Silicon Image SATARaid5Manager to start the Array Manager software Ver 071016 DAS501t User s Manual 58 ...

Страница 59: ...itions RAID groups must first be created using the SATARaid5Manager utility Once the sets have been created allow the system to load Windows a Right click on My Computer icon and select Manage from the pop up menu a Select Disk Management under Storage to view the disk drives DAS501t User s Manual Ver 071016 59 ...

Страница 60: ...nd GPT GUID Partition Table than click OK a Windows Vista system supports GPT disk which supports disk volume greater than 2TB a Right click on the Unallocated partition and select New Single Volume from the pop up menu Ver 071016 DAS501t User s Manual 60 ...

Страница 61: ...Click Next to create the partition a Specify the partition size you want to create than click Next a Assign the drive letter or path you want to create than click Next DAS501t User s Manual Ver 071016 61 ...

Страница 62: ...tion with the following settings and Perform a quick format setup the File system Allocation unit size Volume label than click Next a When the New Partition Wizard has completed click Finish Ver 071016 DAS501t User s Manual 62 ...

Страница 63: ...and drive letter will be updated Once the disk reports Healthy it appears in the listing in System Listing section with all of its pertinent information as well Repeat the above procedure as needed for any other partitions Close the Data Management window by clicking on the small boxed X in the top right corner of the window Click on the My Computer icon on the Desktop The new drives will be visib...

Страница 64: ... These issues are expected to be fixed in the next release 3 7 2 INSTALLING SATA RAID HOST BUS ADAPTER AND SATARAID5 UTILITY Follow the descriptions below and step by step to complete the setup a Insert the Setup and Installation Driver Repository CD in the CD ROM drive a When start the Mac O S double click on the Setup and Installation Driver Repository CD icon Ver 071016 DAS501t User s Manual 64...

Страница 65: ...stallation Located at E Utility SiI3132R5 Macintosh siliconimage3132r5 mpkg PS E CD ROM drive letter a Once started the following dialog screens will appear Click Continue a Read the Software License Agreement than click Continue DAS501t User s Manual Ver 071016 65 ...

Страница 66: ...a Click Agree to continue the installation a Select a destination volume to install the software than click Continue a Click Install to begin the installation Ver 071016 DAS501t User s Manual 66 ...

Страница 67: ...Password for your system than click OK a Click Close to complete the installation a Select Go Computer Applications Utilities Silicon Image SATARaid5Manager to start the Array Manager software DAS501t User s Manual Ver 071016 67 ...

Страница 68: ...7 3 DISK DRIVE MODE SETUP Please refer to the chapter 4 3 7 4 ALLOCATING PARTITIONS a Click Go than click on Utilities a Double click Disk Utility to go to Disk Utility Ver 071016 DAS501t User s Manual 68 ...

Страница 69: ...a Select the disk you want to partition On left side of the window a Click Partition to go to partition window On right side of the window DAS501t User s Manual Ver 071016 69 ...

Страница 70: ...a Select Volumes Scheme a Enter Volumes Information than click Partition Ver 071016 DAS501t User s Manual 70 ...

Страница 71: ...a Confirm to partition the disk by click Partition a The new Striped disk has complete a Repeat the above procedure as needed for any other disks DAS501t User s Manual Ver 071016 71 ...

Страница 72: ...a Close the Disk Utility window after complete setting a The new disks will appear on the desktop and ready for use Ver 071016 DAS501t User s Manual 72 ...

Страница 73: ...ps currently defined on that controller are also shown in the RAID Groups Window Selecting a specific RAID Group will highlight the segments associated with that volume in the Device Configuration Window The Device Configuration window identifies all physical drives and their partitions Throughout the Manager different colors are used to indicate the status of the components The meanings of the co...

Страница 74: ...onfigured the primary and secondary mouse buttons using Control Panel Mouse On a Macintosh system press and hold the Command Apple key and click the mouse 4 2 1 CONTIGUOUS RAID GROUPS Contiguous RAID Groups allow the user to select a segment of disk drive or a disk drive Select the disk and enter the desired values and press Create to create the RAID Group Example below 4 2 2 CONCATENATED RAID GRO...

Страница 75: ...the volume Enter the desired values and press Create to create the RAID Group Example below 4 2 4 MIRRORED RAID GROUPS Mirrored RAID Groups allow the user to select 2 disks for each member of the volume Enter the desired values and press Create to create the RAID Group Example below DAS501t User s Manual Ver 071016 75 ...

Страница 76: ... volume Enter the desired values and press Create to create the RAID Group Example below 4 2 6 PARITY RAID GROUPS Parity RAID Groups allow the user to select minimum of 3 or more disks for each member of the volume Enter the desired values and press Create to create the RAID Group Example below Ver 071016 DAS501t User s Manual 76 ...

Страница 77: ...require more CPU resources which might affect the computer s performance This parameter is not used for Contiguous JBOD Concatenated and Striped configurations Check Pointing Click the On or Off button to enable or disable the Check Pointing feature When Check Pointing is enabled restoring data is very fast after an unexpected power loss although normal performance may be slightly reduced When Che...

Страница 78: ...Spare Rebuild RAID Group Event Log Rebuild Legacy RAID Group About Delete Member Delete RAID Group Resources Delete Legacy RAID Group Delete Orphan Bring RAID Group Online Convert Legacy RAID Group Make Pass Thru RAID Group Summary Bring Legacy RAID Group Online Device Summary Create Legacy Spare Delete Legacy Spare Convert Legacy Spare The commands are documented on the pages that follow Ver 0710...

Страница 79: ...m all Silicon Image RAID drivers The log file is a text file and can be viewed with any text viewer such as Notepad on Windows platforms or with the Event Log window of the SATARAID5 Manager Use the Log File tab to set the location and the desired filename for the log file To specify whether the Log File is generated click on either the Disabled or Enabled radio button If Log File generation is en...

Страница 80: ...ups to occur Information Level The following events will trigger a popup window e Informational e Warnings e Errors Warning Level The following events will trigger a popup window e Warnings e Errors Error Level The following events will trigger a popup window e Errors Disable All No events will trigger a popup window Ver 071016 DAS501t User s Manual 80 ...

Страница 81: ...d RAID 10 Striped and Mirrored groups See Delete Member menu option Advanced RAID Features When this feature is selected and user selects to create RAID group if the RAID group to be created is fault tolerance group RAID 1 RAID 5 or RAID 10 user will be able to select Improper Shutdown Policy in the Create RAID Group dialog box Enables the selection of an Improper Shutdown Policy including Check P...

Страница 82: ...pecified RAID group Capacity If you select Global for the Spare Type current options from a list of capacity are from 128 MB to 100 GB HALF and MAX RAID Group If you select Dedicated for the Spare Type please selected RAID group to which this spare drive is dedicated Device Segment Select one device segment from the available spare type only 4 3 4 DELETE SPARE This menu option displays a dialog bo...

Страница 83: ... box to select highlight orphan segments to delete An orphan segment is part of a RAID group that cannot access other segments within the same RAID group When a member of a RAID group fails in a severe manner such as a loss of power or a complete hard disk failure it becomes an orphan This command displays the Delete Orphan Segment window to show all orphan segments and allow user to delete select...

Страница 84: ...r All options available via the menu bar are shown below File Options Exit Sorting Fields Exit This command closes the Task Summary window Sorting This command sorts the rows based on the selected field Fields This command displays a dialog box to let user choose which fields will be shown in the Segment Summary window Ver 071016 DAS501t User s Manual 84 ...

Страница 85: ...box to let user verify a raid type than display Create RAID Group dialog box 4 3 10 REBUILD RAID GROUP This command displays a dialog box to let user choose a replacement segment to rebuild a non fault tolerant RAID group DAS501t User s Manual Ver 071016 85 ...

Страница 86: ...ays a dialog box to show all RAID groups group ID configuration and status The RAID Group Summary window has its own menu bar All options available via the menu bar are shown below File Options Exit Sorting Fields Exit This command closes the RAID Group Summary window Sorting This command displays a dialog box to let user choose up to 3 items to sort RAID group items in the RAID Group list Ver 071...

Страница 87: ...or done This window provides user the ability to schedule any RAID and disk management operations including RAID group creation rebuild and test The Task Manager window has it s own menu bar All options available via the menu bar are shown below File Options Task Open Sorting Modify Save Fields Suspend Print Resume Exit Cancel Delete Open This option will be available in future revisions Save This...

Страница 88: ... This command displays a dialog box to let user choose which fields will be shown in the task list Modify This command allows user to modify parameters of the selected task items The following is an example of changing rebuild priority for a rebuild task Suspend This command allows user to suspend the selected task items Resume This command allows user to resume the suspended task items Ver 071016...

Страница 89: ...ox will pop up to get confirmation from the user 4 3 15 EVENT LOG This command displays the Event Log window The Event Log window displays SATA device related events that occur while SATARAID5 is running The Event Log window has it s own menu bar All options available via the menu bar are shown below File Options Exit Sorting Fields Exit This command closes the Event Log window DAS501t User s Manu...

Страница 90: ...which fields will be shown in the event log 4 3 16 RESOURCES This command displays the Resource Information window This feature is for debugging purpose only The Event Log window has it s own menu bar All options available via the menu bar are shown below File Display Exit Suspend Alt S Resume Exit This command closes the Resources window Ver 071016 DAS501t User s Manual 90 ...

Страница 91: ...nu option is not available in this product 4 3 18 HELP TOPICS This command opens an interactive help dialog using the standard Windows help interface This option will be available in future revisions 4 3 19 ABOUT This command displays a dialog box with more information about the SATARAID5 program including the revision level DAS501t User s Manual Ver 071016 91 ...

Отзывы: