– 1 –
Q u i c k S t a r t G u i d e
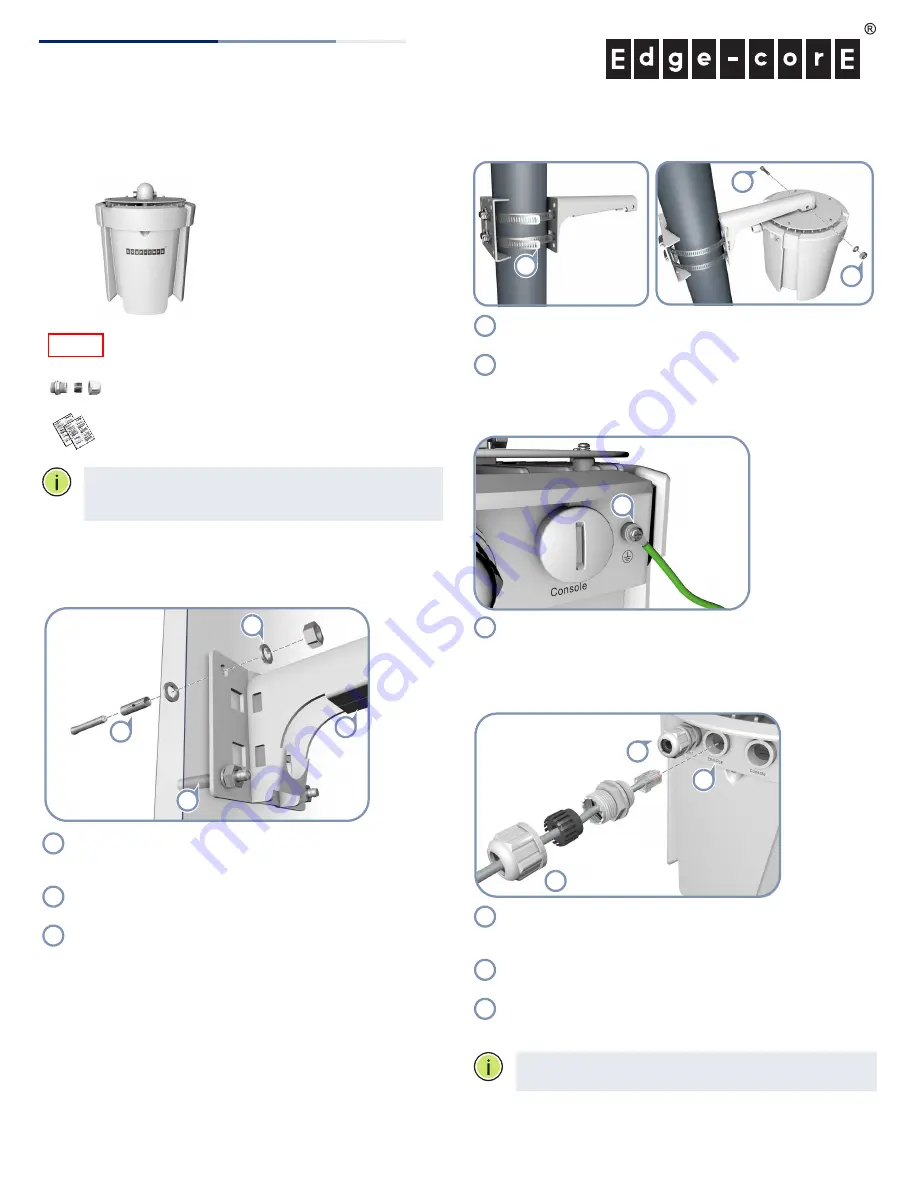
1. Unpack the AP and Check Contents
ECWO7220-L
802.11a/ac/b/g/n
Wireless Access Point
Mounting kit
Two weatherproof port covers
Documentation—
Quick Start Guide
(this document)
and
Safety and Regulatory Information
Note:
For safety and regulatory information, refer to the
Safety and Regulatory Information
document included with
the AP.
2. Mount the AP
The AP can be mounted on a wall, or pole.
a. Mounting on a Wall
Drill four holes in the wall deep enough for the included wall
expansion bolts. Insert the four bolts in the holes leaving the
threaded part exposed.
Place the wall-mount bracket over the four bolts and use the
nuts and washers to secure the bracket to the wall.
Slide the AP onto the bracket arm and secure it using the
included long bolt, nut, and washer.
3
2
1
1
1
2
3
b. Mounting on a Pole
Secure the two mounting bracket parts to the pole using the
two included steel-band clamps.
Slide the AP onto the bracket arm and secure it using the
included long bolt, nut, and washer.
4. Ground the AP
Ground the AP by connecting the included ground wire to
the grounding point on the AP and to nearby good earth
connection.
3. Connect LAN Cables
Connect outdoor-rated Category 5e or better cable to the
1000BASE-T RJ-45 Eth0/PoE port. Be sure to use the included
weatherproof RJ-45 port cover.
Connect the other end of the outdoor-rated Ethernet cable
to an 802.3at-compliant PoE switch or power injector.
(Optional) Connect a local LAN switch or computer to the
Eth1 1000BASE-T RJ-45 port. Be sure to use the included
weatherproof RJ-45 port cover.
Note:
The Eth/PoE port connection provides PoE power to
the unit.
1
2
2
1
2
1
1
1
2
3
1
2
3
E042016-CS-R01
150200001440A
www.edge-core.com
802.11a/ac/b/g/n Outdoor Wireless Access Point
ECWO7220-L


