background image

7

5. PIPESCAN SETUP

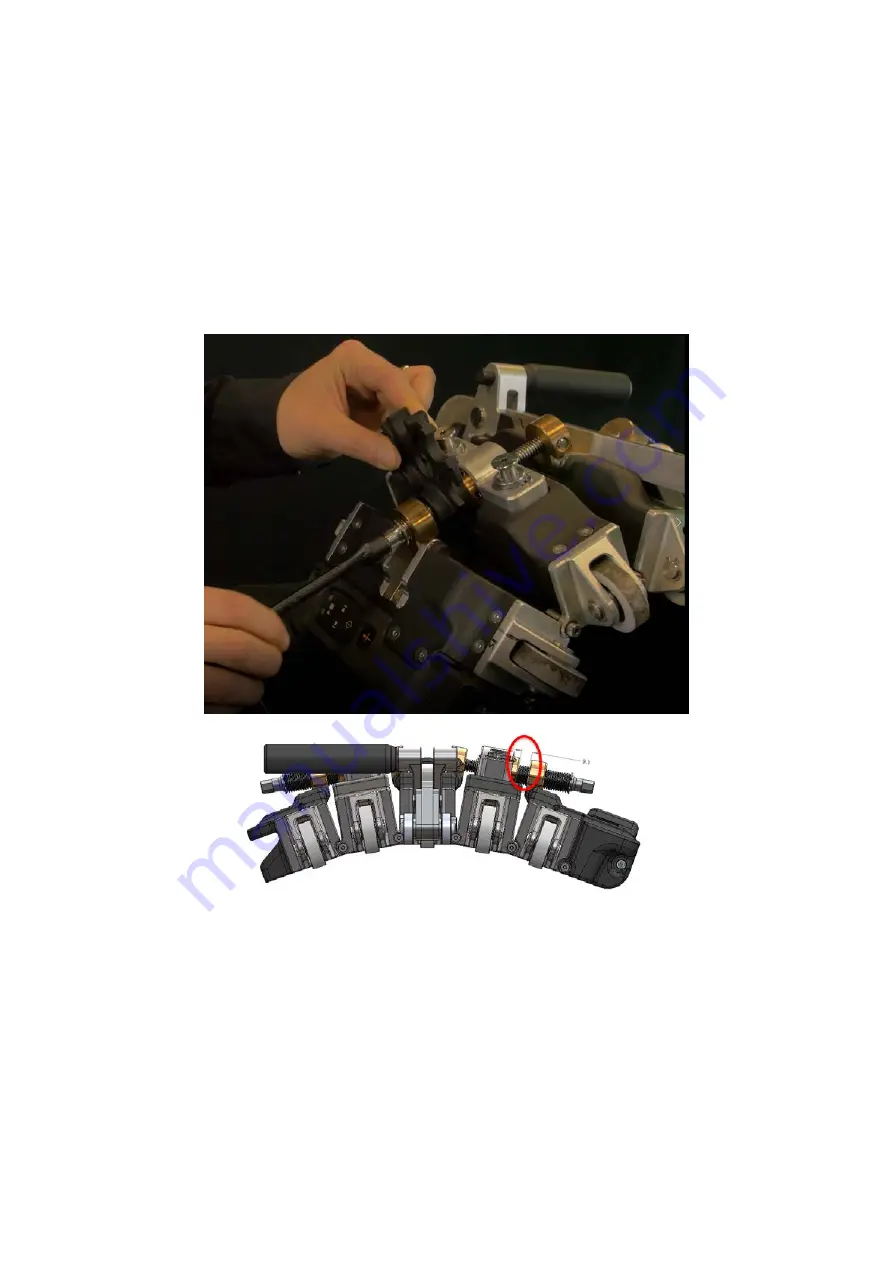
1.  Adjust the head curvature to the desired diameter. Always make the initial adjustment away from the inspection 

surface to ensure longevity of the curvature mechanism. 

1.1 

Adjustment using the gauge

 included with the system: Place the gauge between the outer posts and tighten 

until the posts touches the gauge. Repeat on the other side of the system.

1.2 

Adjustment using a ruler

: If you can’t find the gauge or if the diameter needed is not on it, use a ruler and 

adjust the system. The measurement must be taken between the outer posts, on each side of the system.  Refer 
to the table below for the adjustment details.

2.  Place the scanner on the inspection surface and fine tune the fitting so that all the wheels rotate when being 

pushed.

3.  Ensure the encoder is making contact to the inspection surface.

4.  Connect the umbilical to the Pipescan.

5.  Connect the other end of the umbilical to the instrument.

Содержание PIPESCAN HD

Страница 1: ...D SWIFT M MFL Data Acquisition Instrument 1 What s In The Box 2 2 Swift M Overview 2 3 Pipescan HD Overview 3 4 Software Overview 5 5 Pipescan Setup 7 6 Work Flow Software 8 7 Analysis and Reporting 1...

Страница 2: ...USB 2 0 connectors Network connector HDMI connector Audio connector Quick Copy Button MFL Connector I O connector 12 pin Fischer Drive connector 19 pin Fischer 160 pin array connector 1 WHAT S IN THE...

Страница 3: ...escan head should be adjusted to nominal OD while the head is not on the inspection surface Adjusting the curvature while on the part could damage the mechanism due to the strength of the magnets bein...

Страница 4: ...so To remove simply disconnect the connector and remove the two allen screws Cable Maintenance of Scanning Heads Magnets attract dirt When deemed necessary during inspection or after an inspection cl...

Страница 5: ...ve all indications above threshold to report 5 No defect Classifying an indication as not a defects 6 Review N A 7 Add Note Add general note to C Scan 8 Capture Screen shot of current view Layout 1 Re...

Страница 6: ...to be automatically identified 8 Show Palette controls Display the colour pallet settings 9 Move Cursor Change of cursor position and size 10 X axis N A Current View Stripchart 1 Indications Allows in...

Страница 7: ...he system 1 2 Adjustment using a ruler If you can t find the gauge or if the diameter needed is not on it use a ruler and adjust the system The measurement must be taken between the outer posts on eac...

Страница 8: ...etails 2 1 Project Folder 2 2 Inspection 3 Select Create Setup 3 1 Select Probe 3 2 Configure Scan definition 4 When the Probe is ready to perform the first Setup scan scan press the Acquire button th...

Страница 9: ...an alarm in the strip chart meaning any indications above this alarm are automatically tagged as indications of interest To set the alarm i Select the strip chart user will see a purple perimeter aro...

Страница 10: ...n x Filename indication from all files of the inspection folder can be added in the same report x Index Numerical increment for each indication added to the report automatically generated by the softw...

Страница 11: ...101 6 0 276 7 0 4 0 4 5 114 3 0 189 4 8 PS HD MFL 127XFLAT 4 5 5 0 127 0 1 15 29 2 5 5 563 141 30 1 067 27 1 6 6 625 168 28 0 937 23 8 7 7 625 193 68 0 839 21 3 8 8 625 219 08 0 76 19 3 9 9 625 244 4...

Отзывы: