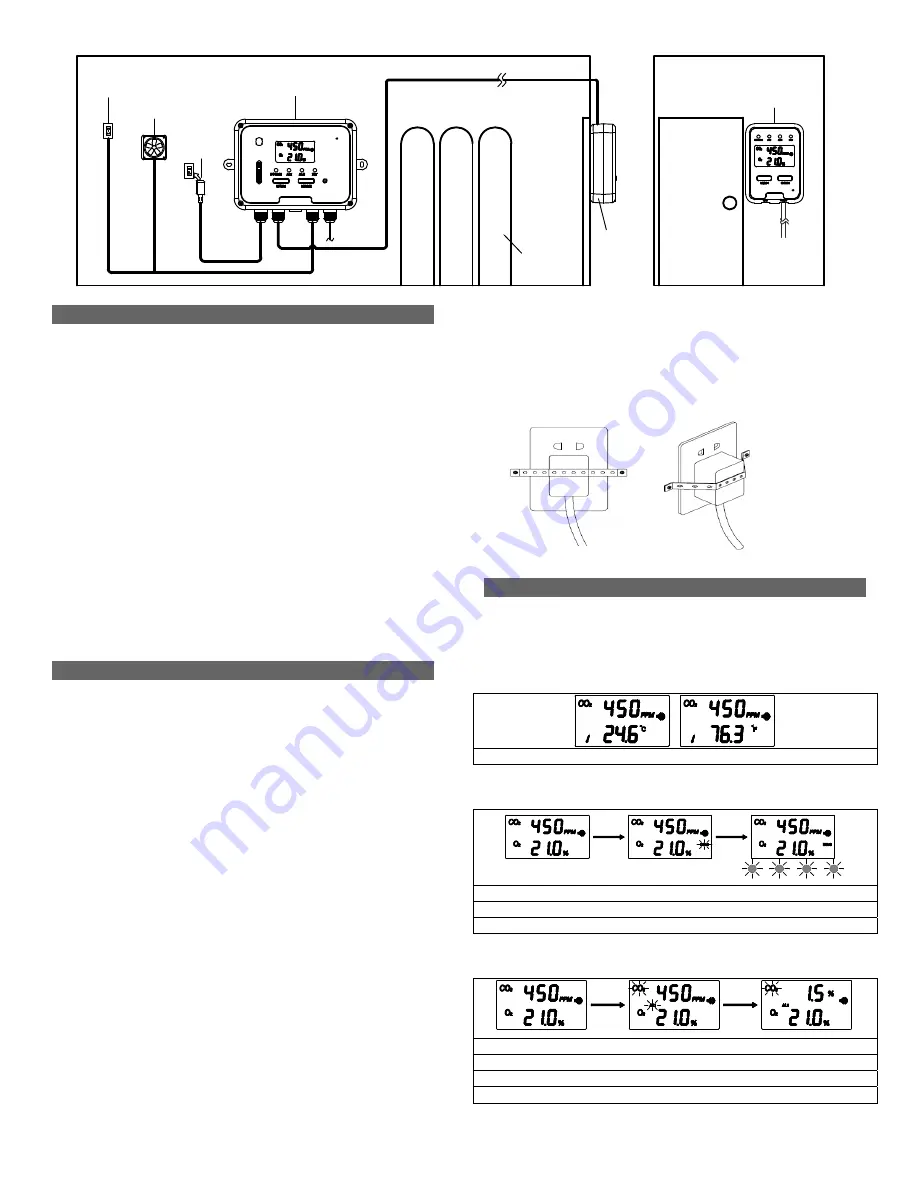
Power
Adapter
Fan for
Ventilation
gas
tanks
SEU (Sensor unit)
RDU
Display
RDU
Display
Power Supply
for fan
8m(26ft) comm. cable
to the 2nd/3rd RDU
(optional,daisy chain)
Door
7. Caring For the Product
To receive the maximum benefit from using this product, please observe the
follow guidelines.
1. Repair - Do not attempt to repair the product or modify the circuitry by
yourself. Please contact your local dealer or a qualified repairman if the
product needs servicing, including the replacement or calibration of the
sensors.
2. Note -- The oxygen sensor must be replaced every 3 years.
3. Cleaning - Disconnect the power before cleaning. Clean with a damp cloth
only. Do not use liquid cleaning agents such as benzene, thinner or
aerosols, as these will damage the device.
4. Maintenance – We recommend testing the communication between the
SEU and RDU under the ‘DIAG” function to verify the SEU and RDU are
working properly. If the four LED’s blink and the buzzers sound
simultaneously, it indicates that SEU and RDU work normally.
When the LCD displays a safety icon “ESC”, please take immediate
protective action to check if a CO2 leak has occurred. We suggest a
calibration and thorough function check at least yearly to make sure that
the RAD-0200 CO2 and O2 Monitor is working properly.
8. Installation Instructions
Please carefully take out the SEU (Sensor Unit), RDU (Remote Display Unit),
panel holders,
network cable connector, communication cable, user manual,
plug lock, screws, expansion plugs, nail cable clips, and warning poster from
the package.
Step-by-Step Installation:
1. Choose a suitable location to install the SEU. Fix a panel holder on the wall
with the four screws (included); the recommend installation height is about
0.45 meters (1.5 feet) from the floor and as close to the manifolds and
valves as possible.
2. Put the SEU on the panel holder. Remove the Air Entry Plug from the air
entry port (N). Save plug for use when cleaning SEU.
3. Fix another panel holder in a suitable location outside the monitored space
with screws (included). Push the RDU onto the panel holder, and stick the
warning poster next to RDU.
4. The communication cable is pre-wired to the SEU. Route the cable to the
RDU and fixed the communication cable to the wall by nail cable clips, and
then plug the cable into the input port on the RDU. Communication is now
ready between the SEU and RDU.
5. The RAD-0200 CO2 and O2 Monitor has two relay outputs: one is for AL1
and the other is for AL2. The relay cable is pre-wired to the SEU. Relays
can control a fan or blower to ventilate monitored space when necessary
and the relay will be triggered when the CO2 concentration exceeds the first
alarm level or O2 concentration drops below the first alarm level.
6. After finishing the installation, Connected the AC power adapter into the
electrical supply outlet. Mount the Plug lock by expansion plugs so that the
power adapter cannot be disconnected without use of tools.
7. When the power has been connected, The SEU and the RDU will begin to
work. Please use the “DIAG” function to verify the communication between
SEU and RDU, the four LED’s will blink and buzzer will sound on SEU &
RDU. Communication is ready when the information displayed is the same
on the SEU & RDU.
Mount the plug lock
9. Customizing Settings
Once power has been connected, the SEU and RDU will begin to monitor the
CO2 & O2 concentration. In order to the get the timely alarm safety information
or to meet personal requirements, you can customize the parameters as
necessary.
Temperature ºC/ºF:
Using the DIAG function:
1. Press Mode until the “DIAG” icon flashes
2. Press Enter, the four LED’s will blink on the SEU and the buzzer will sound
3. The four LED’s will blink and buzzer will sound simultaneously on the RDU
Setting the CO2 First Alarm parameter:
1. Press Mode until the “AL1” icon flashes
2. Press Enter. The “AL1” icon will show on the LCD
3. Press Mode to go through 5,000ppm, 1%, 1.5%, 2% CO2 alarm levels
4. Press Enter again to save the setting
PRESS
MODE
PRESS
ENTER
PRESS
MODE
PRESS
ENTER
1. Press “Enter” to switch between ºC and ºF temperature.


