background image

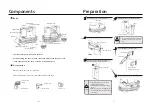
Components

Body

On/Off button

Clean water bucket

Handle

Sewage bucket

Maximum water level

Power cord

Power plug Hose handle

Watering button

Hose hook

Hose

Power cord hook

Power cord bandage

Air ontlet

Air outlet

Accessories

*    The clean water pump is built into the body.

*    During handling, the hose is wound around the machine and the power cord 

      is tied andhung from the hook, as shown in the figure above.

Suction inlet

Brush

Water outlet

Suction inlet

Water outlet

Hose hook

*    Water sucker with brush, for carpet, etc.

*    Right-angled water sucker, for cracks andthe back of the chair.

·6·

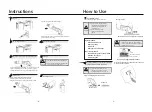
Preparation

3

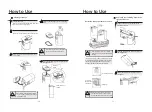
Open the screw cap and fill with clean water

The maximumwater capacity is about 1L.

·7·

Attention

After fillmg with water, screw the cap

tightly to prevent leakage.
Fill it with tap water or alkane ionized
water.
After use, pour away the residual water im
the clean water bucket to prevent leakage
and mildew.

2

Remove the cleanwater bucket from the body.

1

Insert the hose hook into the machime.

4

Install the clean water bucket into the body.

Attention

Do not shake the clean water bucket during
installation: otherwise, it may cause water
leak.

5

Insert the handle into the water sucker

6

Fix the hose and power cord before handling.

Hose hook

Body

Dust cup lock catch

Clean water bucket

Maximum water level

Body

Clean water bucket

Water sucker

Hosehandle

The two holes are

aligned during inserting。

Содержание WDV01

Страница 1: ...SPOT CLEANER ...

Страница 2: ...Contents Attentions Instructions Components Preparation Instructions How to Use Maintenance Fault and Handling 2 4 6 7 8 9 13 15 1 ...

Страница 3: ...consult customer service if there are abnormal sounds or smells Do not disassemble repair or transform it by oneself 2 Attentions Attentions Do not use in dangerous situations such as rain water and strong wind Do not put the main machine in water or water the machine in order to avoid electric shock and fire Do not inhale dirt and dust with suspected infectious diseases Do not use without a sewage...

Страница 4: ...xtinguishing agent etc Large quantities of sands and pebbles Lots of rubbish Metal such as needles and pins glass etc Big plastic bags and stockings Things that tend to pile up inside Fault Prevention As this product is used in wet environment please do not inhale dry dust After using in the low temperature environment please clean out the water inside the sewage bucket the clean water bucket and ...

Страница 5: ... Open the screw cap and fill with clean water The maximumwater capacity is about 1L 7 Attention After fillmg with water screw the cap tightly to prevent leakage Fill it with tap water or alkane ionized water After use pour away the residual water im the clean water bucket to prevent leakage and mildew 2 Remove the cleanwater bucket from the body 1 Insert the hose hook into the machime 4 Install the ...

Страница 6: ...nual carefully and use it correctly Instructions 3 Press the watering button to spray clean water 2 Tum on the power start 1 Plug it in 4 Absorb water 5 Tum off the power stop 6 Unplug it 7 Pour away clean water and sewage and clean the sewage bucket Attention Turn off the power before unplugging it After use please hang the coiled power cord back to its original place Spray clean water while absorb...

Страница 7: ...ating ball will work and the suction will stop 11 1 Turn off the power 2 Remove the sewage bucket 3 Open the upper cover of the sewage bucket and pour away the sewage Attention Clean the sewage bucket in time after use so as not to cause bacteria and smell 4 Clean the bucket upper cover and sealing strip 5 Install the sealing ring cover and fasten the sewage bucket Attention Do not tilt or shake th...

Страница 8: ... thoroughly with water and air dry Press the button and pull out Disassembly of water sucker Remove the front cover and then rinse the water sucker Disassembly of water sucker cover Open it with finger and then remove it Transparent water sucker cover Hole Water sucker cover Pin 1 The pin and hole fit well 2 Press in until clicking sound to make sure the installation is in place Fastening 3 When cle...

Страница 9: ...s turned on The plug is not properly connected and loose resulting in poor contact The internal line or power cord is broken The machine set overheats and the protective device operates Turn off the power and plug it again Call the repair telephone Refer to the instructions for protective device The nozzle is blocked The handle or pump is damaged Remove the water sucker and rinse the nozzle with cl...

Страница 10: ...nership If you feel you have a defective product please submit a copy of your receipt to the address belowandcall1 888 899 0146forinstructionspriorreturningthisitemtothestoreor sendingbackto AltonIndustryLtd Group 643InnovationDrive WestChicago IL60185 We will inspect the product and contact you within 72 hours to give you the results of our inspection We reserve the right to repair or replace the...

Страница 11: ...版本 使用说明书 1 0 WDV01 ECOWELL 145x210 h mm 157g铜版纸 2022 03 02 Norwin 单黑双面印刷 骑马装订 产品型号 品牌 尺寸 材质 印刷要求 日期 排版设计 ...

Отзывы: