background image

T

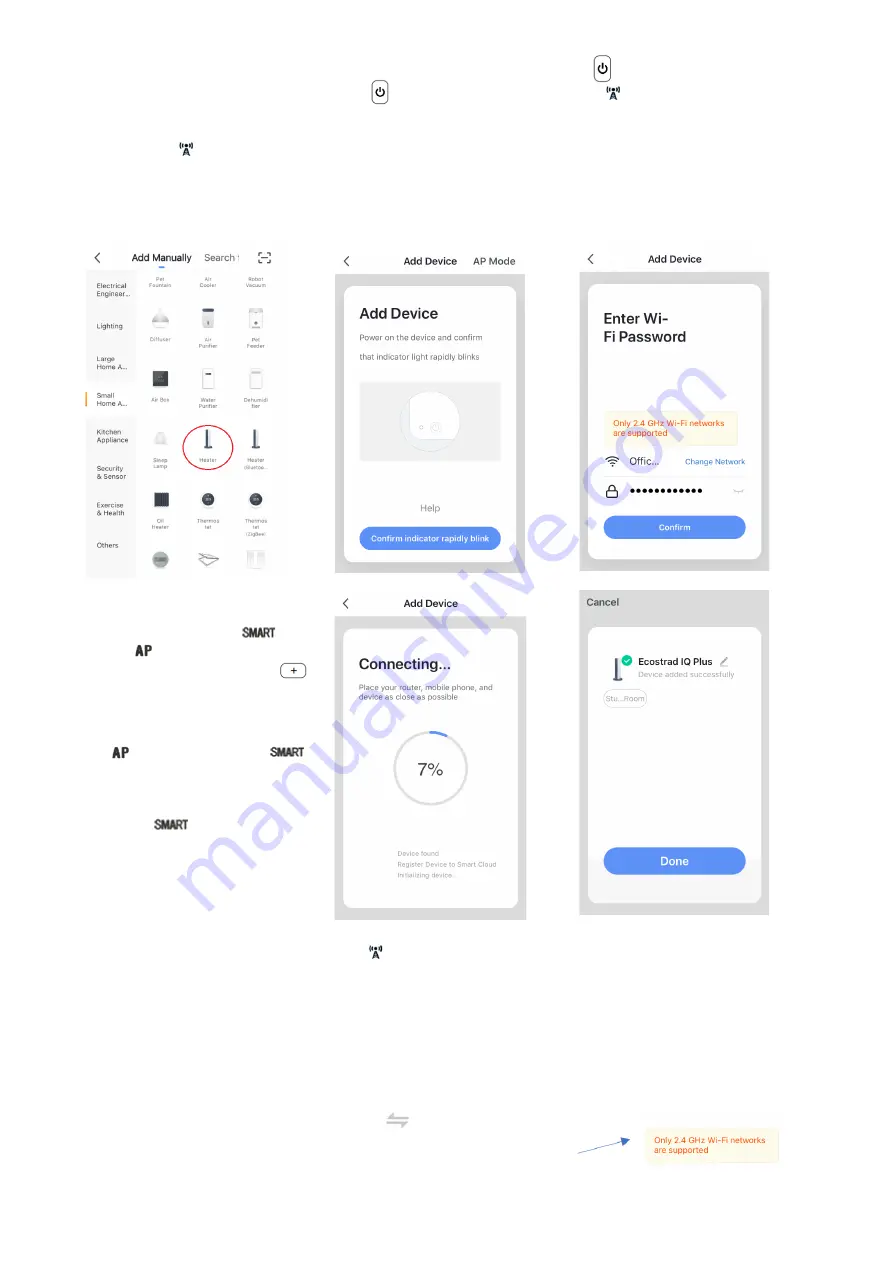
o add the heater to the app, first put it in WiFi connection mode. Press 

 to put it 

in standby mode and then hold down


 to activate pairing mode. The 


icon 

should flash. If the icon does not flash on first attempt, repeat this step until it does. 

While the 


icon is flashing, go to the app and press Add a Device

.


Select the 

device type (Small Appliances > Heater) and confirm that the indicator is flashing. 
You will then be prompted to enter your WiFi password. This allows the app to find 
your heater using your WiFi.

 The app will then display its connecting screen. 

c)

d

)

The heater will beep and display a solid 

       i

con when the device is connected. The 

The heater can connect on 

two network bands, 
and


. If you are having 

trouble connecting, press 

to switch to the alternate 

connection band. Wait 5 
seconds and you will see the 

app will confirm that the 

heater has been added. You can now name the device, 

share it w

ith

 family members, or proceed to scheduling your heating.

NOTE - When connecting, make sure your router is switched on and your mobile 
phone is connected to its WiFi.

The app is only designed to work with 2.4 GHz 

networks

. If you are struggling to 

connect your heater, it may be that you have a 5 GHz dual band router. In this 
case, you will able to connect by pressing           and switching to the 2.4 G band. 
This usually has a very similar name to the 5.0G band. 

For more information on this issue, tap the 2.4 GHz message when connecting. 

e

)

icon switch for the

icon 

on the screen.

8

Most users will connect easiest 
on the 


band.

Содержание iQ 1000

Страница 1: ...Ecostrad Electric Panel Heater 500w 1000w 1500w 2000w 2500w 220 240V 50 60 HZ Class I 1...

Страница 2: ...the power cable wound up this can cause a dangerous build up of heat Do not wind or tangle the cable around the appliance as this may cause weakening and splitting of insulation The power cable shoul...

Страница 3: ...ene to wash the product This can cause the body to turn yellow and corrode Cleaning The heater should be cleaned regularly to ensure fault free operation Installation Parts supplied Parts supplied Hea...

Страница 4: ...e you made your marks c Knock a wall plug into each hole using a hammer d Position the wall hangers over the holes and use the ST4 35mm screws to fix them in place 3 Hang the heater on the wall bracke...

Страница 5: ...am set on the shows you the current time and current temperature to navigate to the screen and skip to section 6 for need to make sure the correct time is set on the screen Press to shift between mode...

Страница 6: ...ift between modes until you see the 5 Frost protection setting a Press to change the frost protection setting b The screen will either show OFF or ON Use the and keys to choose your preferred option c...

Страница 7: ...ork time accumulated c Press or to leave the screen 9 Keypad lock a To activate long press the key The symbol will appear on the screen and the buttons will not respond b To unlock long press the key...

Страница 8: ...connect on two network bands and If you are having trouble connecting press to switch to the alternate connection band Wait 5 seconds and you will see the app will confirm that the heater has been add...

Страница 9: ...ff device is in standby mode Turned On device is in heating mode When the heater is online tap the device name to go to the control interface Note when the heater is offline you will not be able to co...

Страница 10: ...pp Depending on your device your voice control app may discover your devices automatically or you may need to prompt it to do so Once the Smart Life skill is enabled and linked with your Smart Life ap...

Страница 11: ...e heater set to follow a program It may be programmed to be off or heating at a lower temperature at this time Press to switch to Auto mode or adjust the program to heat now Has a door or window been...

Отзывы: