background image


Engl

ish


© 2016 EcoSeb, Inc.                                                                          6                                                                          All rights reserved 
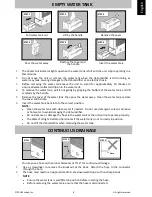
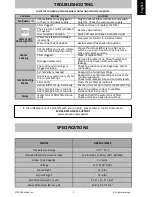
EMPTY WATER TANK


 

The Water Full Indicator lights up when the water tank is full and the unit stops operating in a 

few minutes. 

 

Do  not  move  the  unit  or  remove  the  water  tank  when  the  dehumidifier  is  still  running,  as 

water may leak; causing damages to the dehumidifier or an electric shock.  

 

Before  removing  the  water  tank  leave  the  unit  to  stand  for  approximately  10  minutes  to 

ensure all water collected drips into the water tank. 

 

To remove the water tank, pull it out gently by gripping the bottom of the water tank, and lift 

carefully by the handle. 

 

Remove the cover of the water tank, then pour the water away.  Clean the water tank, restore 

the cover and handle. 

 

Insert the water tank back into to the correct position. 

NOTE : 

 

Clean the water tank with clean water if needed.  Do not use detergent, solvent, abrasive 

or hot water to avoid damaging the dehumidifier. 

 

Do not remove or damage the float in the water tank or the unit will not operate properly. 

 

The Water Full light indicator illuminates if the water tank is not correctly in position. 

 

Do not tilt the dehumidifier when removing the water tank. 


You may use a hose with an inner diameter of 7/16” for continuous drainage: 

 

Use  a  screwdriver  to  remove  the  knockout  at  the  back.    Attach  the  hose  to  the  connector 

through the hole. 

 

The hose must lead to an appropriate drain at a downward slope with no sharp bends.  

NOTE: 

 

Ensure the water tank is well fitted in position before inserting the hose.  

 

Before removing the water tank, ensure that the hose is disconnected.  


CONTINUOUS DRAINAGE


Pull water tank out 


Lift by the handle 


Remove the cover 


Pour the water away 


Restore the cover and 

the handle 


Insert the water tank 

STEP 1 

STEP 2 

STEP 3 

STEP 4 

STEP 5

STEP 6 

STEP 1 

Knockout 

STEP 2 

Hose 

STEP 3 

Hose 

Содержание DD122EA SIMPLE

Страница 1: ...DD1EA SIMPLE Formerly DD122EA SIMPLE US CA FOR MORE LANGUAGES PLEASE VISIT www ecoseb com userguide ...

Страница 2: ...iture musical instruments and artwork by drying it out too much HIGH HUMIDITY High humidity indoors causes damp and condensation The damp left by condensation can damage plaster wall paper furniture vehicles timber windows doors and clothes It can be harmful to our health when bacteria thrives causing mould and fungus MAINTAINING SAFE LEVELS OF HUMIDITY It is important to maintain a consistent hum...

Страница 3: ...tor lights up when the water tank is full or incorrectly installed 2 Power ON Indicator Indicates when the unit is ON 3 Humidistat Dial Select from POWER OFF LOW MEDIUM HIGH LAUNDRY CONTINUOUS MODE settings 4 Economy Turbo Switch Select TURBO or ECONOMY settings CONTROL PANEL 1 2 3 4 BACK FRONT ...

Страница 4: ...ion voiding your guarantee STEP 3 ON OFF TO OPERATE UNIT Place the unit in an upright position on an even level surface Plug the unit into the mains socket Turn the humidity stat dial clockwise to select desired mode Power ON indicator lights up Turn anti clockwise to switch the unit OFF STEP 4 DRY LAUNDRY MODE Low Select to keep the room at a comfortable level Dries the air to approximately 70 RH...

Страница 5: ...when conditions allows follow Steps 1 and 3 USEFUL INFORMATION After turning the dehumidifier OFF DO NOT remove the power plug from the power socket immediately allow the unit to cool down for a minimum 5 minutes to help protect the internal components When you first use your dehumidifier it will work harder to reduce the room humidity to it s target This is the time when it will produce the most ...

Страница 6: ... clean water if needed Do not use detergent solvent abrasive or hot water to avoid damaging the dehumidifier Do not remove or damage the float in the water tank or the unit will not operate properly The Water Full light indicator illuminates if the water tank is not correctly in position Do not tilt the dehumidifier when removing the water tank You may use a hose with an inner diameter of 7 16 for...

Страница 7: ...hygiene standards The frequency depends on the duration and conditions of operation To purchase a replacement filter please visit www ecoseb com STEP 3 CLEANING YOUR DEHUMIDIFIER Turn the dehumidifier OFF wait for the fan to stop and unplug the unit from the socket 2 Clean the surface with a soft damp cloth 3 Dry thoroughly with a towel after cleaning 4 Empty the water tank by sliding out from the...

Страница 8: ... 11 Always unplug the dehumidifier when not in use or when moving location To disconnect the dehumidifier from the power supply grip the plug and pull from the power socket Never pull by the cord 12 Always empty the water tank before storing the unit away 13 Close supervision is necessary when the dehumidifier is used in the presence of children and pets 14 Do not run power cord under carpeting or...

Страница 9: ...king Dehumidifier on uneven surface or water tank fitted incorrectly Ensure the dehumidifier is on a flat even surface use a spirit level to check remove tank and replace correctly Filter clogged Clean or replace filter Damaged water tank Remove the water tank fill with water and place on a hard even surface to test for leakage The continuous drainage is clogged or loose Check the continuous drain...

Страница 10: ...s of merchantability or fitness for a particular purpose are limited to two years or the shortest period allowed by law but not less than two years EcoSeb shall not be liable for consequential or incidental damages such as property damage and incidental expenses resulting from any breach of this written limited guarantee or any implied guarantee Some States and provinces do not allow the exclusion...

Страница 11: ... 2016 EcoSeb Inc All rights reserved www ecoseb com ...

Страница 12: ... 2016 EcoSeb Inc All rights reserved www ecoseb com ...

Отзывы: