background image

5. Pedals:

Assemble both pedals to the bike by screwing them to the 

Crank & pedals leg.


Brake-sets adjustment 

Make sure that the brake pads are not rubbing or locking the 

front / rear disc, while you're not pressing the brake-levers.

In case in which the disc rubs / locked into the brake  pads. 

Release a bit both of the caliper screws (the screws that 
connect the caliper to the fork), tightly press on the 
brake - lever and re-screw back the screws into their 
place while continuously pressing on the lever.   


EcoMotion Bikes

11

Содержание CORE Pro + eFAT

Страница 1: ...CORE Pro eFAT www ecomotionbikes com contact ecomotionbikes com EcoMotion Bikes 1 IMPORTANT In order to ensure your safety and get the most out of your product please read this Manual carefully befor...

Страница 2: ...Pedals 11 Brake sets adjustment 11 Handlebar height adjustment 12 Mounting dismounting of battery 13 Folding the bike 14 Inspection prior riding 15 Operating of the electric system 16 The battery cha...

Страница 3: ...bike is exposed to wear and tear as well as high pressure Various materials and components may react differently to fatigue wear or pressure In case the life expectancy of a certain component has expi...

Страница 4: ...even under the best of circumstances Always use protective gear such as a helmet and other shields as well as closed shoes even for a short ride WARNING Avoid Storing the battery in extreme hot cold...

Страница 5: ...mproper assembly of the bike is dangerous can cause bike component failure resulting in injury to the rider It s your duty to contact us for explanation if any of the instructions in this booklet are...

Страница 6: ...dingly to the PAS level which set on the display TAG Twist And Go a throttle that located on the handlebar activate the motor while it twisted Parts location Assembly instructions 1 Handlebar Prepare...

Страница 7: ...ng up the handlebar folding mechanism click in its lever into the stem Adjust the handlebar so it will be aligned with the bike s fork re open the handlebar folding mechanism tight up the stem s centr...

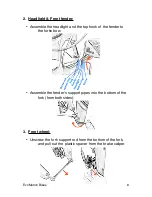
Страница 8: ...hook of the fender to the forks bow Assemble the fender s support pipes into the bottom of the fork from both sides 3 Front wheel Unscrew the fork support rod from the bottom of the fork and pull out...

Страница 9: ...the lock rod lever EcoMotion Bikes 9 WARNING Make sure that the front wheel turns easily sideways and not jammed while you steering the handlebar Make sure that the bike s wires and brake tube are not...

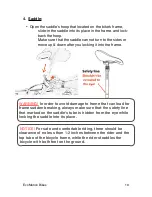
Страница 10: ...tion Bikes 10 WARNING In order to avoid damage to frame that can lead for frame sudden breaking always make sure that the safety line that marked on the saddle s tube is hidden from the eye while lock...

Страница 11: ...ocking the front rear disc while you re not pressing the brake levers In case in which the disc rubs locked into the brake pads Release a bit both of the caliper screws the screws that connect the cal...

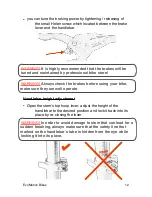
Страница 12: ...it back into its place by re closing the lever EcoMotion Bikes 12 WARNING Always check the brakes before using your bike make sure they are well operate WARNING It is highly recommended that the brake...

Страница 13: ...cked into the bike and it powered off 3 A mode in which the battery is locked into the bike and it powered on and ready for use In order to switch the key from mode 2 to mode 1 the key should be pushe...

Страница 14: ...2 Lock the folding lever by locking it into the stem Folding the frame 1 Unlock the folding mechanism lever 2 Open the lever towards the rear side of the bicycle 3 Lift up the lever until a click is...

Страница 15: ...tires air pressure is same as the one that written on them Check that the tires are not overly worn Worn tires will have no proper road grip Check that the wheel rims are not broken or cracked Check t...

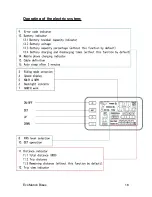
Страница 16: ...Operating of the electric system EcoMotion Bikes 16...

Страница 17: ...he display is on By pressing on the SET button you can view the following info remaining distance to go trip duration trip mileage and total mileage of the bike At any given time the display will show...

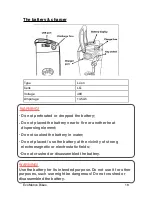
Страница 18: ...o fire or another heat dispersing element Do not soaked the battery in water Do not placed use the battery at the vicinity of strong electromagnetic or electrostatic fields Do not crushed or disassemb...

Страница 19: ...et EcoMotion Bikes 19 IMPORTANT In case that the electric system is left on while the bike is not in use for a long time the battery may reach a state where it is no longer chargeable IMPORTANT The di...

Страница 20: ...won t exceed 45 days without recharging the battery again EcoMotion Bikes 20 WARNING Do not cover the battery and the charger during charging process IMPORTANT It s recommended to charge the battery...

Страница 21: ...o may cause the rider to be thrown forward from the bike Always use both of the brakes when you re braking EcoMotion Bikes 21 IMPORTANT The battery cells are discharged autonomously once the battery i...

Страница 22: ...or Oil the bike chain and the metal parts which are not aluminum on a regular basis The frequency of oiling your bike parts should be more frequent in a humid wet areas Use only original parts Do not...

Страница 23: ...ach exposes it to salt humidity The bike ought to be cleaned and oiled more frequently if used in such areas In case of product malfunction that you cannot solve by yourself according to this manual g...

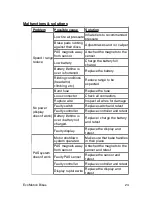
Страница 24: ...splay doesn t work Burnt fuse Replace the fuse Loos connector Check all connectors Rupture wire Inspect all wires for damage Faulty switch Replace switch and retest Faulty controller Replace controlle...

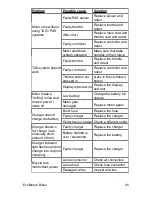
Страница 25: ...wn button Display rupture wire Replace the display and test Motor make a drilling noise and reduce power shuts off Low battery Charge the battery full charge Motor gear damaged Replace motor gears Cha...

Отзывы: