background image

34

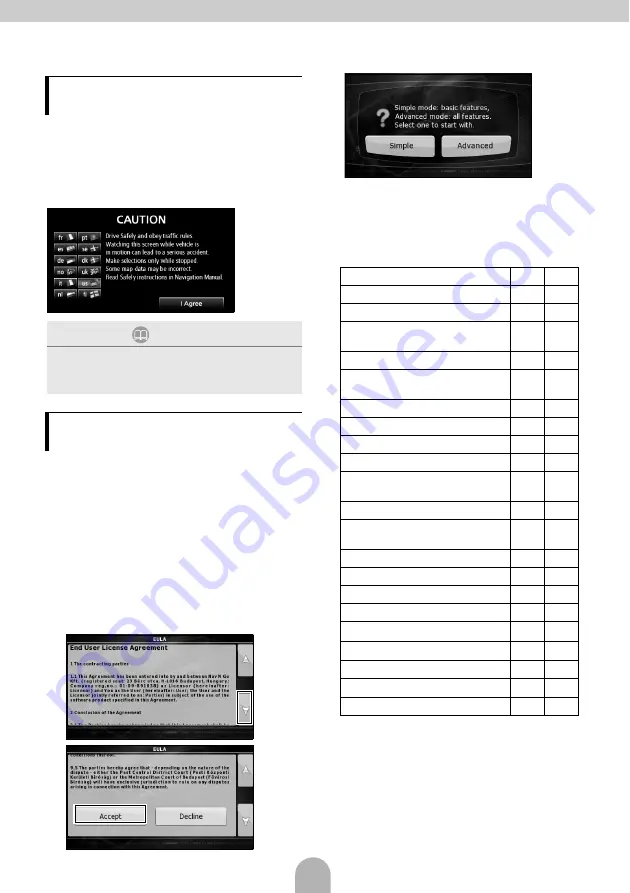
When the engine is turned ON, the DVD/audio
power will automatically turn ON and the
Caution screen will appear. After the selection
of the language, touch [I Agree] to switch to the
Navigation screen. The power will turn OFF
when turning off the engine.

The main unit provides a choice of operation
modes ("Simple mode" and "Advanced mode"),
each providing different menus and settings.
The navigation operations and map-screen
layout are the same in each mode. This
document describes the basic navigation
operations available from "Simple mode." See
the ECLIPSE web manual for advanced
navigation operations ("Advanced mode").
When the power of the main unit is turned on for
the first time, the screen switches in the order
shown below.

a

b

c

"Simple mode" or "Advanced mode" can be
switched later.

The features and settings available in each
mode are as follows:

a

Available in 

Simple mode

b

Available in 

Advanced mode

Screen Operations after Turning
Power ON

ATTENTION

Press [NAVI] if the navigation screen does not
appear.

Press [MENU] and then touch [AUDIO OFF] if the
audio or DVD does not turn ON.

Setting the Navigation Operation
Mode

Type of action

a

b

Navigating to a selected map point

Yes

Yes

Navigating to a street address

Yes

Yes

Navigating to an incomplete
address

Yes

Yes

Navigating to an intersection

Yes

Yes

Navigating to recent destinations
(History)

Yes

Yes

Navigating to Favorites

Yes

Yes

Navigating to a POI

Yes

Yes

Navigating to coordinates

No

Yes

Creating a multi-point route

No

Yes

Saving a map point as a Favorite
destination

Yes

Yes

Saving a map point as a POI

No

Yes

Saving a map point as a location of
a Road Safety Camera

No

Yes

Mark a map point with a Pin

No

Yes

Saving the active route

No

Yes

Saving Track Logs

No

Yes

Map Screen settings

No

Yes

Menu settings

Yes

*1

Yes

Sound settings

Yes

*2

Yes

Route Planning options

Yes

Yes

Regional settings

Yes

*3

Yes

Warnings

No

Yes

*1: Only background picture
*2: Only Master volume
*3: Only language selection

Содержание AVN726EE

Страница 1: ...icaci n Dicho n mero de serie aparece en una etiqueta o bien estampado sobre el equipo REMARQUE Veuillez conserver ce manuel et y inscrire le num ro de s rie de votre AVN726EE servant d fidentificati...

Страница 2: ...hanges to product specifications may result in differences between content of the manual and features of the product Warning This sign indicates a situation in which incorrect handling through disrega...

Страница 3: ...5 4 Setting a Destination 37 5 How to switch the audio source mode 38 6 Removing and inserting discs 39 7 Radio mode operations 40 8 DISC mode operations 41 9 Bluetooth Audio Operation 43 10 USB mode...

Страница 4: ...o not let water or foreign objects enter the internal parts of this main unit Smoke fires or shocks may result Do not use when main unit is malfunctioning the screen is not lit or no sound comes out A...

Страница 5: ...aring damage when the main unit is powered on Do not operate when the sound is not being emitted properly such as distortion This main unit uses invisible laser light Do not disassemble or alter this...

Страница 6: ...position This main unit is precision equipment and the information that you record on it after purchase can be lost as a result of static electricity electrical noise vibration and other influences Y...

Страница 7: ...screen Press to display the audio info menu screen For radio mode Press to select station manually Press to select station automatically Press for 1 second or more For CD MP3 WMA USB and iPod mode Pr...

Страница 8: ...vailable in Advanced mode Screen Operations after Turning Power ON ATTENTION Press NAVI if the navigation screen does not appear Press MENU and then touch AUDIO OFF if the audio or DVD does not turn O...

Страница 9: ...ival at destination and time until next waypoint Distance information remaining distance to destination distance to next waypoint and current elevation Compass Shows the direction of your heading both...

Страница 10: ...oice guidance and the screen background You can also check map and license information Enter text and numbers to find addresses and POI Names The text entry screen differs depending on the function a...

Страница 11: ...up on the map Map Change the map display for the displayed point Check the map and find a detailed destination Info Display a list of points of interest in the vicinity of the displayed point You can...

Страница 12: ...operation screen will appear Operation screens list AM radio FM radio Bluetooth Audio CD MP3 WMA DVD DivX VTR iPod optional USB a Touch Audio off again to restart the broadcast station reception song...

Страница 13: ...c is ejected cAfter removing the disc touch CLOSE How to insert a disc CAUTION Do not touch CLOSE or press while a disc is being inserted ATTENTION Discs that can be used An audio disc or DVD video di...

Страница 14: ...only e AF Touch to automatically switch to the broadcast station with the best reception if the reception of the broadcast station RDS station that you are listening to deteriorates FM radio mode only...

Страница 15: ...r from the folder list screen and then select the video you want to watch c Used to switch folders A video in the selected folder will be played Listening to music CD MP3 WMA Operations using the scre...

Страница 16: ...nu or Top Menu and then touch cTouch or to select an item and then touch Enter The selected item will be played Watching videos DVD ATTENTION Some DVDs may not be played automatically In this case pla...

Страница 17: ...ODE is 1234 Operate the portable device only while the device information screen is displayed fWhen the registration has been completed a message will appear on the display The portable device is now...

Страница 18: ...The connected portable device starts to play music b Touch to stop playback Press to restart playback Connecting the portable device ATTENTION If the registration is not successful a message will app...

Страница 19: ...necting the USB memory ATTENTION Do not disconnect the USB memory during playback Playable MP3 WMA File Standards MP3 Supported standards MPEG 1 MPEG 2 and MPEG 2 5 Supported sampling frequencies MPEG...

Страница 20: ...ect a category from Playlist Artist Album Podcast and Genre on the menu screen and then select the song you want to listen to After selecting the desired category continue the selection procedure unti...

Страница 21: ...ality can also be adjusted b BAL FAD Setting The set position for front to back right to left volume balance can be adjusted c Woofer Setting When a sub woofer is connected the preferred output level...

Страница 22: ...the pairing setting can be selected Registering using a cell phone cTouch Allow Connect dUse the cell phone to input the PIN CODE The default PIN CODE is 1234 Operate the cell phone only while the de...

Страница 23: ...tone The ring tone can be set Auto Connect Registered cell phones can be connected to the main unit automatically Change Code The PIN CODE can be changed by touching Change Code Done To exit menu Cell...

Страница 24: ...r collection as the key CD for the main unit aTouch Info bTouch ESN cInsert the music CD then touch Set up dTouch YES to accept or NO to cancel this procedure Now setting SEC will be displayed followe...

Страница 25: ...r bAfter the battery is connected when the power to the main unit is turned ON the program is read provided the map disc is inserted and the opening screen is displayed After that the security screen...

Страница 26: ...uality that maintains a relatively small file size DivX files can also include advanced media features like menus subtitles and alternate audio tracks Many DivX media files are available for download...

Страница 27: ...53 English MEMO...

Страница 28: ......

Страница 29: ...icaci n Dicho n mero de serie aparece en una etiqueta o bien estampado sobre el equipo REMARQUE Veuillez conserver ce manuel et y inscrire le num ro de s rie de votre AVN726EE servant d fidentificati...

Отзывы: