9
2.
Connect each AVICCAN cable to the speaker connection terminals, each with its
corresponding color. The two shortest cables (black and white) correspond to
the 8
Ω
connection
6.
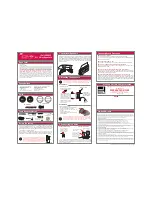
LOCATION AND MOUNTING
The installation of each unit is easily carried out by means of the 4 built-in rotating tabs.
For the correct installation of the product it is necessary to foresee the realization of
circular holes in the places destined to its location as well as the suitable wiring for each
unit.
Below are the steps to follow for a correct installation:
1.
Remove the protective grille from the unit using the supplied hook.
2.
Make a circular hole in the false ceiling. To facilitate this, a cutting/painting
template is supplied with each unit. Once separated into two parts, the external
part can be used as a template to mark the hole in the ceiling, while the internal
disc can be used to protect the speaker cone if you wish to paint the plastic part
in another colour.
3.
Make the connection of the existing cables in the installation with the unit by
means of the terminals or the pressure clamps.
4.
Insert the loudspeaker into the hole drilled. Hold the unit with one hand and
insert it into position taking care that the 4 rotating tabs are in the retracted
position.
5.
Tighten each of the 4 screws accessible from the front of the unit. The
loudspeaker will then be fixed in its final position.
6.
Point the tweeter to the desired direction