background image

28


1. Tuner & channel

     Input connector

1 x F type with loop through

     Output connector

1 x F type 75 Ohm

     Frequency range

950MHz to 2150MHz

     Input impedance

75 Ohm

     Signal level

-25 to -65dBm

     IF frequency

480MHz

     IF bandwidth

36MHz

     LNB power & polarization

Vertical

+13.5V - +14.5V

Horizontal

+17.5V - +18.5V

     22kHz tone

Frequency

22kHz   2kHz

Amplitude

0.6Vp-p   0.2Vp-p

     Demodulation

QPSK

     Input symbol rate

2 - 32Msps

     FEC decoder

Convolutional code rate
1/2, 2/3, 3/4, 5/6 and 7/8 with constraint
Length K=7

 2. MPEG transport stream A/V decoding

     Transport stream

MPEG-2 ISO/IEC 13818
Transport stream specification

      Profile & level

MPEG-2 MP @ ML

      Input T/S data rate

90Mbit/S max.

      Aspect ratio

4:3, 16:9 with pan vector

      Video resolution

720 x 576(PAL), 720 x 480(NTSC)

      Audio decoding

MPEG-1 Audio Layer 1 & 2, Musicam

      Audio mode

Stereo, Dual channel, Joint stereo, Mono

      Sampling rate

32, 44.1 and 48kHz

  3. Memory

      Flash memory

up to 2 Mbytes

      Program DRAM

up to 8 Mbytes

      EEPROM

2 Kbytes

4. A/V & data in/out

     SCART

TV x 1, VCR x 1, Decoder x 1


RGB video output

TV SCART

     0/12V out

RCA x 1

     CVBS video out

RCA x 1, SCART x 2 (TV, VCR)

6. Specifications

Digital Section

Содержание AD-3000 IP Viaccess

Страница 1: ...User Manual ANALOG DIGITAL POSTIONER RECEIVER WITH EMBEDDED VIACCESS AND COMMON INTERFACE ...

Страница 2: ...28 Front rear view 5 2 Features 3 1 Trade Mark of the DVB Digital Video Broadcasting Project 1970 A Receiver and TV set up 13 B Main menu Installation 19 C Advanced Installation 26 Appendix Tri control database remote 31 Safety instructions 2 How to connect your dish to the EchoStar AD 3000IP VIACCESS 11 1 6 ...

Страница 3: ... power cord by gripping the power plug not the cord Route power supply cords so that they are not likely to be walked on or pinched by items placed upon or against them Pay particular attention to cords at plugs convenience receptacles and the point where they exit from the unit Use an outlet that contains surge suppression or ground fault protection For added protection during a lightning storm o...

Страница 4: ...9 Favorite channel function mixed Digital Analog 10 C Ku control function 11 Parental lock Installation Edit lock Receiver lock 12 Variety of LNB polarity control 13 18V 0 22kHz tone 0 12V Mechanical polarizer magnetic polarizer Ferrite and DiSEqC 1 0TM 13 RS232C port for additional information service and update of the receiver control software 14 DiSEqC1 0TM compatible 15 Mechanical and magnetic...

Страница 5: ...on Your TV should support teletext Subtitling 14 SCPC MCPC receivable from C Ku band satellites 15 Variable aspect ratio 4 3 16 9 with pan vector 16 EPG for on screen channel information 17 Multi lingual function when provided by the satellite and broadcasting service provider 18 Total 5000 channels programmable 4000 Channels for TV 1000 Channels for Radio 19 S PDIF Sony Philips Digital Interface ...

Страница 6: ...ut LNB input Loop through Note All the cables used for Input Output connection for the receiver should be well shielded Note All the cables used for Input Output connection for the receiver should be well shielded Selection conf irmation Channel up down Volume up down 2 Slots for CI module ON Standby 1 Smart card slot ...

Страница 7: ...r CI module of your choice Without CI module and smart card only FTA free to air programs are available to watch Note 1 The main plug must not be plugged in before inserting the CI module 2 Insert the CI module fully into the slot behind the lid in the front panel of the receiver towards the arrow on the module facing upwards and inwards 3 Insert your smart card fully into the slot on the CI modul...

Страница 8: ...e video viewing mode at any time Number Input keys enable direct channel selection command selection using numeric keys The TV RAD Radio key switches between TV and radio mode The FAV key shows a list of your selected favorite channels To define channels as favorite select the Edit TV channel menu The EPG key shows program information of the selected channel EPG Electronic Program Guide The Subtit...

Страница 9: ... socket of the EchoStar AD 3000IP VIACCESS to the RF IN of the TV set 3 Search on the TV set for UHF channel 38 This is the default channel where the EchoStar AD 3000IP VIACCESS is set to 1 Connect the Off air TV antenna or cable if available to the ANT IN socket of the EchoStar AD 3000IP VIACCESS 2 Connect the TV OUT socket of the EchoStar AD 3000IP VIACCESS with the RF IN of the VCR 3 Connect th...

Страница 10: ...RT of the EchoStar AD 3000IP VIACCESS to the SCART of the TV set 6 Connect the SCART cable from the VCR SCART of the EchoStar AD 3000IP VIACCESS to the SCART of the VCR 7 When the EchoStar AD 3000IP VIACCESS is switched on the TV set TV set will automatically switch to the relevant SCART input of the TV Note Use different UHF channels for VCR and EchoStar AD 3000IP VIACCESS TVSCART RF IN RF OUT RF...

Страница 11: ...or UHF channel 38 This is the default channel where the EchoStar AD 3000IP VIACCESS is programmed to 5 Connect the SCART cable from the TV SCART of the EchoStar AD 3000IP VIACCESS to the TV SCART from the TV set 6 Connect the SCART cable from the VCR SCART of the EchoStar AD 3000IP VIACCESS to the SCART of the VCR 7 Connect the SCART cable from the DECODER SCART of the EchoStar AD 3000IP VIACCESS ...

Страница 12: ... 6 How to connect your dish to the EchoStar AD 3000IP VIACCESS One Actuated Dish with C Ku feed C band Ku band LNB LNB ACTUATED DISH WITH C KU FEED 1 Connect the IF OUT and LNB IN connectors using the loop through cable provided with the EchoStar AD 3000IP VIACCESS 2 Connect the cables from C and Ku band LNB to a 12 Volt C Ku switch 3 Connect the coaxial cable from the 0 12 Volt switch to the LNB ...

Страница 13: ...gh cable provided with the EchoStar AD 3000IP VIACCESS 2 Connect the DiSEqC 1 0 or Toneburst switch to the LNB IN connector of the EchoStar AD 3000IP VIACCESS 3 Connect both dishes to the 2 inputs from the DiSEqC switch LNB LNB FIXED DISH 1 Digital or Analog FIXED DISH 2 Digital or Analog DiSEqCswitch ...

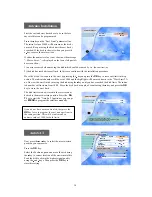
Страница 14: ... This option allows you to select a different language to listen to if supported LNB Setting Select the LNB type which conforms to your LN B using the keys Other parameter values should be changed manually according to your LNB type Press the OK key to confirm your selection Select the LNB Setting menu in the Installation m enu using the keys If you have a Mechanical Polarizer with your LNB you ha...

Страница 15: ...u can pr ess MENU to program the satellites manually If you do not have a moveable dish just press the OK key twice to program the east and west limit in the same position This will be indicated by a numeric value of 1000 for both limits 1 an error occurred when moving the dish which could be caused by i e loose wires or 2 the dish has reached its east limit In this case continue with the installa...

Страница 16: ...te 019 2 E ASTRA1 Ø i Delete Add Exit 1 Please Store most eastern satellite Satellite 004 0 W AMOS1 LNB Type Type1 TP Polar SR Digital 11224 H 27500 Skew Not set Position Realign dish 00 Search type Auto Search Start Search Press OK 1 2 3 4 E 1053 W EL WL Signal Level Signal Quality 6 7 8 12 00 5 ü CAKRAWAR 107 7 E THAICOM 078 5 E ASIASAT3S 105 5 E APSTAR2R 076 5 E GORIZT25 103 0 E PAS4 068 5 E AS...

Страница 17: ... Data Erase All Satellite Data Set present SAT as fixed 1 2 Delete Cancel i Exit Motorized Dish Setting Erase Position Data Antenna Installation 2 1 Exit i Motorized Dish Setting Erase Position Data Antenna Installation 1 2 Exit i The EchoStar AD 3000IP VIACCESS now has programmed the position of all selected satellites The next step is to store all channels on these satellites To do this press th...

Страница 18: ...option 7 Press the OK key to set the time and press the OK key to save the data It is recommended that the time and date set in this menu is the same as of your VCR Now that the date and time has been set you could edit the VCR timer settings You can select the desired language for the OSG On Screen Graphics display using the keys when the Menu Language option is selected Similarly you can select ...

Страница 19: ...AL B G I D K Select the vacant channel considering your local channels and preset channels below Pre set Ch 38 for PAL B G I Ch 40 for PAL D K UHF frequency is set automatically according to the channel selection UHF Tuning Sub backg Select On for Subtitle background on TV Subtitle background i Company info Exit Company Echostar Intl Corp Address Schuilenburglaan 5a City 7604 BJAlmelo About Echost...

Страница 20: ... Signal Level bar If you are unable to get any signal quality please check the LNB Setting to ensure you have selected the correct LNB and switch settings This menu is to align your dish to the selected satellite If you set the Polarity Control parameter in the LNB Setting menu as Polarotor or Ferrite you can adjust the Skew parameter in this menu while you are watchi ng the signal level at the sa...

Страница 21: ...work in the extended IF band above 950 MHz Before you start you have to check your condition whether it is possible to use this facility or not in your households You can ask your household supervisor If EchoStar AD 3000IP VIACCESS VIACCESS is connected to a SMATV network select SMATV Configuration The most common alternatives for Symbol rate and FEC are already preprogrammed When you need to chan...

Страница 22: ...5 ASTRA1 019 2 E 6 8 7 JDF 1 Info Kanal F Star Kino F CNN F The pre programmed PIN Personal Identification Number code is set as 0000 If you want to change it please follow the procedure shown as before Change PIN Code Enter PIN Code Parental Control Exit i Parental Control TV Channel Lock Radio Channel Lock Receiver Lock Off Installation Edit Lock Off Change PIN Code 1 2 4 3 5 Exit i Radio Channe...

Страница 23: ...vent which starts earlier than your Local time Setting might not work Please turn on your VCR to record an event VCR Timer Date mm dd yyyy Satellite ASIASAT2 Channel Saudi Ch1 Start Time hh mm Event Number 1 2 4 3 5 Current Date Time Nov 20 1999 Sat 20 00 6 8 7 Stop Time hh mm Type O D W M Once Recording On Off OFF Exit i 1 Ø If the Receiver Lock is ON you have to input the correct code to operate...

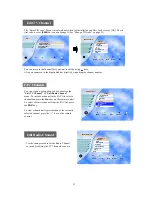
Страница 24: ... Generation ROC Love Songs Dance REE 5 7 6 8 Delete Cancel Move Favorite Exit i 1 You can create a group of up to 96 channels in the Edit TV Channel or Edit Radio Channel menu To include a channel in the FAV list select a channel and press the blue key on the remote control To select a favorite channel from the FAV list press the FAV key To view a thumb nail representation of the currently selecte...

Страница 25: ... Ch 9 OS Down Ch 370 Audio Ch 371 Audio Ch 372 Audio Ch 373 Audio Ch 374 Audio Ch 375 Audio Ch 378 Audio Network 3661H Exit Delete Cancel Add TP i 7 To delete a satellite press the red key when the highlighted bar is located at the transponder you want to delete To add a satellite press the blue key And then Edit Add SAT or TP menu will be displaye d and you can add a satellite in that menu Common...

Страница 26: ...rent channel TVGuide RAI1 Linea verde In 11 10 11 55 RAI2 No Information No Time RAI3 Rai Sport Cavale 11 27 12 02 RAIwidescree Wide Screen 11 00 14 00 2 3 4 Radio Next Info Select Exit i 1 5 6 7 11 52 Now RAISPORT sate Rai Sport Sat 11 00 14 00 TEST2RAI No Information No Time TEST3RAI No Information No Time 1 Red TV Radio key Switches the TV Guide and the Radio Guide by pressing this key 2 Green ...

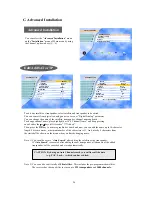
Страница 27: ...P AdvancedInstallation Edit LNB Local Freq 2 3 4 5 1 Exit i Satellite ASTRA1 Longitude 019 2 E Digital Analog Channel RTL_2 Frequency 11214 00 Polarity Horizontal Decoder Level 2 C Ku Ku Edit Add SAT or TP 2 5 6 7 8 4 3 1 9 10 11 Decoder Off Skew Not set Low Threshold Off Analog Ø 12 Ú More Ú Audio Setting To edit any satellite or transponder select satellite and transponder to be edited You can c...

Страница 28: ... OK key at the Start bar to start channel scannin g By doing a channel scan you will loose the channel names This can be redone by going back to factory default This function assists end users to speed up the searching storing process It may be required to fine tune the video by adjusting the frequency manually Edit LNB Local Frequency LNB Local Frequency 0 9 11300 Ø Exit i Auto Scan ASTRA1 Start ...

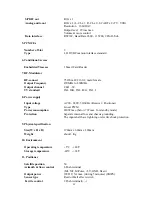
Страница 29: ...with constraint Length K 7 2 MPEG transport stream A V decoding Transport stream MPEG 2 ISO IEC 13818 Transport stream specification Profile level MPEG 2 MP ML Input T S data rate 90Mbit S max Aspect ratio 4 3 16 9 with pan vector Video resolution 720 x 576 PAL 720 x 480 NTSC Audio decoding MPEG 1 Audio Layer 1 2 Musicam Audio mode Stereo Dual channel Joint stereo Mono Sampling rate 32 44 1 and 48...

Страница 30: ... PAL D K PAL B G PAL I 8 Power supply Input voltage AC90 240V 50 60Hz Receiver Positioner Type Linear PWM Power consumption 240W max below 7W max for standby mode Protection Separate internal fuse and chassis grounding The input shall have lightning or electric shock protection 9 Physical specification Size W x H x D 370mm x 60mm x 280mm Weight about 3 Kg 10 Environment Operating temperature 5ºC 4...

Страница 31: ...0kHz 230kHz 280kHz 330kHz 500kHz Audio frequency response 20Hz to 15kHz Output impedance 600 Ohms Output level 2 0 Vrms Max 3 Video Format Invert Normal C Ku Selectable video output De emphasis CCIR Recommendation 405 1 625 lines Output impedance 75 Ohms Frequency response 50Hz to 5 0MHz Output level 1 Vp p normal 4 Decoder format Format Base band De Emphasized Unclamped Un Filtered De Emphasized ...

Отзывы: