background image

wheeled trimmer

4

Section

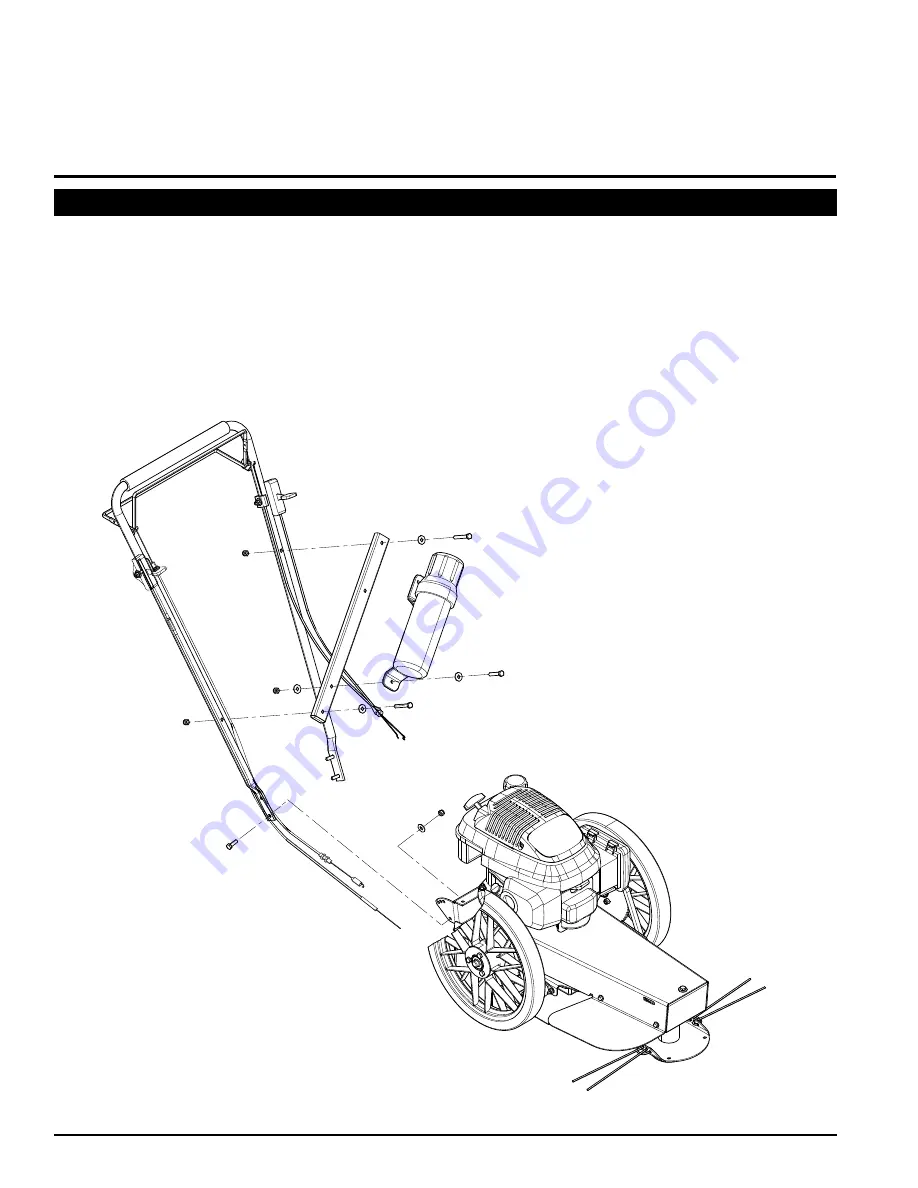
Remove the trimmer and handlebar from the shipping box and pallet.

1. 

The manual container is partially assembled on one side of the handlebar.  If necessary, loosen the bolt securing 

2. 

the manual container to the handlebar.  Rotate the container and attach the remaining end to the opposite side of 

the handlebar using one 5/16" x 2-1/4 bolt, washer and nut.  DO NOT TIghTEN BOLTS AT ThIS TIME.
Stand handlebar upright.  Align the bottom hole on the handlebar with the bottom hole on the handlebar support 

3. 

channel located on the trimmer and attach with two 5/16" x 1" bolts, washers and nuts.  DO NOT TIghTEN BOLTS 

AT ThIS TIME.

2

aSSEmbLY

2.1  INSTaLL THE HaNdLEbaR

Содержание WT160S

Страница 1: ...panion to 12330 SN Range 702557 A05369 wheeled trimmer WT160S 160 cc SELF PROPELLED WT160T 160 cc push W TILT WT190 190 cc push WT190S 190 cc self propelled WT190T 190 cc push W TILT WT190SE 190 cc SE...

Страница 2: ...reet P O Box 849 West Fargo ND 58078 800 247 7335 701 282 5520 Fax 701 282 9522 opesales crary com service crary com Monday Friday 8 am to 5 pm Central Time SERIAL NUMBER MANuFACTuRED By CRARy INDuSTR...

Страница 3: ...t not limited to bearings belts pulleys filters 2 and chipper knives This warranty does not cover normal maintenance service or adjustments 3 This warranty does not cover depreciation or damage due to...

Страница 4: ...arting the mower 7 4 2 Stopping the mower 7 4 3 trimming Guide 7 4 4 self propelled operation 8 4 5 Parallel Trimming for push trimmers 8 4 6 parallel Trimming for self propelled models 8 4 7 Off Cent...

Страница 5: ...ch a manner that flames or heat from the system will not ignite flammable material Failure of the owner operator of the equipment to comply with this regulation is a misdemeanor under California law a...

Страница 6: ...servicing storing or changing 1 an accessory shut off the machine and make sure all moving parts have come to a complete stop Disconnect the battery and remove the ignition key where applicable Replac...

Страница 7: ...PLUG WIRE FROM SPARK PLUG AND MAKE SURE ALL MOVING PARTS HAVE COME TOACOMPLETE STOP DO NOT OPERATE THIS EQUIPMENT IN THE VICINITY OF BYSTANDERS DO NOT A L L O W C H I L D R E N TO OPERATE THIS EQUIPM...

Страница 8: ...ndlebar Rotate the container and attach the remaining end to the opposite side of the handlebar using one 5 16 x 2 1 4 bolt washer and nut DO NOT TIGHTEN BOLTS AT THIS TIME Stand handlebar upright Ali...

Страница 9: ...s away from sparks or flames Acontainer with a capacity of 2 gallons or less with a pouring spout is recommended Do not fill the fuel tank while the engine is hot or running since spilled fuel could i...

Страница 10: ...when starting a cold engine Firmly push the primer bulb 3 times before starting self propelled bail Models All self propelled models Engages the self propel mode Pull up the self propel bail located...

Страница 11: ...throttle 7 lever if equipped from the CHOKE position to the RUN position Move the throttle if equipped to the SLOW position 1 then release the trimmer bail OR move the throttle to the STOP position Cl...

Страница 12: ...rd to the original position Tighten the right axle bolt and resume regular trimming 5 or mowing Models All self propelled models The Wheeled Trimmer can be used in either push or self propelled mode P...

Страница 13: ...orrective action taken This schedule is designed for units operating under normal conditions If the unit is operating in adverse or severe conditions it may be necessary for the items to be checked an...

Страница 14: ...hole used in Step 1 Pull the cutting string tight Loop the cutting string back and feed through the first 3 hole on the opposite end of the trimmer head Feed through the remaining second hole and pul...

Страница 15: ...e is obstructed 4 Dirty stale water 5 contaminated gas Flooded engine 6 Dirty or plugged air cleaner or 7 engine cooling fins Trimmer bail not engaged 8 Fill gas tank 1 Connect loose wire to the spark...

Страница 16: ...lbs 77 lbs OVERALL LENGTH 50 50 50 50 50 50 OVERALL HEIGHT 38 38 38 38 38 38 OVERALL WIDTH 21 21 21 21 21 21 FRAME MATERIAL Solid steel Solid steel Solid steel Solid steel Solid steel Solid steel HAN...

Страница 17: ...1 4 570 420 2631 1940 2468 1820 BOLT DIAMETER A METRIC BOLT TORQUE 4 8 8 8 10 9 12 9 N m Ft lb N m Ft lb N m Ft lb N m Ft lb M3 0 5 0 4 M4 3 2 2 M5 5 4 M6 6 4 5 11 8 5 17 12 19 14 5 M8 15 11 28 20 40...

Страница 18: ...se of harmonized standard EN ISO 3744 2010 Sound Power Level 84 dB LPA Guaranteed Sound Power Level 98 dB LWA WT160S Serial number 703605 and up West Fargo ND 58078 0849 June 29 2011 CRARY INDUSTRIES...

Страница 19: ...f harmonized standard EN ISO 3744 2010 Sound Power Level 84 dB LPA Guaranteed Sound Power Level 98 dB LWA WT160SXE Serial number 703605 and up West Fargo ND 58078 0849 June 29 2011 CRARY INDUSTRIES IN...

Страница 20: ...Use of harmonized standard EN ISO 3744 2010 Sound Power Level 84 dB LPA Guaranteed Sound Power Level 98 dB LWA WT160SXS Serial number 703605 and up West Fargo ND 58078 0849 June 29 2011 CRARY INDUSTRI...

Страница 21: ...se of harmonized standard EN ISO 3744 2010 Sound Power Level 84 dB LPA Guaranteed Sound Power Level 98 dB LWA WT160T Serial number 700825 and up West Fargo ND 58078 0849 June 29 2011 CRARY INDUSTRIES...

Страница 22: ...f harmonized standard EN ISO 3744 2010 Sound Power Level 84 dB LPA Guaranteed Sound Power Level 98 dB LWA WT160TXE Serial number 700825 and up West Fargo ND 58078 0849 June 29 2011 CRARY INDUSTRIES IN...

Страница 23: ...Use of harmonized standard EN ISO 3744 2010 Sound Power Level 84 dB LPA Guaranteed Sound Power Level 98 dB LWA WT160TXS Serial number 700825 and up West Fargo ND 58078 0849 June 29 2011 CRARY INDUSTRI...

Страница 24: ...se of harmonized standard EN ISO 3744 2010 Sound Power Level 87 dB LPA Guaranteed Sound Power Level 101 dB LWA WT190 Serial number 707258 and up West Fargo ND 58078 0849 June 29 2011 CRARY INDUSTRIES...

Страница 25: ...harmonized standard EN ISO 3744 2010 Sound Power Level 87 dB LPA Guaranteed Sound Power Level 101 dB LWA WT190XE Serial number 707258 and up West Fargo ND 58078 0849 June 29 2011 CRARY INDUSTRIES INC...

Страница 26: ...se of harmonized standard EN ISO 3744 2010 Sound Power Level 87 dB LPA Guaranteed Sound Power Level 101 dB LWA WT190XS Serial number 707258 and up West Fargo ND 58078 0849 June 29 2011 CRARY INDUSTRIE...

Страница 27: ...se of harmonized standard EN ISO 3744 2010 Sound Power Level 87 dB LPA Guaranteed Sound Power Level 101 dB LWA WT190S Serial number 702033 and up West Fargo ND 58078 0849 June 29 2011 CRARY INDUSTRIES...

Страница 28: ...harmonized standard EN ISO 3744 2010 Sound Power Level 87 dB LPA Guaranteed Sound Power Level 101 dB LWA WT190SXE Serial number 702033 and up West Fargo ND 58078 0849 June 29 2011 CRARY INDUSTRIES IN...

Страница 29: ...se of harmonized standard EN ISO 3744 2010 Sound Power Level 87 dB LPA Guaranteed Sound Power Level 101 dB LWA WT190SXS Serial number 702033 and up West Fargo ND 58078 0849 June 29 2011 CRARY INDUSTRI...

Страница 30: ...se of harmonized standard EN ISO 3744 2010 Sound Power Level 87 dB LPA Guaranteed Sound Power Level 101 dB LWA WT190T Serial number 700096 and up West Fargo ND 58078 0849 June 29 2011 CRARY INDUSTRIES...

Страница 31: ...harmonized standard EN ISO 3744 2010 Sound Power Level 87 dB LPA Guaranteed Sound Power Level 101 dB LWA WT190TXE Serial number 700096 and up West Fargo ND 58078 0849 June 29 2011 CRARY INDUSTRIES IN...

Страница 32: ...se of harmonized standard EN ISO 3744 2010 Sound Power Level 87 dB LPA Guaranteed Sound Power Level 101 dB LWA WT190TXS Serial number 700096 and up West Fargo ND 58078 0849 June 29 2011 CRARY INDUSTRI...

Отзывы: