manualshive.com logo in svg
background image

CONTENTS

Tools needed: Rubber mallet


Description 

Qty.   Part Number

A.   Bottom/back Panel 

N/A

B.   Front Panel 

N/A

C.   Top Panel 

N/A

D.   End Panel 

N/A

E.   Scabbard Panel 

N/A

F.    Hinge Pins 

4   99944400452 

G.    Latches  

99944400453

H.   Scabbard - 20 in. case 

N/A

I.    Scabbard - 24 in. case 

N/A

J.    Scabbard - 32 in. case 

1

   (optional) 

1  99988801212

K.  Handle  

99944400454

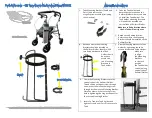
L.    Scabbard Plug – Location (L)  1 

N/A


 Scabbard plug is stored in location (L) when the saw is in the 

carrying case.  

1. 

Place panel (D) on flat surface. Align pegs of panel (A) with 

holes on panel (D) and press into place until pegs snap into 

holes.

2. 

Align holes of panel (E) with pegs on panel (A) and press into 

place until pegs snap into holes.

USAGE:

To insert saw into box:

1.  Install scabbard (H/I/J) onto saw.

2.  Insert saw with scabbard into box.

3.    Place the scabbard plug into panel (E) when the saw is not in  


the Carrying Case.

99988801210 (20”) / 99988801211 (24”)

ToughChest


Carrying Case Instructions

99922201673

12/16

SUP22201673


wArNING

Failure to follow these instrucitons could result in in

-

jury to the operator, property damage and/or damage 

to the product and its contents.

1

A

B

C

D

E

H/I/J 

L

Содержание ToughChest 99988801210

Страница 1: ...lace panel D on flat surface Align pegs of panel A with holes on panel D and press into place until pegs snap into holes 2 Align holes of panel E with pegs on panel A and press into place until pegs snap into holes USAGE To insert saw into box 1 Install scabbard H I J onto saw 2 Insert saw with scabbard into box 3 Place the scabbard plug into panel E when the saw is not in the Carrying Case 999888...

Страница 2: ...entro del Estuche de Transportador 1 Coloque el Panel D sobre una superficie plana Alinee las clavijas del panel A con los agujeros en el Panel D y presione hasta que las clavijas encajen en los agujeros 2 Alinee los orificios del Panel E con clavijas en el Panel A y presione hasta que los pasadores encajen en los orificios MANEJO Para Colocar la sierra en el estuche 1 Coloque la funda H I J en la...

Страница 3: ...pour l utilisateur et l endommagement du produit et de son contenu ou d autres biens matériels Placez le panneau D sur une surface plane Alignez les chevilles du panneau A avec les trous du panneau D et faite une pression pour que le chevilles s enclenchent dans les trous du panneau Alignez les trous du panneau avec le chevilles du panneau A et faite une pression pour que le chevilles s enclenchen...

Страница 4: ...pport Department at 1 800 673 1558 from 8 30 am to 4 30 pm Central Standard Time Monday through Friday Before calling please know the model and serial number of your unit to help your Consumer Product Support Representative echo asistencia de productos al consumidor Si necesita ayuda o tiene preguntas relacionadas con la aplicación operación o mantenimiento de este pro ducto puede llamar al Depart...

Отзывы: