SERVICE INFORMATION
PB-655
PB-755
7
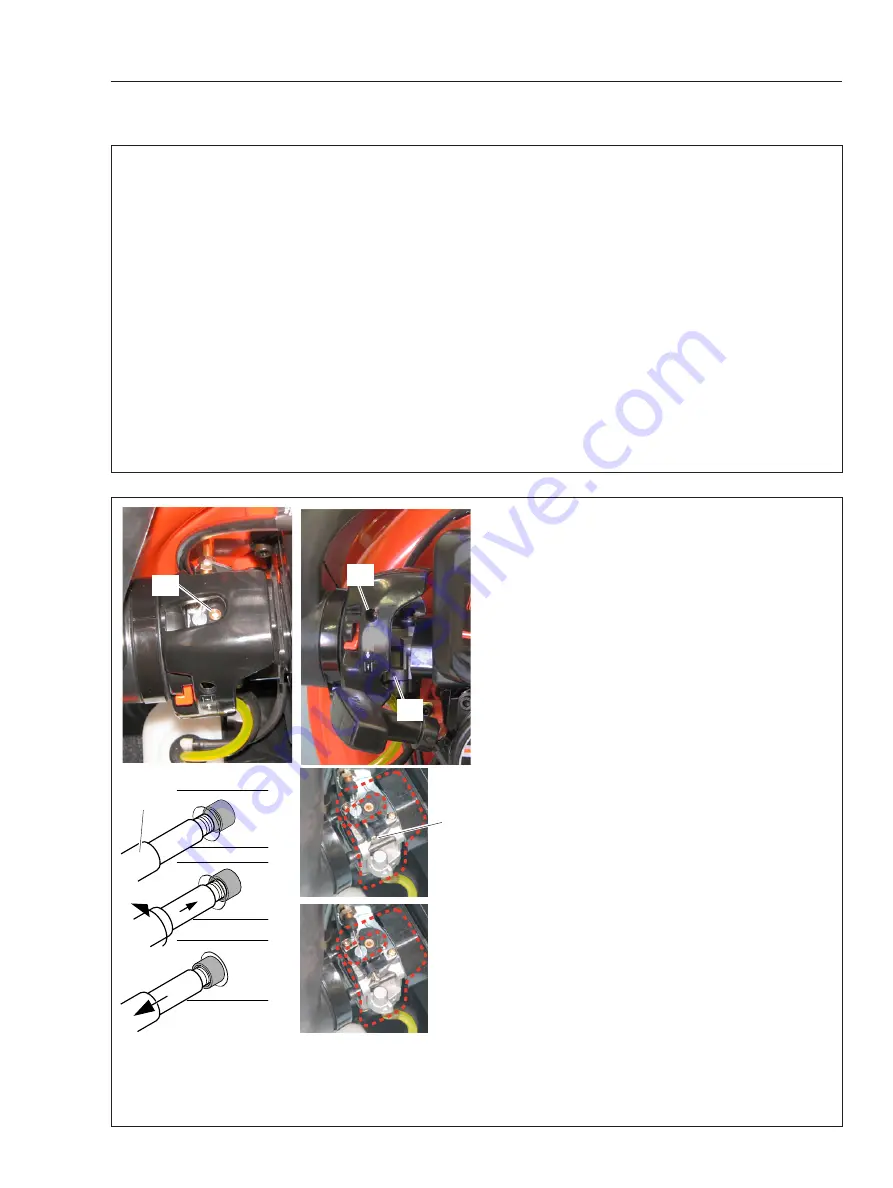
1. Remove plugs from Idle mixture needle hole (A)
and H mixture needle hole (B) using limiter plug
tool (C) as follows.
(1)Put limiter plug tool (C) on limiter plug in mixture
needle hole.
(2)Push and turn limiter plug tool anticlockwise 2
turns into limiter plug slowly.
(3)Pull out limiter plug tool with the limiter plug from
mixture needle hole.
(4)Repeat plug removal procedure for the other
mixture needle.
NOTE :
When plug is damaged and left in the hole,
use needle or pin-shaped tool to scrape.
2. Turn hi speed (H) mixture needle (B) clockwise
until lightly seated. And then turn hi speed (H)
mixture needle anticlockwise 3 3/4 turns.
Turn idle mixture needle (A) anticlockwise
completely out until a clicking sound is heard. Then
turn it clockwise 10 turns from the point that the
clicking sound is heard.
3. Turn idle adjust screw (D) clockwise until its head
touches boss (G) as shown Fig 1. Then turn idle
adjust screw (D) anticlockwise 8 turns from the point
as shown Fig 2.
NOTE :
Initial carburettor setting (Idle adjust screw, idle and hi speed (H) mixture needles) shown here is
to start the engine after restoration or carburettor change. Idle adjust screw, idle and H mixture needles
turn for designated engine revolution through procedures indicated here may vary. As long as idle and
WOT engine speed is set in given range, the variance would be ignorable.
2 CARBURETTOR ADJUSTMENT PROCEDURE
2-1 General adjusting rules
A. Before starting the unit for adjustment, check the following items.
1. The correct spark plug must be clean and properly gapped.
2. The air filter element must be clean and properly installed.
3. The muffler exhaust port must be clear of carbon.
4. The fuel lines, tank vent and fuel filter are in good condition and clear of debris.
5. The fuel is fresh ( > 89 octane :
RON
) and properly mixed at 50 : 1 with “ISO L-EGD” or “JASO FC/FD”
2 stroke oil.
6. All blower pipes are installed for proper engine loading.
B. Start and run engine for 3 minutes alternating rpm between WOT for 50 seconds and idle for 10 seconds.
Adjust idle speed screw to 2,600 +/- 200 r/min. If engine does not run correctly after this adjustment,
proceed to the next step 2-2.
IMPORTANT : After adjusting carburettor according to the steps 2-2 and 2-3, the limiter plug(s)
must be installed in Idle and hi speed (H) mixture needle(s) hole(s) to comply with Emission Directive.
2-2 Initial idle adjust screw, idle mixture needle and hi speed (H) mixture needle settings
(1)
(2)
(A)
(B)
(C)
(D)
Fig1
(G)
Fig2
(3)


